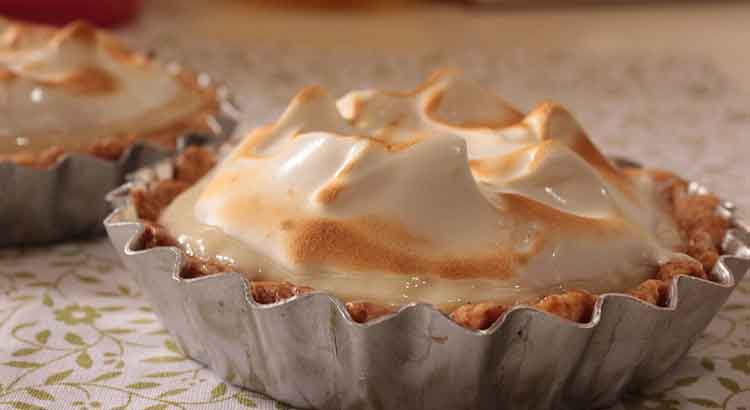
Are your culinary creations sometimes met with disappointment when your chocolate meringue pie turns out disappointingly runny? You’re not alone! Let’s dive into the delicious world of desserts and discover why this happens.
The most common reason why a meringue pie is too runny lies in the meringue itself. If the egg whites aren’t whipped to stiff peaks or if the sugar isn’t properly incorporated, your meringue won’t hold its structure. This can lead to a weepy mess on top of your pie.
Curious to learn how to whip up that perfect meringue and achieve a pie that’s a slice of perfection? We’ll explore foolproof solutions to firm up your meringue and elevate your dessert game.
Underbaking the Filling
Picture this: you’ve been eagerly anticipating a slice of your favorite chocolate meringue pie. The anticipation builds as you cut into it, but alas, the filling oozes out like a river. What went wrong? One common reason for runny pie fillings is underbaking. When the filling doesn’t get enough time in the oven, it doesn’t have the chance to set properly.
The solution here is simple: patience. Make sure to follow your recipe’s recommended baking time and don’t rush the process. The filling might look a bit wobbly when you take it out of the oven, but it continues to cook as it cools. Remember, it’s better to wait a little longer for that perfect consistency than to end up with a soupy mess.
Not Properly Cooling the Filling
We’ve all been there – the excitement of pulling a freshly baked pie out of the oven is almost irresistible. But resist we must, because not letting the pie filling cool properly can lead to a disappointing outcome. When you cut into a pie that hasn’t cooled sufficiently, the filling might still be in a semi-liquid state, causing it to spill out and leave you with a less-than-ideal slice.
So, what’s the fix? Give your pie the time it deserves to cool down. It’s recommended to let your pie sit at room temperature for at least a couple of hours after baking. This allows the filling to fully set and firm up, ensuring that you get those beautiful, clean slices you’ve been dreaming of. Remember, a little patience goes a long way when it comes to achieving pie perfection.
Meringue Overcooking or Undercooking
Ever sliced into your chocolate meringue pie only to be greeted by a layer of rubbery meringue? Or perhaps you’ve encountered a meringue that looks fine on the surface but collapses into a puddle after a while. Both scenarios can be attributed to issues with meringue cooking. Overcooking or undercooking the meringue can lead to textural problems that disrupt the harmony of your pie.
To get that impeccable meringue, it’s crucial to strike the right balance. When overcooked, the meringue can become dense and chewy. On the flip side, undercooked meringue lacks stability and might weep or collapse over time. To nail the perfect meringue, aim for a golden-brown color on top, achieved through gentle baking. This ensures the meringue is cooked through but maintains its delightful fluffiness underneath.
Unstable Meringue
Is your meringue behaving like a moody friend, going from perfectly puffed to deflated and sad? The culprit behind unstable meringue is often inadequate stabilization. If you find your meringue turning into a watery mess or losing its structure, it’s time to take action. Adding stabilizers like cream of tartar or cornstarch to your meringue mixture can work wonders in helping it hold its shape.
Stabilizers create a reliable support system for your meringue, preventing it from collapsing or becoming overly watery. Just a small amount can make a significant difference in the stability and texture of your meringue. So, next time you’re whipping up a meringue topping, consider incorporating a stabilizer to ensure it maintains its form from the moment it crowns your pie until the last delicious bite.
Moisture in the Filling
Imagine eagerly cutting into your chocolate meringue pie, only to have the meringue slide off the filling like a disheartening landslide. The presence of excess moisture in the filling can wreak havoc on your pie’s structural integrity. Ingredients like overly juicy fruits or unstrained custards can introduce unwanted moisture, leading to a runny disaster.
The solution? Be mindful of the moisture content in your filling components. Drain fruit fillings well and consider adding a thickening agent to your custards. Cornstarch or flour can work wonders in absorbing excess moisture and helping your filling achieve that delightful sliceable consistency. By maintaining the right balance of flavors and textures, you’ll be well on your way to pie perfection.
Humidity
Is your meringue pie the star of the show one day and a droopy mess the next? Humidity might be playing the role of the sneaky saboteur. High humidity levels can wreak havoc on your meringue’s stability, causing it to absorb moisture from the air and turn watery. This unwelcome guest can quickly turn your picture-perfect pie into a soggy letdown.
Combatting humidity requires a strategic approach. Enjoy your meringue pies on drier days when humidity levels are lower. If you can’t avoid baking on a humid day, try using a dehumidifier in your kitchen or even reducing the sugar content in your meringue. These tactics can help mitigate the effects of humidity and ensure your meringue maintains its lovely texture.
Cooling and Storage
Ah, the satisfaction of baking a delectable chocolate meringue pie! But wait, don’t dig in just yet. Proper cooling and storage are essential steps to ensure your pie holds its form and taste. Placing a hot pie straight into the refrigerator can lead to condensation forming between the filling and the meringue, causing a dreaded watery layer on top.
To avoid this culinary calamity, let your pie cool at room temperature for a couple of hours before refrigerating it. This gradual cooling process allows excess moisture to evaporate without creating that undesirable wateriness. When it’s time to store your masterpiece, cover it loosely with plastic wrap or aluminum foil, ensuring the covering doesn’t touch the meringue. This way, your pie will remain fresh, sliceable, and delightfully delicious.
Mastering the art of cooling and storage is like adding the final stroke to a masterpiece. By exercising a bit of patience and care during these crucial steps, you’ll be rewarded with a pie that not only looks stunning but also delivers on taste and texture.
Final Thoughts
And there you have it, a whirlwind tour of the ups and downs of chocolate meringue pie perfection. Baking a flawless pie might seem like a daunting task, but armed with the right knowledge, it becomes an achievable feat. Remember, each mishap is just a step toward mastering the art of pie-making.
From underbaked fillings to temperamental meringues, we’ve explored the common pitfalls and their simple solutions. While these challenges might test your patience, they also offer valuable lessons that enhance your baking skills. With a little practice and a dash of determination, you’ll soon be turning out impeccable pies that rival any bakery’s offerings.
So, the next time you find yourself facing a runny meringue or a weepy filling, don’t fret. You now have a toolkit of solutions to tackle these issues head-on. Embrace the process, experiment with different techniques, and don’t be afraid to make mistakes – after all, that’s how the most delicious discoveries are made.
As you embark on your pie-baking adventures, remember that perfection lies not only in the final result but also in the knowledge and experience you gain along the way. So go forth, armed with your newfound insights, and create pies that not only look exquisite but also taste truly exceptional. Happy baking!
FAQ
Q: Can I use a store-bought pie crust for my chocolate meringue pie?
Absolutely! Store-bought pie crusts are a convenient option that can save you time in the kitchen. Just make sure to follow the package instructions for pre-baking the crust before adding your filling and meringue. This step helps prevent a soggy bottom and ensures your pie crust is perfectly golden and crisp.
Q: Can I make the meringue ahead of time and store it?
While it’s best to prepare the meringue and bake it on the pie as close to serving time as possible, you can make the meringue ahead of time and store it. Whip the meringue until stiff peaks form, spread it over the pie filling, and use a spatula to create decorative peaks. Then, place the pie in the oven and bake until the meringue is golden. Allow the pie to cool before refrigerating. Keep in mind that the texture of the meringue may be slightly different after refrigeration, but it will still be delicious.
Q: My meringue turned grainy – what went wrong?
A grainy meringue can result from undissolved sugar in the egg whites or from overbeating the mixture. To avoid this, ensure that your sugar is fully dissolved into the egg whites before whipping. You can rub a small amount of the mixture between your fingers; if it feels smooth, the sugar is dissolved. Also, avoid overbeating the meringue, as this can cause the proteins to break down and result in a grainy texture.
Q: Can I use a blowtorch to brown the meringue?
Yes, using a kitchen blowtorch to brown the meringue is a fun and effective method. Once your meringue is spread over the pie, you can use the blowtorch to carefully brown the surface. Keep the flame moving in a circular motion to ensure even browning. This method not only adds a beautiful finish to your pie but also imparts a delightful toasted flavor to the meringue.
Q: My meringue pie weeps after a few hours – how can I prevent this?
Weeping, where liquid pools around the meringue, can occur due to several factors. One key factor is the improper sealing of the meringue to the pie filling. Make sure the meringue is spread all the way to the edges of the crust to create a seal. Additionally, avoid overbaking the meringue, as this can cause it to shrink and pull away from the edges, allowing moisture to escape. Finally, consider using stabilizers like cream of tartar or cornstarch in your meringue mixture to enhance its structure and reduce the chances of weeping.
Q: Can I freeze a chocolate meringue pie?
Freezing a chocolate meringue pie is possible, but keep in mind that the texture of the meringue may change upon thawing. To freeze, allow the pie to cool completely, then wrap it tightly in plastic wrap and aluminum foil. Thaw the pie in the refrigerator before serving. While the texture of the meringue might be slightly softer after freezing, the flavors will still be delightful.
By addressing these frequently asked questions, you’re well on your way to becoming a chocolate meringue pie pro. Armed with the right tips and tricks, you’ll be able to tackle any challenge that comes your way and create pies that are not only visually appealing but also a joy to indulge in. Happy baking!