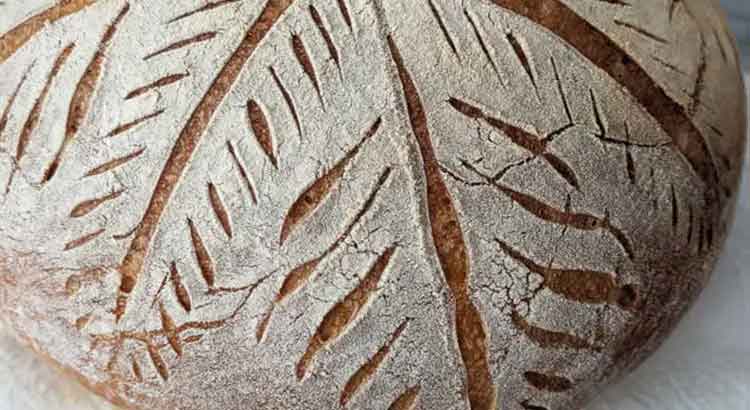
Do you ever find yourself admiring freshly baked bread and wonder why it has those beautiful patterns on top? Have you ever wondered how those intricate designs are created on the surface of your loaf? Is your curiosity piqued about why some bakers make deliberate slashes on their bread before baking? If you’ve ever asked yourself these questions, you’re in for a delightful journey into the world of bread baking.
The main reason why bread dough is scored is to control its expansion during baking. Scoring, also known as slashing or cutting, serves several essential purposes. It allows the bread to expand evenly, prevents it from tearing apart at weak points, and enhances its appearance.
But there’s more to this practice than meets the eye. Let’s dive deeper into the art of scoring bread and discover the secrets behind those tantalizing crust designs.
Step-by-Step Beginners Guide
Choosing the Right Dough
Before we dive into the art of scoring bread, you need to start with the right dough. While any bread dough can be scored, it’s essential to pick a dough that suits the style you want to achieve. A simple, basic dough with flour, water, yeast, and salt is perfect for beginners. Once your dough is ready, it’s time to move on.
Preparing Your Bread Dough
Once you’ve mixed and kneaded your dough to the right consistency, it’s time to let it rise. Allow it to proof until it has doubled in size. This step is crucial as it develops the gluten structure, making your bread light and airy. After proofing, gently deflate the dough to release excess gas.
Tools of the Trade
To score your bread, you’ll need a few essential tools. A sharp blade or a bread lame is the go-to choice for most bakers. It allows for precise and clean cuts on the dough’s surface. Make sure your blade is razor-sharp to avoid tearing the dough. Additionally, you can use a sharp kitchen knife or even scissors in a pinch.
Scoring Techniques
Scoring bread involves making deliberate cuts on the dough’s surface. This isn’t just for aesthetics; it helps control the bread’s expansion during baking. There are various scoring patterns you can try, like a simple single slash, a tic-tac-toe pattern, or even intricate designs. Whatever you choose, make sure your cuts are swift, confident, and at a slight angle.
Proper Scoring Depth
The depth of your cuts is crucial. Too shallow, and they won’t open up; too deep, and your bread might deflate or lose its structure. Aim for a depth of about a quarter to a half-inch, depending on the size and type of your bread. Experiment and find the right depth that works best for your recipe.
Scoring Angles
The angle at which you make your cuts can also affect the final look of your bread. For a rustic look, make diagonal slashes. A single slash down the center can give your loaf an elegant appearance. Be creative and experiment with different angles to discover what appeals to you.
The Final Proof
After scoring your dough, give it one final short proof before baking. This step helps the dough relax and expand, giving your bread those beautiful patterns. Cover it with a damp cloth or plastic wrap to prevent the dough from drying out.
Baking Your Scored Bread
Now comes the exciting part—baking your beautifully scored bread. Preheat your oven with a baking stone or a heavy-duty baking sheet inside. If possible, create steam in the oven to encourage a crisp crust. When it’s time to bake, slide your dough onto the preheated surface and close the oven door quickly. The steam and heat will work their magic, giving your bread a perfect rise and crust.
Admire Your Handiwork
Once your bread is done baking, take it out and let it cool on a wire rack. As it cools, you can’t help but admire the intricate patterns you’ve created. Now you not only have a delicious loaf of bread but a piece of edible art too.
Practice Makes Perfect
Scoring bread may seem daunting at first, but like any skill, practice makes perfect. Don’t be discouraged if your first attempts don’t turn out exactly as you envisioned. With time, you’ll become more skilled at creating those stunning patterns that not only enhance the appearance of your bread but also improve its texture and flavor.
Additional Tips
Experiment with Flour Types
Different types of flour can affect the texture and appearance of your bread. Experiment with various flours, like whole wheat, rye, or spelt, to discover unique flavors and textures. Keep in mind that some flours may require adjustments to your recipe, such as changes in hydration levels, so be prepared to adapt.
Control the Dough’s Hydration
The amount of water in your dough, known as hydration, plays a significant role in how your bread turns out. Higher hydration doughs produce airier, open crumb structures, while lower hydration doughs result in a denser crumb. Adjust the hydration to match your desired bread texture.
Consider Using a Proofing Basket
To maintain the shape and structure of your dough during the final proof, consider using a proofing basket, also known as a banneton. These baskets, often made from wicker or wood, support the dough as it rises and creates beautiful patterns on the crust. Simply dust the inside with flour to prevent sticking.
Play with Scoring Patterns
Scoring is not just about functionality; it’s also a creative outlet. Try different scoring patterns to add a personal touch to your bread. From simple lines to intricate designs, the possibilities are endless. Experimentation can lead to unique and eye-catching loaves.
Master the Scoring Angle
The angle at which you make your cuts affects the way your bread opens up during baking. A shallow angle will create a wider opening, while a steeper angle results in a narrower one. Explore various angles to achieve different visual effects, and take notes on what works best for your preferred style.
Don’t Skip Steam
Steam is a crucial element in bread baking. It helps create a crisp crust and encourages proper oven spring. To introduce steam into your oven, you can use a dedicated bread cloche or a cast-iron pan filled with hot water. Be cautious when adding the water to avoid burns.
Be Patient
Bread baking is a patient baker’s game. Rushing through the process can lead to disappointing results. Allow your dough to ferment and rise at its own pace. The extra time invested will pay off in the form of better flavor and texture.
Learn from Your Mistakes
Not every loaf will be perfect, and that’s okay. Embrace failures as opportunities to learn. Analyze what went wrong, whether it’s over- or under-proofing, improper scoring, or baking time, and make adjustments accordingly. Each mistake brings you one step closer to becoming a bread-baking pro.
Share Your Bread
Baking bread is a rewarding experience, and sharing your freshly baked loaves with friends and family is a joy. It’s a simple way to spread happiness and create cherished memories. Plus, their feedback can help you improve your skills and discover what they love most about your bread.
Enjoy the Journey
Bread baking is not just about the end result; it’s about the process itself. Enjoy the tactile experience of kneading the dough, the aroma of bread filling your kitchen, and the satisfaction of creating something from scratch. Embrace the journey, and you’ll find that every loaf you bake is a little piece of art.
Final Thoughts
As we wrap up our exploration of scoring bread, it’s important to reflect on the simplicity and beauty of this age-old technique. While it may seem like a small detail in the grand scheme of bread baking, the act of scoring holds immense significance. It’s a marriage of both form and function, where practicality meets artistry.
In your journey as a bread baker, you’ll encounter challenges and triumphs alike. Some loaves will rise perfectly, adorned with your favorite scoring pattern, while others may not turn out as expected. Embrace each experience, for it is these moments of learning and adaptation that truly define your growth as a baker.
Ultimately, scoring bread is a testament to the connection between tradition and innovation. It’s a reminder that in the world of baking, even the simplest of acts can yield profound results. So, whether you’re a novice or a seasoned pro, continue to hone your skills, experiment with new patterns, and, above all, savor the joy of creating not just bread but edible works of art. Happy baking!
FAQ
Q: Can I score any type of bread? A: Yes, you can score nearly any type of bread, but the technique and depth of scoring may vary depending on the dough’s hydration and recipe. For example, high-hydration doughs like ciabatta or baguettes may require more shallow cuts to prevent deflation, while denser doughs like rye might benefit from deeper scoring to allow for better expansion.
Q: What if I don’t have a bread lame? A: Don’t worry! While a bread lame is the preferred tool for scoring due to its precision and ease of use, you can achieve decent results with a sharp kitchen knife or even scissors. The key is to ensure that whatever tool you use is sharp enough to make clean, swift cuts without tearing the dough.
Q: Do I need to score bread if I’m using a bread machine? A: Scoring bread is primarily done when baking in a conventional oven, where it helps control the dough’s expansion and allows for a better rise and crust development. In a bread machine, the machine typically handles these aspects automatically, so scoring is not necessary.
Q: How do I prevent my bread from sticking to the proofing basket when using one? A: To prevent your dough from sticking to the proofing basket, dust it generously with flour before placing the dough inside. This creates a barrier between the dough and the basket, making it easier to release the dough when it’s time to transfer it to the oven.
Q: Can I score bread after it has started rising in the oven? A: Scoring is typically done just before placing the dough in the oven, during the final proof. Once the bread starts baking and the crust sets, it becomes difficult to score without deflating the dough. So, it’s best to score right before baking.
Q: Can I use other liquids besides water to create steam in the oven? A: Yes, you can use other liquids like milk or ice cubes to create steam in the oven. The goal is to introduce moisture to the baking environment to achieve a crisp crust. Experiment with different methods to find what works best for your baking style.
Q: How do I know if my bread is fully baked? A: You can check if your bread is fully baked by tapping its bottom; it should sound hollow. Additionally, the internal temperature should reach around 190-200°F (88-93°C) for most bread. Remember that baking times can vary depending on the size and type of bread, so it’s essential to monitor it closely.
Q: Can I score gluten-free bread or sourdough? A: Yes, you can score gluten-free bread and sourdough, but there are some considerations. Gluten-free doughs tend to be stickier, so you might need to use a bit more flour or oil on your blade to prevent sticking. Sourdough is typically scored in a circular or crosshatch pattern and may require slightly deeper cuts due to its naturally robust fermentation.
Q: Why does my scored bread sometimes burst unevenly during baking? A: Uneven bursting can occur if your scoring cuts are not made with even pressure or depth. Ensure that your cuts are swift, confident, and at a consistent angle. Additionally, make sure your dough is appropriately proofed; overproofing can cause it to burst unpredictably.
Q: What can I do with leftover bread dough scraps? A: Leftover dough scraps can be turned into delicious treats like breadsticks, rolls, or even pizza. Simply shape the scraps, let them rise for a short time, and bake them in a preheated oven until they’re golden brown.
These frequently asked questions cover some common doubts and concerns when it comes to scoring bread. Remember that while there are general guidelines, the best way to become proficient is through hands-on experience and experimentation. Happy baking, and may your scored bread always turn out beautifully!