If you’ve ever wondered how to create those delightful, fluffy, and moist treats right in your kitchen, you’re in the right place. Today, we’ll embark on a baking adventure together and explore the wonderful “Muffin Method.” Don’t worry if you’re new to baking – this beginner’s guide will take you through the step-by-step process with ease and a touch of friendliness.
So, what exactly is the Muffin Method? Well, it’s a simple yet powerful technique used by bakers to whip up scrumptious muffins quickly. The secret lies in the way we mix the ingredients, allowing for just the right amount of airiness and tenderness. It’s a method that’s perfect for anyone who wants to try their hand at baking without any fuss or complications.
In this guide, we’ll break down each step of the Muffin Method, from mixing the dry ingredients to baking those muffins to golden perfection. Along the way, we’ll answer some of the most common questions that might pop into your mind. So, put on your apron, preheat that oven, and let’s get ready to bake up some magic together!
What the Muffin Method Is and What It Does
So you want to learn about the muffin method? Well, you’re in for a treat! The muffin method is a popular technique used in baking to create delicious and fluffy muffins. It’s called a method because it’s a specific way of combining ingredients to achieve the desired texture and structure in your baked goods. The muffin method is all about simplicity and speed, making it perfect for beginners or anyone looking for a quick and easy baking project.
The key idea behind the muffin method is to mix the wet and dry ingredients separately, and then quickly and gently combine them together. This method helps to prevent overmixing, which can lead to tough and dense muffins. By keeping the mixing to a minimum, you allow the leavening agents (such as baking powder or baking soda) to do their job and create those beautiful air pockets that make muffins light and tender.
Not only does the muffin method produce mouthwatering muffins, but it also offers endless possibilities for flavor variations. Whether you’re craving blueberry, chocolate chip, or savory cheese and herb muffins, the muffin method can accommodate your taste preferences. So, let’s dive into the step-by-step guide and start baking!
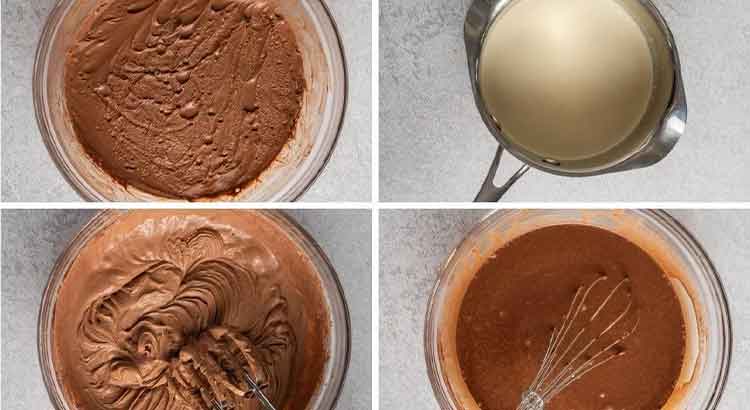
Step 1: Mix the Dry Ingredients
The first step in the muffin method is to gather and mix all the dry ingredients. In a large mixing bowl, combine the flour, sugar, baking powder, and salt. Whisk these dry ingredients together until they are well combined. This step helps to evenly distribute the leavening agents, sugar, and salt throughout the flour, ensuring a consistent flavor and texture in your muffins.
It’s important to note that measuring your dry ingredients accurately is crucial for successful baking. Use measuring cups or a kitchen scale to ensure you add the right amount of flour, sugar, and leavening agents. Level off the measuring cups with a straight edge to remove any excess flour, as too much flour can result in dry and heavy muffins.
Once your dry ingredients are well mixed, set them aside and move on to the next step. We’re getting closer to enjoying those delicious muffins!
Step 2: Mix the Wet Ingredients
Now that the dry ingredients are ready, it’s time to mix the wet ingredients. In a separate bowl, whisk together the milk, melted butter (or oil), eggs, and any flavorings or extracts you desire. Whisking these ingredients together ensures they are well combined and will contribute to the moistness and flavor of your muffins.
When it comes to choosing the fat for your muffins, melted butter adds a rich and buttery taste, while oil can result in a more tender and moist texture. Both options work well, so use whichever you prefer or have on hand.
If you want to add some extra pizzazz to your muffins, feel free to incorporate flavorings like vanilla extract, almond extract, or spices such as cinnamon or nutmeg. These little additions can elevate the taste and aroma of your muffins and make them even more irresistible.
Once the wet ingredients are thoroughly mixed, it’s time to move on to the final step of the muffin method.
Step 3: Combine the Dry and Wet Ingredients
With both the dry and wet ingredients prepared, it’s time to bring them together. Create a well in the center of the dry ingredients and pour the wet ingredients into it. Using a spatula or a wooden spoon, gently stir the mixture until the ingredients are just combined. It’s crucial not to overmix at this stage to avoid developing gluten and ending up with tough muffins.
You may notice a few lumps in the batter, but that’s perfectly fine. In fact, lumps are expected and desirable in muffin batter because they indicate that you’ve achieved the right balance of mixing. Overmixing can lead to dense and rubbery muffins, so embrace those lumps!
At this point, if you wish to add any mix-ins like fresh fruits, chocolate chips, or nuts, gently fold them into the batter. This is where you can get creative and customize your muffins to your liking.
Step 4: Let It Rest
Once you’ve divided the batter into the muffin cups or tin, it’s time to let it rest. Allowing the batter to rest for about 15 minutes before baking is a crucial step in the muffin method. During this resting period, the dry ingredients absorb some of the moisture from the wet ingredients, resulting in a more tender and evenly baked muffin.
While you wait, preheat your oven to the specified temperature in your recipe. This ensures that your muffins will bake evenly and rise properly.
The resting time also gives you an opportunity to clean up your workspace and prepare any additional toppings or glazes you may want to add to your muffins after baking. It’s always helpful to have everything ready beforehand, so you can focus on enjoying the baking process.
Step 5: Bake at a High Temperature
Now comes the exciting part – baking your muffins! For the best results, bake your muffins at a relatively high temperature, usually around 375°F (190°C). The high temperature helps create that coveted domed top and golden-brown exterior while ensuring that the insides are fully cooked.
Place the muffin tin in the preheated oven and set the timer according to your recipe. It’s important not to open the oven door too frequently during baking, as it can cause the temperature to fluctuate and affect the muffins’ rise.
After the initial baking time, check the doneness of your muffins by inserting a toothpick or a cake tester into the center of a muffin. If it comes out clean or with a few crumbs, they are ready to be taken out of the oven. If the toothpick comes out with wet batter clinging to it, continue baking for a few more minutes and check again.
Once your muffins are baked to perfection, remove them from the oven and let them cool in the tin for a few minutes. Then transfer them to a wire rack to cool completely before indulging in their delightful flavors.
Congratulations! You’ve successfully mastered the muffin method and created scrumptious homemade muffins. Enjoy your well-deserved treats and don’t be afraid to experiment with different flavors and add-ins in your future baking adventures.
FAQ
I’m thrilled to see that you’ve made it to the Frequently Asked Questions section! This is where I address some common queries that beginners often have about the muffin method. So, let’s dive right in and get those questions answered!
1. Can I use whole wheat flour instead of all-purpose flour in the muffin method?
Absolutely! Whole wheat flour can be substituted for all-purpose flour in the muffin method. However, it’s important to note that whole wheat flour tends to absorb more moisture than all-purpose flour, so you may need to adjust the liquid ingredients slightly. Start by adding a couple of extra tablespoons of milk or another liquid until the batter reaches the right consistency. Whole wheat flour also lends a nuttier flavor and denser texture to muffins, so be prepared for a slightly different result.
2. Can I make muffins without eggs?
Certainly! If you prefer to make eggless muffins, there are several alternatives you can use. One common substitute is applesauce, which adds moisture and helps bind the ingredients together. You can replace each egg with ¼ cup of applesauce. Another option is mashed bananas, which not only acts as a binder but also adds natural sweetness. Use ½ a mashed banana per egg in your recipe. Additionally, you can try using flaxseed or chia seeds mixed with water as an egg replacement. Mix 1 tablespoon of ground flaxseed or chia seeds with 3 tablespoons of water for each egg. Keep in mind that the texture and rise of the muffins may be slightly different without eggs, but they can still be delicious!
3. Can I freeze muffins?
Absolutely! Muffins freeze wonderfully, making them a convenient treat to have on hand whenever a craving strikes. To freeze muffins, allow them to cool completely, then place them in an airtight container or freezer bags. Make sure to label and date the container or bags. Frozen muffins can be stored for up to 3 months. When you’re ready to enjoy them, simply thaw the muffins at room temperature or pop them in the microwave for a quick warm-up. It’s like having freshly baked muffins whenever you want!
4. How can I make my muffins more moist?
If you find that your muffins are turning out dry, there are a few tips you can try to make them more moist and tender. One method is to add a little more fat to the batter, such as melted butter or oil. This extra fat helps to retain moisture in the muffins. Additionally, you can incorporate ingredients like yogurt, sour cream, or buttermilk into the batter, which add richness and moisture. Another tip is to avoid overbaking the muffins. Check for doneness by inserting a toothpick into the center of a muffin – if it comes out with a few crumbs, they’re done. Overbaking can result in dry muffins, so keep a close eye on them as they bake.
I hope these answers have provided you with the information you were looking for. If you have any more questions, don’t hesitate to ask. Happy baking and enjoy your homemade muffins!