Dense sourdough bread is the most common and annoying problem among new bakers. And one that I know too well. When I first started baking all of my loaves came out of the oven extremely dense and heavy. It took me quite a few tries to solve this problem but after a lot of experimenting with proportions, humidity, temperature, fermentation time, and more, I finally figured it out.
To help out people that are facing the same problems that I did, I decided to make this guide containing every tip and trick that I learned about making soft and airy sourdough bread. So let’s start with the first one.
1. Don’t Over or Under Ferment the Dough
Both over fermenting and under fermenting the dough will give it less rising power. And with enough rising power, it can’t make room for the air pockets that make the bread airy to form.
Fermenting the dough is also referred to as letting the dough rise.
If you ferment the dough for too little:
- The gluten won’t have enough time to develop properly
- The bacteria won’t form enough carbon dioxide, which helps with the aerated texture
If you ferment the dough for too long:
- The gluten strands begin to break down
- There will be too little sugar and starch in the flour, which will make the dough unable to rise
So no matter how you look at it, you have to ferment your dough for just the right amount of time.
The exact amount of time that you have to let your dough rise (ferment) will vary depending on the ingredients, but on average if you use white flour, the dough has reached its peak when it doubles in size.
But from personal experience, I know that it’s not that easy to always use the dough at its peak. So you should know that it’s better to use the dough before it peaks than after it peaks.
While using the dough at its peak is still the best solution, if you are not sure if your dough has peaked or not, better be safe and use it before it starts defaulting, even if it could have risen a little more.
2. Use the Starter at Its Peak
Just like with the dough, it’s important to know when you should use your starter if you want an airy sourdough bread. But unlike with the dough, it’s easier to know when the starter has reached its peak.
I’ve actually written an entire article about this subject, but to keep things simple I will tell you the simplest method of knowing when the starter has reached its peak. And that is to keep track of its previous rises.
When you feed your starter you will give it the same amount of water and flour every time, so it will always rise up to the same point. So the simplest thing that you can do is to use a marker and place a sign on the jar up to where the starter has risen. If you always use the same amount of water and flour there shouldn’t be any significant differences. And when your starter has reached the mark, it means that it reached its peak.

If you want to know more ways in which you can tell that your starter has reached its peak you can check out my article: When Will a Sourdough Starter Reach Its Peak? (With Pictures)
3. Increase the Hydration Level
The amount of water that you use in the dough will have a big impact on how dense the loaf will be.
The only disadvantage of this method is that it will be a little bit harder to give the loaf a shape. So my advice is to start by adding a small amount of water. 20 grams of water should be a good place to start.
If after adding 20 grams of water you see that you can easily shape the loaf, you can try to add another 10 or 20 grams of water. Keep adding water until you believe that adding any more will make shaping the dough too difficult.
If you’ve added too much water an extra 10 or 20 grams of flour. And don’t worry this won’t affect your bread in any way, it will only make it slightly bigger.
4. Use Less Flour
This is similar to the last method, but instead of adding more water you will use less flour, the effect will be the same.
But, unlike the last method, you can’t remove flour as you knead. My advice is to start by using 50 grams less flour, and if you can’t properly knead or shape the dough add 10 grams of flour.
5. Use a Different Type of Flour
Flour is the most important thing when it comes to the texture of the bread.
If you want your bread to be as airy as possible, it’s important to use flour that has a lot of strong gluten.
Gluten is what stops the bread from collapsing onto itself when rising. Gluten also gives the
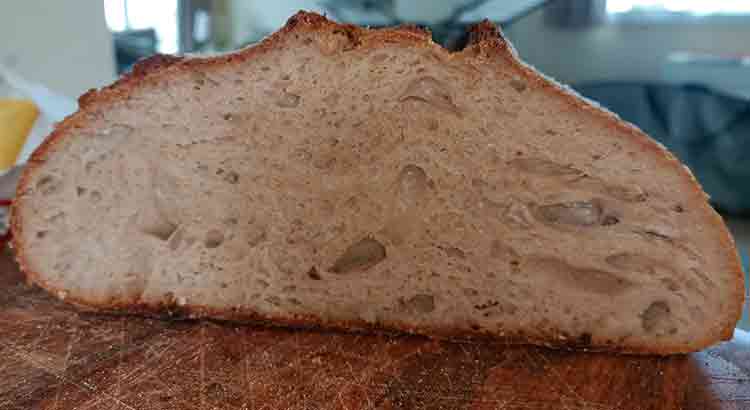
Gluten is what gives bread its elasticity and rigidness, that is stopping the bread from collapsing onto itself. But instead of using words to explain the effects of gluten, let me show you two pictures side by side.

The sourdough on the left side is made with strong white flour, which has a lot of gluten, while the one on the right side is made with rye flour which doesn’t have less gluten.
As you can see the bread on the left side is filled with air pockets of all sizes, while the one on the right side has only a few small air pockets. And all of this is due to the amount of gluten found in the flour used for each loaf.
The best flour for an airy sourdough bread is strong white flour. This type of flour has the most gluten out of all flour types, and it’s also the most malleable and easy to handle flour.
Whole wheat flour and rye flour will make your bread dense. While whole wheat flour has more nutrients than white flour, it also has less gluten which means that your flour will be considerably denser. Rye flour is the worst choice that you can make if you want an airy bread.
While rye flour has a lot of healthy nutrients, this flour will always give you a dense bread. And another problem is that rye sourdough bread needs a lot of time to rest, at least 24 hours. This is because the flour absorbs a lot more water than other types of flour, and if you don’t let it rest enough the bread will be raw on the inside.
If you want to know more about how long sourdough bread should be let to rest depending on its size and what flour you used you should check out my article: How Long Should I Let My Sourdough Bread Rest? (+Pictures).
If you want to make an airy bread and use other types of flour besides white flour, you can always mix the two flours together, while the final result will be slightly denser, you will feel the taste of the second flour, and get the benefit of all the extra nutrients.
But if you want to use only whole grain flours, the next two tips will be extra helpful to you.
6. Shift Your Flour
This method is extremely efficient if you are using whole grain flour.

Shifting the flour before using it will separate the bran found in the flour. The bran found in wholegrain flour acts like a small sharp bit that cuts through the gluten strands that form in the bread, thus stopping them from creating air pockets.
Just by using this method alone, you will notice a considerable change in the texture of your sourdough bread.
7. Soak Your Flour Overnight
As strange as it might sound this is a legit technique that will have good and visible results.
Soaking whole wheat flour overnight will soften up the bran in the wheat, thus making it much more flexible, so it won’t be able to cut the gluten strands.
Soaking flour is just the same as preparing the dough for the sourdough bread, without adding the starter and leaving it on the counter until the next day.
I am not exactly sure why this is called soaking,to me it seems that you just have to prepare your ingredients one day in advance, but the name is not important. What’s important is that this works.
To see how efficient this method is you can take a piece of bran from the flour and set it aside, and soak the rest of the flour. The next day try to find another piece of bran in the flour and compare it with the bran that you set aside, you will clearly see how efficient this method is.
If you don’t want to soak your entire flour you could combine this method with the last one to separate and soak only the bran. This will also work.
And make sure to cover the bowl in which you mixed the flour and water.
8. Use a Mature Starter
What makes sourdough bread grow, and make it airly, is the strength of the starter. And this strength comes with time.
Inside the starter live a lot of small bacteria, which eat the sugar and the starch from the flour that we give them daily. When they eat they become very active and multiply. After they are done eating they slow down and some of them disappear, the ones that remain are the most efficient. So in a way, it’s survival of the fittest.
After many feeding cycles, only the best of the best will remain. This is why a mature starter is way more efficient than one that’s been made just a few days ago. So if your starter is relatively young it won’t be able to make the most aerated sourdough bread.
Unfortunately, there is no way to age your starter faster, but it’s important to know that as your starter matures your sourdough bread will become better and better at making airy bread.
If you want to get a mature starter right now, one thing that you can do is to go to a local bakery that makes sourdough bread and ask them if they are willing to sell some of their starter. Most bakeries have matured and well-maintained starters. And from my experience, some of them are willing to share it.
And if you can’t get a mature starter there are a few ways in which you can give your starter a small boost.
9. Use Baking Soda
Adding some baking soda into the dough, right before giving it its final shape will give the sourdough starter a helping.
Baking soda is extremely alkaline and reacts with the strong acidity of the starter. The result of this interaction is mostly gas, which will give the bread an airy texture.
Just make sure that you don’t add the baking soda earlier, as this will partially stop the starter from doing its job.
10. Add a Little Bit of Yeast
The sourdough starter is basically wild yeast. So by adding a little bit of commercial yeast, you won’t be changing the effect of the starter, and you will give the starter a considerable boost.
11. Preheat Your Oven at the Maximum Temperature
Preheating your oven is a must, if you don’t do it your beard won’t grow to its full potential, it will be very dense and the crust will be extremely thick.
Most recipes require you to preheat the oven to the exact same temperature that you will be baking at, which is not bad, but if you want a really airy bread you should preheat your oven to the maximum temperature, and when you put the bread in, reduce the temperature to something that is suitable for baking.
The extra heat, in the beginning, will give your bread an extra boost which will make your bread less dense and full of air. Just make sure to reduce the temperature once you put the bread inside, baking a sourdough bread at the maximum temperature is not recommended.
12. Use as Little Flour as Possible When Handling the Dough
When handling the dough it’s important to try and use as little flour as possible on the surface that you are working on, and on your hands. The flour that you are using will mix in with the dough and will make the bread denser.
In general, sourdough is a slightly wet dough, and it can be very difficult to handle at first, but the more you work it, the more elastic it will get, and it will be easier to handle, so try to add as little flour as possible, or none at all and have a little patience with the dough.
13. Use a Dutch Oven
If you want a fluffy bread, then you need steam and nothing is better at retaining steam than a dutch oven.
The reason why you need steam in order to have an airy bread is quite simple. While in the oven, the thing that will stop the bread from growing any bigger and forming more air pockets is the crust of the bread. When the crust hardens it will make it very hard for the water inside the bread to escape, so there is less room for air pockets to form.
In order to slow down the hardening of the crust you want to have as much steam as possible in the oven, and the best thing that you can use to stop the steam from escaping is a dutch oven.
But if you don’t have a dutch oven there are still a few things that you can do.
14 Place Some Ice Cubes in the Oven
If you don’t have a dutch oven there is a simple trick that you can use to increase the amount of steam in your oven. And that is to place some ice cubes on a tray and put them in at the same time with the bread.
After a few minutes, the ice cubes will start to melt and will create a lot of steam in the oven, which will slow down the formation of the crust, thus allowing the formation of more air pockets in the bread.
If you don’t have ice cubes you could simply use water, but it won’t be as efficient. Ice cubes are considerably colder than water from the sink, and this difference in temperature will create more steam, and it will do it faster.
While this method is not as efficient as using a dutch oven, it will help your bread be less dense.
15. Moisten the Surface of the Dough
Instead of relying on steam to soften up the exterior of the dough, you could simply spray it with some water right before putting the loaf in the oven.
This will make it harder for the crust to form, so the water inside the bread will have more time to get out, and the air will have more time to get in.
16. Use a Preferment
A preferment is basically flour and water that you combine with the starter, let it ferment for a while, then combine it with the ingredients for the bread.
Doing this instead of simply combining the starter with the rest of the ingredients, will slow down the fermentation process, which means that the dough will be able to raise more, and there will be more carbon dioxide and air in it.
17. Handle the Dough Gently
One reason why a lot of people can’t make their sourdough bread be airy is that they are not used to handling the dough with the required gentleness.
Bread that is made using commercial yeast or baking soda doesn’t require much gentleness. But sourdough is different, sourdough is filled with lots of air and gas, and the interior structure is very fragile. So you can’t handle sourdough the same you would handle pizza dough.
Sourdough has to be handled with a lot of care, just a couple of wrong moves can make the air and the gas, stored inside the dough, be released. And at that point, there is nothing that you can do to get them back.
18. Let Your Bread Rest Properly
Another important step in obtaining an airy is to let it rest for enough time.
When you take a sourdough bread out of the oven, despite its appearance, the bread is mostly raw on the inside, the dough is only partially cooked, and there is a lot of moisture trapped on the inside.
If you were to try and cut the bread right now the interior won’t be able to support itself and it will collapse onto itself.
If you want to know how much time you should leave a sourdough bread rest you should check out my article: How Long Should I Let My Sourdough Bread Rest? (+Pictures), for this article, I made a few loaves of sourdough and cut some of them without letting them rest, so if you want to see the results make sure to check out the article.
19. Put the Bread in the Oven at the Right Moment
One essential thing that you have to get right if you want an airy bread is the moment you put the bread in the oven.
So you basically have to let the dough rise for the right amount of time. If you put it in the oven too early the bread won’t grow to its fullest, and the bread won’t have as many air pockets as it should. If you leave the dough to rise for too long you will get a dense bread that has just a few small air pockets in it.
Here is how you can know if your loaf has risen just enough. Make a small dent with your finger in the dough, if the dent:
- Springs back up quickly, your dough still needs a little more time to rise.
- Comes up slowly, you can put the dough in the oven, your sourdough bread is ready for baking.
- Doesn’t come back up, you’ve let your dough rise too much.
Unfortunately, if you’ve let your dough rise for too long, there is nothing that you can do. At this point, the bacteria in it have eaten up all the sugars and the starches, and have produced all the carbon dioxide that they could, and the air in the dough has come out. Sou you will have to start over.
But things like this can happen, in the beginning, it happened to me more times than I can count, but as you practice those kinds of things will become rarer, and at one point they won’t happen at all, so don’t lose hope.
20. Add Milk
Replacing some of the water required by the recipe with milk will make your bread fluffier.
But one thing to keep in mind is that this will not only change the texture of the bread but the taste as well. Any extra ingredient will take away from the sourness of the bread and make it taste milder, and in some cases sweeter. If you want sour bread you should check out his article: 21 Ways to Make Sourdough Bread as Sour as Possible, and if you are looking for a sweet sourdough bread, don’t worry I got you covered as well: 21 Ways to Make Sourdough Bread Less Sour Tasting.
21. Add Butter
Just like milk, butter will make the bread softer and fluffier. But there is one more way in which you can use it, besides mixing it with the rest of the ingredients.
You can rub some melted butter on top of the bread before putting it in the oven. This will slow down the formation of the crust, and as a result, more air pockets will form inside of the bread.
While you can use water to do this as well, butter will last longer than water, so it will slow down the crus even more.
22. Use Sweeteners
Nothing will make the bacteria in the starter more active than sugar. If the bacteria are able to make a bread rise just by eating the small amounts of sugar found in flour, just imagine what they could do if you gave them one or two tablespoons of sugar.
- One tablespoon of sugar means 14.3 grams of sugar.
- One teaspoon of sugar means 4.2 grams of sugar
- 100 grams of flour has 0.3 grams of sugar.
So by adding just a teaspoon of sugar to your dough, you will drastically increase the amount of sugar in the dough, so the bacteria will be more active and more efficient.
But you don’t have to limit yourself to sugar; you can also use honey, maple syrup, or molasses.
23. Pre-shape the Dough
You can’t get an airy bread if you don’t give your bread a proper shape, this is something that everybody knows. But something that not everybody knows is how important it is to pre-shape the bread.
Pre-shaping the bread will give it a better texture which will allow it to develop an airy texture.
Here is how to pre-shape your sourdough bread:
- Shape your dough roughly in the usual manner and leave it on the countertop
- Lightly flour the dough’s surface and cover with a light cloth
- Let the dough rest on the countertop for about 30 minutes
- After 30 minutes have passed, shape the dough into its final shape, and let it proof as you usually do.
You will notice that your dough will hold its shape better, and once it has been baked it will be slightly bigger and the texture less dense.
Final Thoughts
Those are my 23 tips and tricks on how to make your sourdough less dense and heavy.
When I first started making sourdough bread my biggest problem was that I didn’t let the dough rise enough, or that I was letting it rise for too long, until it started deflating. After I managed to get this part right my bread started being less dense, but it still wasn’t there. So then I started adjusting the hydration, experimenting with different baking temperatures, adding different ingredients, etc. And after many, many attempts, I was finally able to bake the bread that I always wanted.
With this guide, you should be able to do the same thing, but without having to ruin as many loaves of bread as I did.
Happy Baking!