Whether you find yourself without this essential baking tool or simply prefer to explore alternative methods, fear not! With a few handy tips and a touch of creativity, you can still whip up a batch of delicious muffins that will impress your taste buds and those lucky enough to enjoy them.
If you don’t have a muffin pan, you can simply use alternative baking containers such as ramekins, custard cups, or even small cake pans. These versatile options allow you to shape and bake your muffins without missing a beat.
So, whether you’re a beginner baker or a seasoned pro, these tips will guide you through the process, ensuring that your muffins turn out perfectly every time, even without a traditional pan.
Use Alternative Baking Containers
When you find yourself craving freshly baked muffins but don’t have a muffin pan on hand, don’t fret! There are several alternative baking containers you can use to make delicious muffins without a muffin pan.
One option is to use ramekins or custard cups. These small ceramic or glass dishes are perfect for making individual-sized muffins. Grease the inside of the ramekins with butter or cooking spray, then pour the muffin batter into each cup, filling them about three-quarters full. Place the ramekins on a baking sheet and bake according to your muffin recipe’s instructions. Remember to adjust the baking time since the smaller containers may require less time in the oven.
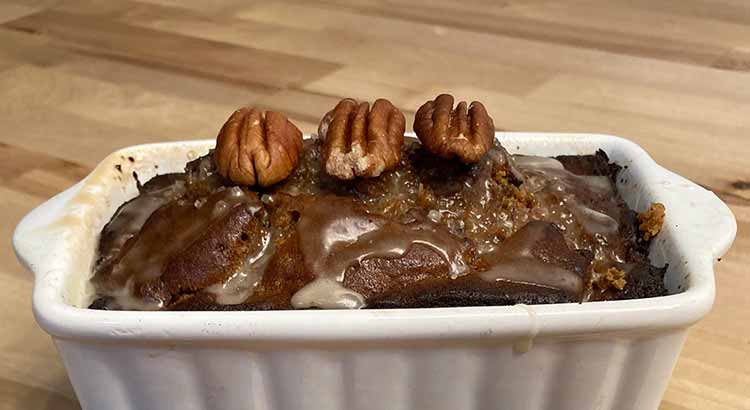
Another alternative is to use a mini loaf pan. This pan typically has six or eight small loaf-shaped cavities, which can be used to bake muffins. Grease the pan with butter or cooking spray and fill each cavity with muffin batter. You may need to adjust the baking time slightly, as the muffins may bake faster in the mini loaf pan compared to a traditional muffin pan. Keep a close eye on them and use a toothpick to test for doneness.
If you don’t have ramekins or a mini loaf pan, you can also try using a regular baking sheet lined with parchment paper or silicone baking mats. Spoon the muffin batter onto the prepared baking sheet, leaving some space between each muffin. The muffins may spread slightly, but they will still turn out delicious. Keep in mind that the baking time may vary when using this method, so keep a close eye on the muffins and test for doneness with a toothpick.
Cupcake Liners
If you have cupcake liners on hand, they can be a convenient solution for making muffins without a muffin pan. Here’s how to do it:
Place the cupcake liners on a baking sheet or in a cake pan. If you’re using a cake pan, make sure it’s deep enough to hold the liners without them tipping over. Grease the inside of each liner lightly with cooking spray or butter to prevent sticking.
Fill each liner with the muffin batter, filling them about three-quarters full. It’s important not to overfill them to avoid overflow during baking.
Place the filled cupcake liners in the oven and bake according to your muffin recipe’s instructions. The liners will help the muffins hold their shape while they bake, ensuring they come out perfectly.
Once the muffins are baked, let them cool in the cupcake liners for a few minutes before removing them from the baking sheet or cake pan. Gently lift the muffins out of the liners and transfer them to a wire rack to cool completely.
Using cupcake liners is a simple and convenient way to make muffins without a muffin pan. Plus, they add a cute and colorful touch to your muffins, making them even more appealing.
Grease and Flour
When you don’t have a muffin pan, one of the simplest solutions is to grease and flour your baking containers. This method works well for any type of baking dish, such as cake pans or pie plates. Here’s how you can do it:
Start by greasing the inside of the baking dish with butter, cooking spray, or vegetable oil. Make sure to coat the entire surface to prevent the muffins from sticking.
Next, sprinkle a light dusting of flour over the greased surface. Tilt and rotate the baking dish to evenly distribute the flour, tapping out any excess.
Now, spoon the muffin batter into the prepared baking dish, filling it about three-quarters full. Be careful not to overfill, as the muffins may rise and expand during baking.
Place the baking dish in the oven and bake according to your muffin recipe’s instructions. Keep in mind that the baking time may vary slightly due to the different baking container used.
Once the muffins are done, remove them from the oven and let them cool in the baking dish for a few minutes. Use a butter knife or offset spatula to gently loosen the edges of the muffins. Then, transfer them to a wire rack to cool completely.
Greasing and flouring your baking containers allows the muffins to easily release from the dish, resulting in beautifully baked treats. Just make sure to adjust the baking time accordingly and keep an eye on the muffins as they bake.
Muffin Molds
If you don’t have a muffin pan, but you have silicone muffin molds or silicone baking cups, you’re in luck! These flexible molds are a fantastic alternative and make removing the muffins a breeze. Here’s how to use them:
Place the silicone muffin molds or baking cups on a baking sheet for stability. This will also make it easier to transfer them in and out of the oven.
Fill each mold or cup with muffin batter, leaving a small gap at the top for the muffins to rise.
Carefully place the baking sheet with the filled molds or cups in the oven and bake according to your muffin recipe’s instructions. The silicone molds provide excellent heat distribution and ensure even baking.
Once the muffins are cooked, remove the baking sheet from the oven and let them cool for a few minutes. Then, gently pop the muffins out of the silicone molds. If the muffins stick a bit, give them a slight twist or press the bottom of the molds to release them.
Transfer the muffins to a wire rack to cool completely before enjoying.
Silicone muffin molds are not only a practical solution when you don’t have a muffin pan, but they are also reusable and easy to clean. Their flexibility and non-stick properties make them a fantastic option for making muffins without any hassle.
Foil or Parchment Paper
When you’re lacking a muffin pan, foil or parchment paper can come to the rescue. Here’s how you can make use of these kitchen staples:
Start by tearing off squares of foil or parchment paper. Each square should be large enough to wrap around a portion of muffin batter.
Grease the inside of the foil or parchment paper squares with butter, cooking spray, or oil to prevent the muffins from sticking.
Next, shape the foil or parchment paper into cylindrical shapes. Create a small collar by wrapping the paper around your fingers or a cylindrical object like a small glass or jar. Ensure that the paper is securely wrapped and forms a stable base.
Place the prepared foil or parchment paper collars on a baking sheet, leaving some space between each one.
Spoon the muffin batter into each paper collar, filling them about three-quarters full. The collars will help the muffins hold their shape while they bake.
Carefully transfer the baking sheet with the foil or parchment paper collars to the oven and bake the muffins according to your recipe’s instructions.
Once the muffins are baked, let them cool for a few minutes before removing the foil or parchment paper collars. Gently unwrap the paper and transfer the muffins to a wire rack to cool completely.
Using foil or parchment paper as makeshift muffin liners allows you to bake muffins without a dedicated muffin pan. It’s a practical solution that ensures your muffins maintain their shape and don’t stick to the baking sheet.
Adjust Baking Time
When making muffins without a muffin pan, it’s crucial to adjust the baking time to ensure they are properly cooked. Here are a few tips to help you determine the right baking time:
Start by preheating your oven as indicated in your muffin recipe.
Since you’ll be using alternative baking containers or methods, keep in mind that the baking time may vary from what the recipe suggests.
Check the muffins for doneness a few minutes earlier than the recipe’s recommended baking time. Insert a toothpick into the center of a muffin and remove it. If it comes out clean or with a few moist crumbs clinging to it, the muffins are ready. If the toothpick comes out with wet batter, they need more time to bake.
If the muffins are browning too quickly on the outside but are not fully cooked on the inside, you can cover them loosely with foil to prevent further browning while allowing them to continue baking.
Keep in mind that the size and type of baking container you use will affect the baking time. Smaller containers, such as ramekins or muffin molds, may require less time in the oven, while larger ones, like cake pans, may need more time.
Remember to make a note of the adjusted baking time for future reference, so you’ll have a reliable guide the next time you bake muffins without a muffin pan.
By being mindful of the baking time and conducting the toothpick test, you can ensure that your muffins are perfectly cooked, regardless of the baking method or container used.
Cool and Remove Carefully
Once your muffins are baked, it’s important to handle them with care to ensure they come out of the alternative baking containers or liners intact. Follow these steps to cool and remove your muffins successfully:
- After removing the muffins from the oven, let them cool in the baking containers for a few minutes. This allows them to firm up slightly and makes them easier to handle.
- If you used alternative baking containers like ramekins or custard cups, use a butter knife or offset spatula to gently loosen the edges of the muffins. This will help prevent any sticking.
- Carefully transfer the muffins to a wire rack to cool completely. If you’re using cupcake liners or silicone molds, you can leave the muffins in the liners or molds to cool.
- Allow the muffins to cool completely on the wire rack before enjoying them. Cooling ensures that the muffins maintain their texture and prevents them from becoming soggy.
- If you used foil or parchment paper as makeshift liners, let the muffins cool completely before unwrapping them. Gently peel away the foil or parchment paper from the muffins. They should release easily, but if there’s any resistance, you can use a butter knife to help lift them out.
- Once the muffins are removed from the baking containers or liners, place them back on the wire rack to cool further, if needed. This helps prevent moisture buildup on the bottom, which can make the muffins soggy.
- Once completely cooled, serve and enjoy your homemade muffins!
Remember, the cooling and removal process may vary slightly depending on the baking method and containers used. Be gentle when handling the muffins to prevent any breakage or damage. Patience is key, as allowing the muffins to cool completely ensures that they maintain their shape and texture.
Final Thoughts
And there you have it! We’ve explored various tips and techniques for making muffins without a muffin pan. With a little ingenuity and resourcefulness, you can still satisfy your craving for freshly baked muffins, even if you don’t have all the fancy equipment. Whether you’re using alternative baking containers, cupcake liners, foil or parchment paper, or silicone molds, there’s a solution that can work for you.
Remember to grease and flour your baking containers, adjust the baking time accordingly, and handle your muffins with care during the cooling and removal process. These small steps can make a big difference in ensuring your muffins turn out just right. So don’t let the absence of a muffin pan hold you back from enjoying these delightful treats.
Baking is all about creativity and experimentation. So don’t be afraid to try different methods and containers to see what works best for you. Who knows, you might stumble upon a new favorite way to make muffins without a muffin pan! So embrace the process, have fun in the kitchen, and enjoy the satisfaction of baking your own homemade muffins.
Now, go ahead and give it a try! Whip up a batch of muffins using one of the techniques we’ve discussed, and enjoy the delicious results. Whether you’re treating yourself or sharing them with loved ones, the joy of freshly baked muffins knows no bounds. So let your creativity shine, and may your muffins bring smiles and warmth to your heart. Happy baking!
FAQ
I know you may have some lingering questions about making muffins without a muffin pan. Don’t worry, I’ve got you covered! Let’s address some frequently asked questions to provide you with the information you need.
1. Can I use aluminum foil instead of cupcake liners?
Certainly! Aluminum foil can be a great alternative to cupcake liners when making muffins without a muffin pan. Simply cut squares of aluminum foil, shape them into cups, and place them on a baking sheet. Grease the foil cups lightly to prevent sticking, fill them with muffin batter, and bake as usual. Just keep in mind that the foil cups may not hold their shape as well as cupcake liners, so handle them with care when removing the muffins.
2. Can I use a silicone baking mat instead of parchment paper?
Absolutely! A silicone baking mat can work as a suitable replacement for parchment paper when making muffins without a muffin pan. Place the silicone baking mat on a baking sheet and spoon the muffin batter directly onto the mat, leaving some space between each muffin. The silicone mat provides a non-stick surface, allowing the muffins to release easily. However, keep in mind that the baking time may vary slightly, so it’s essential to monitor the muffins closely and adjust as needed.
3. Can I make mini muffins without a muffin pan?
Yes, you can definitely make mini muffins without a dedicated mini muffin pan! One option is to use mini cupcake liners or silicone baking cups. Grease them lightly, fill with mini muffin batter, and bake on a baking sheet. Another option is to use a regular baking sheet lined with greased foil or parchment paper. Spoon small portions of batter onto the prepared baking sheet, allowing some space between each mini muffin. Adjust the baking time accordingly, as mini muffins may require less time in the oven compared to regular-sized muffins.
4. Can I use paper cups as an alternative to cupcake liners?
While paper cups may seem like a convenient substitute for cupcake liners, they may not hold their shape as well during baking. The paper cups may become greasy and may not provide the same level of non-stick properties as cupcake liners. It’s generally recommended to use proper cupcake liners or alternative baking containers for best results. However, if you’re in a pinch, lightly greasing the paper cups and placing them on a baking sheet may work as a temporary solution.
5. Can I freeze muffins made without a muffin pan?
Absolutely! Muffins made without a muffin pan can be frozen just like regular muffins. Once the muffins have cooled completely, place them in an airtight container or freezer bags, removing as much air as possible. Label the container with the date and muffin flavor, and store them in the freezer. When you’re ready to enjoy them, simply thaw the muffins at room temperature or warm them in the oven for a few minutes. Freezing muffins is a convenient way to have homemade treats on hand whenever you crave them.
I hope these answers have helped clarify any doubts you had about making muffins without a muffin pan. Remember, baking is all about experimentation and finding what works best for you. So don’t be afraid to get creative and try different methods. Enjoy the process, and may your muffins turn out absolutely scrumptious!