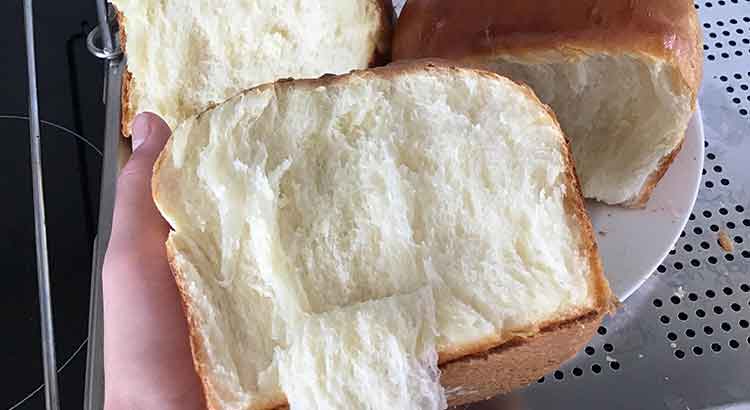
Who doesn’t love sinking their teeth into a soft and pillowy slice of bread? Whether you’re making a sandwich, enjoying toast, or simply indulging in a warm roll, the softness of bread can truly elevate your culinary experience. If you’ve ever wondered how to achieve that perfect softness in your homemade bread, you’re in luck! In this article, we’ll share 7 simple and effective ways to make your bread softer.
The simplest way to make your bread softer is to incorporate more fat into the dough. Fat adds moisture, richness, and tenderness to the bread, resulting in a delightful texture and flavor.
No complicated techniques or fancy ingredients required – just easy tips that anyone can follow to achieve bakery-quality softness in their own kitchen. So, let’s get started and transform your bread into a fluffy and tender delight!
Add More Fat
Adding more fat to your bread recipe is a simple and effective way to make your bread softer. Fat, such as butter or oil, helps to lubricate the dough, resulting in a more tender texture. When fat is incorporated into the bread dough, it coats the gluten strands, preventing them from forming a strong network. This leads to a softer, more delicate crumb.
To add more fat to your bread, you can increase the amount of butter or oil in your recipe. For example, if your recipe calls for 2 tablespoons of butter, try adding an extra tablespoon for a total of 3 tablespoons. You can also experiment with different types of fat, such as using olive oil instead of butter. Just keep in mind that different fats may impart different flavors to your bread.
In addition to adding fat directly to the dough, you can also brush melted butter or oil on top of the bread before and after baking. This creates a thin layer of fat on the crust, which helps to keep it soft and moist. Simply melt a small amount of butter or oil and use a pastry brush to apply it to the surface of the bread. Be sure to do this while the bread is still warm for best results.
Use Milk Instead of Water
Another easy way to make your bread softer is to replace water with milk in your recipe. Milk adds moisture and richness to the dough, resulting in a softer and more tender crumb. The proteins and fats in milk also contribute to the overall texture of the bread, making it more delicate and flavorful.
To substitute milk for water in your bread recipe, simply use an equal amount of milk instead of water. For example, if your recipe calls for 1 cup of water, use 1 cup of milk instead. You can use any type of milk, such as whole milk, skim milk, or even non-dairy alternatives like almond milk or soy milk. Just keep in mind that different types of milk may slightly alter the taste and texture of the bread.
If you prefer a more pronounced milk flavor in your bread, you can scald the milk before adding it to the dough. To scald the milk, heat it in a saucepan over medium heat until small bubbles form around the edges. Then let it cool to room temperature before incorporating it into the recipe. This process helps to enhance the milk flavor and contributes to a softer final product.
Add Eggs
Adding eggs to your bread recipe is a fantastic way to make it softer and more tender. Eggs contribute moisture, fat, and protein to the dough, resulting in a delightful texture and flavor. The proteins in eggs help to create a tender crumb, while the fats contribute richness and moisture.
To incorporate eggs into your bread, simply beat them before adding them to the dough. The number of eggs you use will depend on the recipe and the desired outcome. Typically, one or two eggs are sufficient to enhance the softness of the bread. Beat the eggs lightly with a fork or whisk, then add them to the dough during the mixing process.
If you’re looking for an even softer texture, consider using only egg yolks instead of whole eggs. Egg yolks contain a higher fat content and will result in a more tender crumb. You can separate the egg yolks from the whites by gently cracking the eggs and carefully transferring the yolks back and forth between the two halves of the shell, allowing the whites to drip out. Then, whisk the yolks and add them to the dough.
Eggs can also add a rich, golden color to your bread crust. To achieve a beautiful golden hue, you can brush a beaten egg or egg wash on top of the bread before baking. This will give your loaf an appealing appearance while further enhancing its softness.
Increase Hydration
Proper hydration is essential for soft and moist bread. By increasing the hydration level in your dough, you can achieve a softer and more tender crumb. Hydration refers to the amount of water or liquid relative to the amount of flour in the recipe.
To increase hydration, you can simply add a little more water or liquid to the dough. Start by gradually adding small amounts of water or liquid at a time until you reach the desired consistency. The exact amount will depend on the specific recipe and the type of flour used. Keep in mind that different flours absorb liquid differently, so it may take some experimentation to find the right hydration level.
Another technique to increase hydration is to use a preferment, such as a poolish or a biga. A preferment is a mixture of flour, water, and a small amount of yeast that is allowed to ferment for a certain period before being incorporated into the final dough. The fermentation process increases the availability of water to the dough, resulting in a softer texture.
Additionally, consider using a higher-protein flour, such as bread flour, which can absorb more liquid and contribute to a softer crumb. Experimenting with different flours and hydration levels will help you find the perfect balance to achieve the softest bread possible.
Use a Preferment
Using a preferment, such as a poolish or a biga, in your bread-making process can significantly contribute to a softer and more flavorful outcome. A preferment is a mixture of flour, water, and a small amount of yeast that is allowed to ferment for a specific period before being incorporated into the final dough. This fermentation process not only adds complexity to the bread’s flavor but also enhances its softness.
To create a poolish preferment, combine equal parts of flour and water (by weight) with a small amount of yeast in a bowl. Stir the mixture until well combined, cover it, and let it ferment at room temperature for several hours or overnight. The longer the fermentation, the more flavorful the bread will be. When it’s time to make the dough, incorporate the poolish into the recipe, adjusting the amount of flour and water accordingly.
Similarly, a biga preferment involves mixing flour, water, and yeast in a bowl, but with a higher proportion of flour to water compared to a poolish. The biga is then left to ferment for a certain period, usually overnight. The fermented biga is later added to the bread dough, contributing to its softness and overall quality.
Using a preferment not only improves the texture of the bread but also extends its shelf life. The fermentation process breaks down complex carbohydrates in the flour, making it easier for our bodies to digest and ensuring a more tender crumb. So, if you want your bread to be soft and delectable, consider incorporating a preferment into your baking routine.
Use Bread Flour
One of the key factors in achieving soft bread is the type of flour you use. Bread flour, with its higher protein content, is an excellent choice for making softer loaves. The increased protein content in bread flour helps to develop gluten, which is responsible for the bread’s structure and texture.
Gluten, formed when the proteins in flour combine with water, creates a network that traps air bubbles during fermentation and baking. This network of gluten strands provides structure and elasticity to the bread dough, resulting in a soft and tender crumb.
When compared to all-purpose flour, bread flour has a higher protein content, typically around 12-14%. This higher protein level allows for more gluten development, leading to a softer texture. So, if you’re looking for softer bread, consider using bread flour as your primary flour in the recipe.
If you don’t have bread flour on hand, you can still achieve a softer texture by combining different types of flour. For example, you can mix all-purpose flour with a small portion of vital wheat gluten, a natural protein derived from wheat. Adding vital wheat gluten to all-purpose flour helps increase its protein content, making it more similar to bread flour.
Remember to measure the flour accurately when baking, as using too much flour can result in a dense and dry loaf. Use a kitchen scale or spoon the flour into the measuring cup and level it off with a straight edge to ensure consistency and the right flour-to-liquid ratio.
By incorporating these simple tips into your bread-making routine, you can enjoy irresistibly soft and tender loaves straight from your oven. Experiment with different ingredients and techniques until you find the perfect combination that suits your taste and preferences. Happy baking!
Extend the Proofing Time
One of the most crucial stages in bread-making is the proofing process, where the dough is allowed to rise and ferment before baking. By extending the proofing time, you can achieve a softer and more flavorful loaf. This extra time allows the yeast to work its magic, producing carbon dioxide that creates air bubbles, resulting in a lighter and more tender texture.
To extend the proofing time, you can start by using less yeast in your recipe. Reducing the amount of yeast slows down the fermentation process, giving the dough more time to develop flavor and texture. It’s important to note that this method requires a longer proofing time, so plan your baking schedule accordingly.
Another technique to extend the proofing time is to let the dough rise in a cooler environment. Yeast activity slows down in lower temperatures, allowing for a longer and slower fermentation process. You can place the dough in the refrigerator overnight or in a cool room to give it more time to rise. Just make sure to cover the dough to prevent it from drying out.
Additionally, incorporating a folding technique during the proofing process can enhance the dough’s structure and softness. After the initial rise, gently deflate the dough and fold it over itself a few times to redistribute the yeast and strengthen the gluten. This folding action helps to create a more even texture and promote a softer crumb.
Remember, patience is key when it comes to proofing. Give your dough ample time to rise and develop its flavors. While the exact proofing time may vary depending on the recipe and room temperature, aim for a doubled or slightly increased volume of the dough before proceeding to the baking stage.
By extending the proofing time, you allow the dough to fully develop its flavors and textures, resulting in a soft and delectable loaf of bread. Take your time, experiment with different techniques, and enjoy the rewarding process of bread-making. Your patience and effort will be rewarded with a delicious and tender homemade bread.
FAQ
Q: How can I tell if my bread is properly proofed?
A: Properly proofed bread will have visibly increased in size and volume. You can perform the finger poke test to check if the dough is ready. Gently press your fingertip into the dough about half an inch. If the indentation slowly springs back, it’s likely that the dough is adequately proofed. If the indentation remains, the dough may be overproofed. It’s important to find the right balance to achieve the desired softness.
Q: Can I use these techniques for gluten-free bread?
A: Yes, many of these techniques can be applied to gluten-free bread baking as well. However, keep in mind that gluten-free bread requires different ingredients and handling methods. For example, instead of gluten, you may need to rely on alternative binders like xanthan gum or psyllium husk to create structure. It’s recommended to follow specific gluten-free bread recipes that have been developed and tested for optimal results.
Q: How long should I let the dough rise in the refrigerator?
A: The exact time will depend on the recipe and the temperature of your refrigerator. As a general guideline, you can let the dough rise in the refrigerator for 8 to 12 hours or even overnight. This slow rise allows the flavors to develop and contributes to a softer texture. However, if you notice the dough becoming overly fermented or sour, you may need to adjust the time accordingly.
Q: Can I combine multiple techniques to make my bread even softer?
A: Absolutely! You can combine various techniques to tailor your bread to your preferences. For example, you can use milk instead of water, add more fat, extend the proofing time, and incorporate a preferment. Experimenting with different combinations will help you find the perfect balance of softness, flavor, and texture that suits your taste.
Q: Can I make my bread softer without making it too dense?
A: Yes, it’s possible to achieve a soft and tender crumb without sacrificing lightness. It’s important to strike a balance between a tender texture and a well-developed gluten structure. Pay attention to the hydration level, the proofing time, and the handling of the dough. Avoid overmixing or adding excessive amounts of fat, as these can lead to a denser result. Experiment with the suggested techniques, and don’t be afraid to adjust and refine your process until you achieve the perfect balance of softness and lightness.
Q: Can I use these tips for other types of bread, like rolls or buns?
A: Absolutely! These tips are applicable to various types of bread, including rolls and buns. Whether you’re making a classic sandwich loaf, dinner rolls, or cinnamon buns, incorporating these techniques can help you achieve a softer end product. Remember to adjust the baking time and temperature according to the specific recipe and the size of your bread or rolls.
Baking your own bread is a satisfying and rewarding experience, and with these simple techniques, you can elevate your homemade loaves to a new level of softness. Remember to adjust the measurements and techniques according to your specific recipe and personal taste. Enjoy the process, and savor the joy of biting into a warm, soft slice of freshly baked bread. Happy baking!