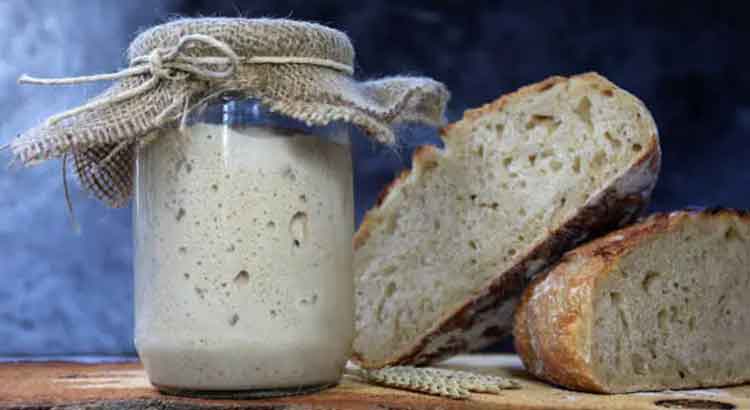
Do you ever find yourself staring at your sourdough starter jar, wondering if it’s time for a deep clean? Is your kitchen cluttered with conflicting advice on maintaining the perfect starter? Well, fret not, because we’re about to unravel a secret that’ll simplify your sourdough journey.
Sourdough starter jars don’t need to be cleaned in the traditional sense. Instead, focus on regular feeding and discarding to keep your starter happy and healthy. Cleaning can disrupt the delicate balance of wild yeast and bacteria that give your sourdough its unique flavor. So put down that scrub brush and let’s explore a better way to care for your precious starter.
Curious to uncover the truth behind the sourdough starter mystique? We’ll delve into the science of fermentation, demystify the feeding process, and offer practical tips to ensure your starter thrives. Say goodbye to the unnecessary cleaning hassle, and hello to the world of effortless sourdough baking. Stick around to simplify your sourdough journey and bake bread that’s truly exceptional.
Regular Feeding
Sourdough starter care might seem like a complex puzzle, but it’s simpler than you think. Forget about the cleaning routine; what your starter really craves is regular feeding. Feeding your starter is like giving it a hearty meal to keep it happy and bubbling with life.
To do this, just follow a straightforward schedule. For every 24 hours, take out a portion of your starter, usually around half, and replace it with equal parts flour and water. It’s like a sourdough refreshment. This consistent feeding routine keeps the yeast and bacteria well-fed, maintaining a balanced microbial community in your jar.
You don’t need to stress about cleaning the sides or bottom. Instead, focus on watching your starter double in size after feeding. That’s your cue that everything is going smoothly. And if you’re not ready to bake, it’s okay to store your starter in the fridge and feed it weekly. Simple, right?
Scraping Down Sides
Cleaning your sourdough starter jar? Not necessary! Scraping down the sides, however, is a different story. It’s not about cleanliness but ensuring your starter’s health and vitality.
After several feedings, you might notice dried bits of starter clinging to the sides of the jar. Instead of scrubbing them away, gently scrape these down into the mix during your next feeding. Those little bits contain valuable microbes that contribute to the distinctive flavor of your sourdough.
By incorporating these remnants into your starter, you’re giving it a flavor boost. Plus, it’s less wasteful. You’re respecting the sourdough’s journey, making sure nothing goes to waste.
Use a Glass or Plastic Jar
When it comes to choosing the right jar for your sourdough starter, opt for either glass or plastic. These materials are your best friends in the sourdough world. Why? Because they’re non-reactive. Unlike metal containers, which can react with the acidity of your starter, glass and plastic won’t interfere with the fermentation process.
A glass mason jar with a loose-fitting lid is a popular choice. It allows airflow, which is crucial for a healthy starter. If you prefer plastic, food-grade plastic containers work well too. The key is to ensure that your chosen jar is clean and in good condition.
Remember, it’s not about keeping your jar spotless, but about creating an environment where your starter can thrive. So, let your jar be your partner in the sourdough adventure, and forget about the constant cleaning.
Use a Rubber Band or Marker
Wondering how to keep track of your starter’s growth without the need for meticulous cleaning? It’s simple: use a rubber band or marker. This nifty trick helps you monitor your starter’s progress and maintain its health without the hassle of frequent cleaning.
If you’re using a glass jar, place a rubber band around the jar at the level where your starter reaches after each feeding. As your starter grows, you’ll see the band move higher. For plastic containers, use a washable marker to mark the starting level. It’s like tracking your starter’s journey without the need for a magnifying glass.
This method not only simplifies your sourdough routine but also provides valuable insights into your starter’s activity. You can easily spot when it’s ready for baking or if it needs more feedings. It’s all about making your sourdough experience friendlier, one rubber band or marker line at a time.
Keep It Lidless or Use a Loose Lid
Here’s a little secret: sourdough starters thrive when they can breathe. That’s why you should keep your jar lidless or use a loose-fitting lid during the fermentation process. It might sound counterintuitive, but it’s a game-changer.
With a lidless jar or a loosely-covered one, your starter gets access to oxygen. This oxygen is essential for the fermentation process and helps those friendly microbes in your starter do their job efficiently. Plus, it prevents gas buildup that could potentially lead to an explosive situation if your jar is tightly sealed.
So, don’t worry about keeping your starter airtight or cleaning the lid daily. Instead, let it breathe and watch it flourish. It’s all about creating a comfortable environment for your little microbial friends to work their magic.
Refresh and Discard
Cleaning your sourdough starter jar is a thing of the past when you embrace the “refresh and discard” method. This approach not only simplifies your sourdough routine but also ensures your starter remains vigorous and healthy.
To refresh and discard, simply remove a portion of your starter before each feeding, typically around half. Then, add equal parts flour and water to what remains. This process keeps your starter from becoming overcrowded with waste products and encourages the growth of active yeast and bacteria.
No need to scrub the jar clean; your focus is on maintaining the starter’s vitality. The discarded portion can even be used in other recipes, like pancakes or waffles. It’s a win-win situation that eliminates the need for frequent cleaning while reducing waste.
Deep Cleaning
Now, you might be thinking, “What if my sourdough starter jar gets really dirty over time?” Don’t worry; we’ve got you covered. While daily cleaning isn’t necessary, an occasional deep clean can help maintain a healthy environment for your starter.
For deep cleaning, follow these simple steps:
1. Empty the Jar: Begin by removing all the contents of your jar, including your starter.
2. Rinse with Warm Water: Give the jar a good rinse with warm water to remove any residual starter.
3. Scrub with Salt Paste: Create a paste by mixing equal parts of salt and warm water. Use this paste to scrub the inside of the jar. The salt acts as a gentle abrasive that helps remove stubborn residue without harsh chemicals.
4. Rinse Thoroughly: After scrubbing, rinse the jar thoroughly with warm water to ensure no salt residue remains.
5. Air Dry: Let the jar air dry completely before reintroducing your sourdough starter.
Remember, deep cleaning is a sporadic task, not a daily chore. It’s like giving your starter’s home a spring cleaning when it really needs it. With these straightforward steps, you can keep your jar fresh without the constant burden of cleaning.
Final Thoughts
In the world of sourdough starter care, simplicity reigns supreme. Cleaning your sourdough starter jar doesn’t have to be a never-ending chore. Instead, focus on the essential practices that keep your starter vibrant and ready to create delicious bread.
Regular feeding is the cornerstone of sourdough maintenance. By adhering to a feeding schedule, you ensure your starter remains balanced and full of life. It’s a far cry from the tedious cycle of scrubbing and sterilizing jars.
Remember to scrape down the sides and incorporate those flavorful bits into your starter. It’s not about cleanliness but about utilizing every bit of flavor and vitality within your jar. With this simple technique, you honor the sourdough journey without the need for excessive cleaning.
Choosing the right jar, whether it’s glass or plastic, and using markers or rubber bands to track your starter’s growth are little tricks that make your life easier. They eliminate the need for meticulous cleaning and provide a clearer picture of your starter’s progress.
Lastly, allowing your jar to breathe with a loose lid or no lid at all, along with the refresh-and-discard method, simplifies your routine and keeps your starter robust. And when the rare occasion for a deep clean arises, a few straightforward steps ensure your jar stays fresh.
In the end, it’s not about how spotless your sourdough starter jar is, but about the quality of care you provide to your microbial friends. Simplify your approach, let go of the cleaning fuss, and enjoy the delicious rewards of your thriving sourdough starter. Happy baking!
FAQ
Q1: Can I use a metal jar for my sourdough starter?
A1: It’s best to avoid metal jars for your sourdough starter. Metals can react with the acidic nature of the starter, potentially affecting its flavor and health. Stick with glass or food-grade plastic containers for a worry-free sourdough experience.
Q2: How often should I feed my sourdough starter?
A2: Feed your starter once a day if it’s at room temperature. If you store it in the fridge, weekly feedings are sufficient to keep it healthy. Pay attention to its activity; if it’s doubling in size within a few hours of feeding, it’s ready for baking.
Q3: Is it okay to use a tight-fitting lid on my sourdough starter jar?
A3: While it’s essential to let your starter breathe, airtight lids can create pressure buildup, which could lead to a messy situation. Instead, opt for a loose-fitting lid or even cover the jar with a cloth secured with a rubber band to strike the right balance.
Q4: How do I know if my sourdough starter has gone bad?
A4: If your starter develops an off-putting odor, turns pink or orange, or exhibits mold growth, it’s time to say goodbye. A healthy starter should have a pleasant, tangy aroma and a creamy consistency.
Q5: What should I do with the discarded starter from the refresh-and-discard method?
A5: Don’t let it go to waste! You can use the discarded starter in various recipes like pancakes, waffles, or even as an ingredient in bread. It adds a delightful tangy flavor to your culinary creations.
Q6: Can I use a plastic lid instead of a cloth when keeping my starter lidless?
A6: Yes, you can use a plastic lid with a few holes punched in it to let air in while keeping pests out. It’s a convenient option if you prefer not to use a cloth.
Q7: Is it necessary to wash my jar every time I feed my starter?
A7: No, daily washing isn’t required. Simply remove any residue or dried bits from the sides, and your jar will be good to go. Deep cleaning is only necessary on occasion.
Q8: How long can I go without feeding my starter if I’m on vacation?
A8: If you’re going on a short trip, feed your starter well before you leave, and it should be fine for a few days without attention. For longer vacations, consider refrigerating your starter or sharing it with a sourdough-loving friend.
Q9: Can I use tap water to feed my sourdough starter?
A9: Generally, tap water is fine, as long as it’s free from strong chemicals like chlorine. If you’re concerned about your water quality, you can use filtered or dechlorinated water to feed your starter.
Q10: Should I store my sourdough starter in a warm or cool place?
A10: Room temperature, around 70°F (21°C), is ideal for a sourdough starter. It allows for steady fermentation without overheating. Avoid extreme temperatures, as they can harm the microbial balance.
Q11: Can I freeze my sourdough starter for long-term storage?
A11: Yes, freezing is a viable option. Before freezing, feed your starter, let it double in size, and then transfer it to an airtight container. When ready to use, thaw it in the fridge and bring it back to room temperature with regular feedings.
Q12: How long does it take to establish a new sourdough starter from scratch?
A12: It can take anywhere from 5 to 7 days to establish a new sourdough starter. During this time, you’ll go through a process of daily feedings and observations until it’s ready for baking.
Q13: Can I use whole wheat flour or rye flour instead of all-purpose flour for feeding my starter?
A13: Absolutely! Whole wheat and rye flours can add depth of flavor to your starter. You can use them exclusively or in combination with all-purpose flour for feedings.
Q14: What’s the best way to revive a neglected sourdough starter?
A14: If your starter has been neglected, start by feeding it regularly at room temperature. It may take a few days of consistent feedings to bring it back to its bubbly, active state.
Q15: How can I adjust the sourness of my sourdough bread?
A15: To control the sourness, you can experiment with the fermentation time. A longer fermentation will result in a tangier flavor, while a shorter one will yield a milder taste.
With these FAQs, we hope to simplify your sourdough journey and address any concerns you may have. Remember, sourdough is a flexible and forgiving process, and with a little care, your starter will reward you with delicious loaves time and time again. Happy baking!