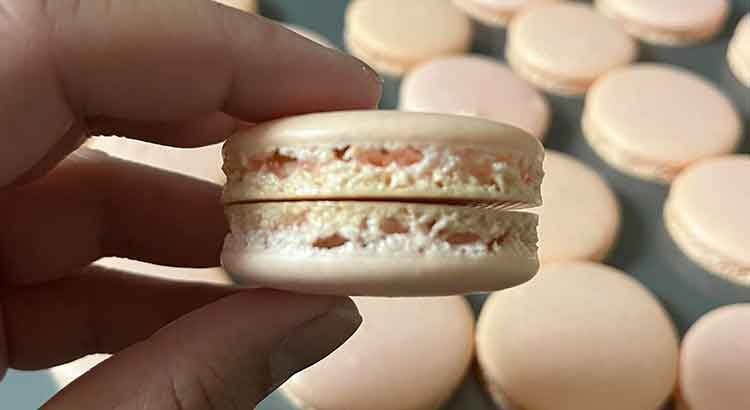
Are your macarons leaving you with empty, hollow shells? Don’t fret! In this article, we’ll delve into the common culprits behind hollow macarons and provide you with simple solutions to fix them.
The main reason your macarons turn out hollow is under-whipped egg whites. These delicate whites need to be whipped to stiff peaks to create the ideal structure for your macarons. Without sufficient whipping, the shells lack the necessary stability, resulting in hollow macarons.
But wait, there’s more! In this article, we’ll not only address under-whipped egg whites but also uncover other factors that contribute to hollow macarons. From overmixed batter to high oven temperature, we’ll cover it all. You’ll learn practical tips and techniques to overcome these challenges and ensure your macarons turn out beautifully every time.
Under-Whipped Egg Whites
When it comes to making macarons, one of the most common reasons they turn out hollow is under-whipped egg whites. Those delicate whites play a crucial role in creating the signature texture of these delightful treats. The process of whipping egg whites incorporates air into the mixture, creating a light and fluffy batter. If you don’t whip them enough, the macarons won’t have enough structure to rise properly, leading to hollow shells.
To avoid this, make sure you beat the egg whites until they reach stiff peaks. You’ll know you’ve achieved the right consistency when you can turn the bowl upside down without the egg whites sliding out. Be patient and avoid rushing this step. Sometimes, using room temperature eggs can make it easier to achieve the desired texture. So, next time you embark on your macaron-making journey, ensure your egg whites are whipped to perfection!
Overmixed Batter
Another common culprit behind hollow macarons is overmixing the batter. This might come as a surprise, as proper mixing is crucial for achieving the right texture. However, there’s a delicate balance you need to strike. If you overmix the batter, it becomes too runny, and the macarons spread too much during baking, resulting in hollow shells.
To avoid this, gently fold the dry ingredients into the whipped egg whites until the batter is smooth and flows like lava. Overmixing can easily happen if you’re too rough with the folding, so take your time and be gentle. Practice makes perfect, so don’t be discouraged if your first attempts don’t turn out as expected. Keep refining your technique until you master the art of macaronage!
Overly Large Macaron Shells
When you pipe macaron batter onto your baking sheet in large circles, they might look impressive, but they often don’t turn out the way we want them to.
To avoid hollow macarons caused by overly large shells, opt for smaller circles when piping the batter. This way, they’ll have a better chance of rising evenly and baking through without leaving an empty space in the middle. Remember, it’s not about size; it’s about achieving that perfect balance of crispy exterior and chewy interior.
High Oven Temperature
The oven can be both a friend and a foe when it comes to making macarons. A common mistake that leads to hollow shells is using a high oven temperature. Baking at too high a temperature causes the macarons to rise too quickly, forming a hard outer shell that traps the steam inside. As the steam tries to escape during baking, it creates empty pockets within the shells.
To fix this, set your oven temperature lower and be patient with the baking process. It might take a bit longer, but it will give the macarons enough time to rise gradually and form a more even texture. Experiment with your oven and find the sweet spot that works best for your macaron recipe.
Insufficient Resting Time
Let’s talk about one crucial step in macaron making that can make all the difference: resting time. After piping your macaron shells onto the baking sheet, it’s essential to let them rest before popping them into the oven. This resting period allows the shells to develop a thin skin on the surface, which helps them rise evenly during baking.
If you skip or shorten the resting time, the macarons might not have enough time to develop that skin, leading to hollow results. Aim for around 30 minutes to an hour of resting time, depending on the humidity of your kitchen. You’ll know they’re ready when you gently touch the surface, and it doesn’t feel sticky anymore.
So, be patient and give your macarons the resting time they deserve. It might seem like a small detail, but it can make a world of difference in achieving those perfect, non-hollow shells!
Aged Egg Whites
Here’s another tip to help you conquer hollow macarons: use aged egg whites. Now, you might be wondering why age matters when it comes to egg whites. Well, aging egg whites means letting them sit at room temperature for a day or two before you start baking.
Why does this help? As egg whites age, they lose some of their moisture, which can lead to better macaron results. The slightly dehydrated egg whites whip up better, creating a more stable meringue with the right amount of moisture. This means your macarons will have a smoother texture and are less likely to turn out hollow.
Before you start your macaron adventure, separate your egg whites, place them in a clean, covered container, and let them age on the countertop. Just make sure they don’t catch any odors from the surroundings. When it’s macaron-making time, you’ll be thankful you took this extra step!
Incorrect Macaronage Technique
Macaronage is the process of combining the dry ingredients with the whipped egg whites to create the perfect macaron batter. It’s a critical step that can make or break your macarons.
If you don’t get the macaronage technique right, you might end up with a batter that’s either too stiff or too runny. Both scenarios can lead to hollow shells. Here’s how you can avoid this:
1. Gentle Folding: When combining the dry ingredients with the whipped egg whites, be gentle with your folding motion. Using a spatula, fold from the sides to the center and then gently press down. Repeat this motion until the batter flows like lava and forms a ribbon when you lift the spatula.
2. Don’t Undermix or Overmix: Undermixing or overmixing the batter can lead to hollow macarons. If the batter is too thick, it won’t spread evenly, causing hollows. On the other hand, if it’s too runny, it will spread too much, also resulting in hollow shells. So, find that perfect consistency through practice and learn to recognize the signs of a properly mixed batter.
3. Test Your Batter: To check if your batter is ready, you can do a simple test. Scoop up a small amount of batter and let it drop back into the bowl. If the batter slowly settles into a smooth surface without any peaks, it’s ready to go!
Remember, macaronage might seem a bit tricky at first, but with practice, you’ll get the hang of it. Don’t be discouraged by a few mishaps along the way. Just keep trying, and soon enough, you’ll be creating beautiful, non-hollow macarons that will impress everyone!
Final Thoughts
We’ve covered some essential tips to troubleshoot those pesky hollow macarons, and now it’s time for some final thoughts. Baking macarons can be both rewarding and challenging, but don’t let hollow shells discourage you. With a bit of practice and a pinch of patience, you’ll be creating picture-perfect macarons that will have everyone swooning!
Remember, mastering the art of macaron making takes time, so don’t be too hard on yourself if your first few batches don’t turn out as expected. Each attempt is a chance to learn and grow as a baker. Keep track of your progress, make notes, and fine-tune your techniques along the way. Before you know it, you’ll be the macaron expert among your friends and family!
Embrace the journey, and don’t be afraid to experiment. Try different flavors, colors, and fillings to find your unique twist on the classic macaron. Baking is all about creativity and enjoyment, so have fun with it! And if you ever feel discouraged, remember that even the most experienced bakers face challenges. Don’t hesitate to seek advice from fellow bakers or online communities – there’s a whole world of macaron enthusiasts out there willing to share their tips and tricks.
So, go forth with confidence and whip up those macarons like a pro! Whether you’re baking for a special occasion or simply to treat yourself, know that each batch you create is a labor of love. With dedication and passion, you’ll soon be delighting everyone with your delicious and beautifully non-hollow macarons. Happy baking!
FAQ
Hey, hey! Congratulations on mastering the art of macaron making and creating those lovely, non-hollow shells! But wait, you might still have some questions lingering in your baking-savvy mind. Fret not, my friend! Let’s tackle some frequently asked questions about macarons, so you can continue to level up your macaron game!
1. Why are my macarons lopsided or uneven?
Lopsided or uneven macarons can happen to the best of us. There are a few reasons behind this common issue. First, make sure you’re piping the batter onto the baking sheet evenly and consistently. Hold the piping bag perpendicular to the sheet and apply steady pressure. If you notice any peaks after piping, gently smooth them out with a damp finger.
Another factor is your oven’s temperature distribution. Ovens can have hot spots, leading to uneven baking. To counter this, consider rotating the baking sheet halfway through the baking process. Additionally, using a silicone baking mat can help distribute heat more evenly.
2. How do I store macarons, and how long do they last?
Storing macarons correctly ensures they stay fresh and delicious for as long as possible. Place your cooled macarons in an airtight container, layering them with parchment paper to avoid sticking. Keep the container in the refrigerator to maintain their texture and flavor. Macarons stored this way can last up to a week.
For longer storage, consider freezing your macarons. Place them in a single layer on a baking sheet in the freezer until they’re firm. Then, transfer them to an airtight container or a resealable freezer bag. Frozen macarons can stay good for up to three months. Just remember to thaw them in the refrigerator before indulging in their scrumptiousness!
3. How do I achieve different macaron flavors?
Oh, the joy of exploring various macaron flavors! The sky’s the limit when it comes to creativity. To achieve different flavors, you can experiment with flavored extracts or oils. Add a drop or two to your macaron batter during the macaronage process. For example, use lemon extract for a zesty twist or cocoa powder for chocolatey goodness.
You can also incorporate food coloring to match the flavor. Go for natural food coloring options to avoid altering the texture of your macarons. And don’t forget about the filling! Different flavored ganaches, jams, or buttercream can transform your macarons into delightful taste sensations.
4. Help! My macarons keep sticking to the baking mat or parchment paper. What should I do?
Sticking macarons can be frustrating, but fear not – there’s a simple solution. Make sure your macarons are thoroughly cooled before attempting to remove them from the baking mat or parchment paper. Trying to peel them off while warm can cause them to tear or stick.
If you’re using parchment paper, a handy trick is to place a few drops of water underneath the paper while the macarons are still warm. The steam created helps to loosen them gently. For silicone baking mats, carefully lift the edges of the mat and peel it away from the macarons.
5. Can I make gluten-free macarons?
Absolutely! Macarons are naturally gluten-free since they are made primarily with almond flour, powdered sugar, and egg whites. Just ensure that all your ingredients are certified gluten-free to avoid any cross-contamination.
Remember, practice makes perfect, and with time, you’ll become a macaron pro! Don’t hesitate to experiment, troubleshoot, and have fun on your macaron-making journey. Happy baking!