This is one of the most common problems people have with their sourdough starter. And there are quite a few reasons why this is happening. So let’s see what are the most common causes.
A Sourdough starter can have bubbles but not rise due to an improper consistency, bad temperature, using the wrong flour type, underfeeding, not having enough time to develop, or due to being contaminated.
Those are the 6 reasons why a starter won’t rise even if it’s bubbly. Now, let’s take a closer look at each one and see why your starter won’t rise, and see what you can do to solve this problem.
1. Consistency
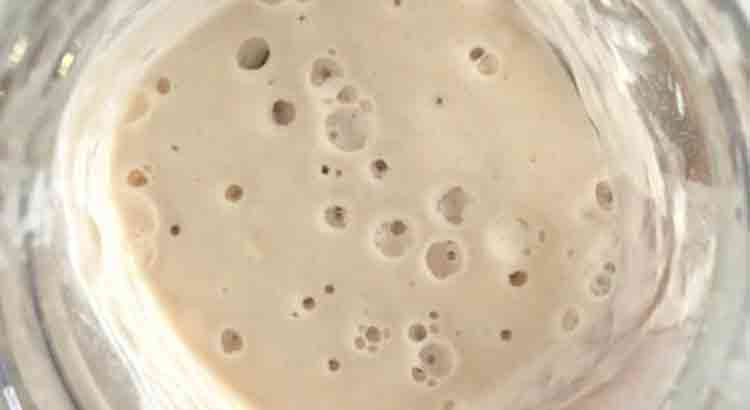
Consistency is one of the most common reasons why a starter won’t rise, even though its surface is full of bubbles. The main problem, in this case, is too much water.
Starters can have any kind of consistency, as long as it’s able to do their job of making the dough rise. But a very wet starter will act very differently from a balanced starter.
Starters rise by creating and trapping Carbon Dioxide inside of them. A starter with too much water in it won’t be able to do this, because it’s too liquid. So all the carbon dioxide will rise to the surface and it will form bubbles, but there will be none on the inside, so the starter won’t rise.
Out of all the possible problems that you could have with your starter, this is one of the most harmless, as it won’t really affect your bread. Even if it’s not rising, your starter is healthy.
Even if the starter itself is not rising, your bread should rise, as the consistency of the dough will be much more solid. But one thing that you have to keep in mind is that you might want to use less water or more flour since your starter is already very wet.
You could solve this problem by using less water, or adding more flour, but as I said this is not really a problem, but ideally you want a starter that is able to rise, as this will help you out a lot in knowing when is the right moment to use it.
If you want to know more about different starter consistencies and how they will affect the sourdough bread made with them you can check out my article: Is my Sourdough Starter the Right Consistency? (Beginner Guide)
2. Flour Type
A starter is made out of only two ingredients, water, and flour. The role of the water is to activate the starter and give it a more fluid consistency, and the flour is responsible for everything else. So the type of flour that you use is extremely important.
The biggest mistake when it comes to flour is making a starter with only white flour. Compared to every other type of flour, white flour has the least nutrients and will provide very little energy for the starter to grow. A brand new starter that is kept only using white flour will produce a few bubbles, but it won’t have enough to rise properly.
You can switch to using only white flour only after your starter is well established, which usually takes between 2 and 4 weeks, but until then it’s recommended to use whole grain flour.
In order to make white flour, white, it has to go through a bleaching process which eliminates a lot of the nutrients and microorganisms on the flour that the starter needs to grow. Also, white flour is made only using a part of the grain, leaving the rest aside. Whole grain, on the other hand, uses all parts of the grain, which are filled with more nutrients.
Solving this problem is very simple, start using whole grain flour to feed your starter. Alternatively, you could mix white flour with whole grain, this will make the transition easier for the starter and you should see your starter rising faster.
You don’t have to use whole grain all the time for your starter, after a few weeks of constant rises you can slowly transition back to white flour. Now that your starter is well developed, it should be able to rise even with just plain white flour.
Another tip that I have for you when it comes to flour is that you can use a little bit of rye flour to boost the activity of your starter. Rye flour is full of nutrients and is a superfood for any sourdough starter. Just be careful not to use too much, as this will make your starter too active and you will have to feed it multiple times per day.
3. Underfeeding
Using the wrong flour type is a way of underfeeding your starter but there are two more ways in which you could be doing this. And those are using the wrong feeding ratio and measuring the flour and water the wrong way. Let’s start with talking about feeding ratios first.
When you were looking out how to make your starter you’ve probably noticed that most people recommend a 1:1:1 ratio, but there are more ratios out there that work, like 2:3:2, or 1:2:2.
All of those ratios have one thing in common, even if it’s not that obvious at first. All of them use an equal, or greater quantity of flour, compared to the quantity of the starter.
If you feed your starter less flour than the amount of starter that you keep it won’t rise, because it won’t have enough energy to do so.
So, while you can adjust the ratio to your liking, make sure that you always use more flour than starter.
Another big and common problem that can easily make you underfeed your starter is measuring using cups instead of grams. Cups are used to measure volume, grams are used to measure weight. One cup of flour weighs 120 grams, while a cup of water weighs 236 grams. And the weight of the starter will vary from starter to starter.
If you were using a 1:1:1 ratio, and you were using cups instead of grams you could end up with this: 156 grams of starter – 120 grams of flour – 236 grams of water, which is actually not how much you want to feed your starter.
So make sure to use a digital scale when measuring flour and water, this is the only way to measure them correctly.
And before we move to the next thing, I want to also tell you that graded measuring cups are not a good option, even if they have markings for flour, water, etc. Different types of flour have different weights, so they won’t work.
4. Temperature
Temperature plays a huge role in how, or if, a starter rises.
Basically, if the temperature is too low, your starter will need more time to rise. And if the temperature is too high the starter will rise and fall very quickly.
The best temperature range at which you should keep your sourdough starter is between 70°F(22°C) and 75°F(24°C).
If the temperature is too low your starter might need more time to grow. What more time means depends on how cold it is, it could mean 2 to 3 days, or even more if you are getting close to freezing temperatures.
If the temperature is too high you run the risk of missing the rise, which could lead you to believe that it didn’t rise at all.
But regardless of which of those two reasons is your problem, the solution is the same, move your starter in a room with a proper temperature.
5. Not Enough Development Time
There is also a possibility that there is nothing that you need to change in the way you are maintaining your starter.
It’s very common for a brand new starter to grow for the first few days, and then stop doing so for a while, even up to two weeks. This happens because the starter is full of thousands of good bacteria, called probiotics. Those bacteria are relatively fragile, and they need some time to make their new environment suitable. And during this time they will stop growing.
If you didn’t know about those bacteria you can check out my article: Does Sourdough Contain Probiotics? (+ What They Do), in this article I talk in detail about them, what benefits they have, and why they are not dangerous to us.
So if your starter is brand new, it could simply be that it needs some time to develop, there is nothing that you can do to speed up this process. But during this time you still have to feed your starter regularly and keep it at a proper temperature, so even if your starter is taking a break from growing, you can’t take a break from taking care of it.
6. Contamination
If your starter starts developing an earthy smell, and you see either mold or pink/orange spots on it, then the starter has been contaminated by some bad bacteria and it has gone bad.
Starters are a very acidic environment, which makes it extremely hard for bad bacteria to grow, but it can still happen.
If you notice any of those signs on your starter then you can’t do anything to save it, the only thing that you can do is to throw it away and start a new one. Even if you still have some bubbles in the starter, those will start to fade away, and no new bubbles will take their place.
This is a very unfortunate case, but it can happen, and throwing out just the parts of the starter that seem bad is not recommended, as the whole starter is probably contaminated and there is no way to save it.
Final Thoughts
Those are the 6 possible reasons why your starter is bubbly but it doesn’t rise. As you can see most of them can be easily identified and solved. So start by checking each one of them out, and when you figure out what the problem is, correct it.
Just keep in mind that even if you fix the problem right now, it’s not guaranteed that the next day your starter will be rising, it might need a few more days to get back in shape, so make sure that you give it some time.