Do you ever find yourself intrigued by those beautifully decorated cakes and wonder how to achieve that flawless finish? Whether you’re new to baking or just dipping your toes into the world of cake decoration, getting that smooth fondant can be a bit tricky at first. Let’s walk you through the basics of how to smooth fondant like a pro – step by step, so you can create stunning cakes that look as good as they taste.
Roll Out the Fondant
So, you’ve got your cake baked and ready to be transformed into a masterpiece. The first step in achieving that smooth fondant look is rolling out the fondant. Imagine this like you’re rolling out dough for a pie crust – it’s all about getting that even, thin layer.
Grab your fondant and a rolling pin. Before you start, make sure to sprinkle a little powdered sugar or cornstarch on your work surface and rolling pin. This prevents the fondant from sticking and makes the whole process smoother than a scoop of your favorite ice cream.
Place your fondant on the sugared surface and begin rolling. Start from the center and work your way out, turning the fondant as you go to maintain an even thickness. Don’t roll too thin, though; you want it to be thick enough to handle without tearing, but not so thick that it becomes bulky.
Once you’ve achieved the desired thickness, you’re ready for the next step – the art of lifting and draping the fondant over your cake.
Lift and Drape
This is where the real magic starts to happen. Lifting and draping the fondant over your cake requires a bit of finesse, but don’t worry, you’ve got this.
Gently lift the rolled fondant using your rolling pin or your hands. Place it at the center of your cake and slowly drape it over the top. Think of it like tucking a cozy blanket over a bed – you want it to cover the cake snugly.
Using your hands, start smoothing the fondant from the top down to the sides. The goal is to make it adhere to the cake’s surface without any creases or wrinkles. If you notice any air bubbles trapped underneath, gently lift the fondant and smooth them out.
Now, let’s focus on the top surface. Using a fondant smoother or your hands, gently work your way from the center to the edges. This step helps you achieve that flawless finish that will make your cake look as smooth as a calm lake on a summer’s day.
Smooth the Top
Alright, we’re getting closer to that perfectly smooth fondant finish! Smoothing the top is like giving your cake a soft, polished touch that’s so satisfying.
Once you’ve draped the fondant over the cake, it’s time to focus on the top surface. Use your hands or a fondant smoother to gently press down and smooth out any wrinkles or imperfections. Imagine you’re smoothing out a wrinkled shirt – the goal is to make it look neat and tidy.
Start from the center and work your way out towards the edges. Be gentle but firm, and take your time. If you encounter any stubborn wrinkles, you can use a small fondant tool or the edge of your smoother to carefully lift the fondant and smooth it out.
Remember, practice makes perfect. Don’t worry if it’s not absolutely flawless on your first try. With each cake you decorate, you’ll become more comfortable and skilled at achieving that smooth, polished top.
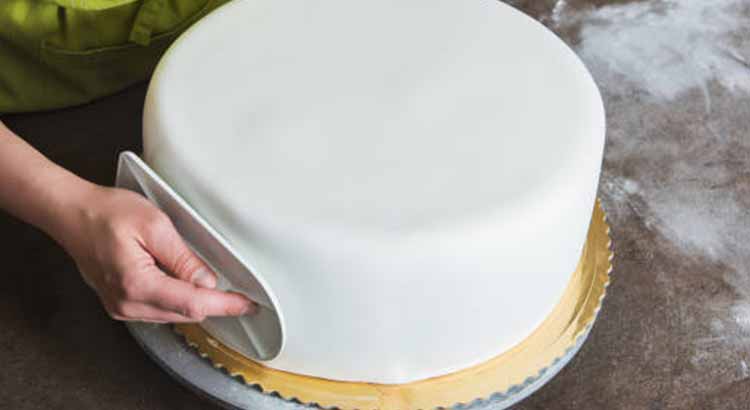
Smooth the Sides
Now that the top is looking fantastic, let’s give some love to the sides of your cake. Smoothing the sides is the final touch that brings the whole cake together.
Using your hands or a fondant smoother, gently press the fondant against the sides of the cake. Start from the top and work your way down towards the base. You’re essentially hugging the cake with fondant, ensuring it adheres snugly.
As you work your way around the cake, be mindful of any excess fondant at the base. You can use a fondant smoother to trim off the excess, creating clean edges that look as neat as a freshly made bed.
If you notice any air bubbles along the sides, don’t panic. Simply use a small pin or fondant tool to gently prick the bubble and smooth out the area. With a little patience and care, your cake will soon have those flawless, smooth sides that make it look professionally crafted.
Trim the Excess
We’re almost at the finish line of fondant perfection! Trimming the excess fondant is like giving your cake a tidy haircut – it’s the little details that make all the difference.
After you’ve smoothed the fondant on both the top and sides of the cake, you might have some excess hanging around the base. This excess fondant is like the loose ends of a ribbon that need to be tidied up.
Gently lift the edge of the fondant and use a pair of clean, sharp scissors to trim off the excess. Start by making small, careful cuts to avoid accidentally cutting too much. You can always trim more if needed, but you can’t put it back once it’s cut!
As you trim, work your way around the cake, creating an even and clean edge. Think of it as giving your cake a crisp, well-defined outline that sets the stage for your beautiful decoration.
Create a Clean Edge
Now that you’ve trimmed away the excess fondant, let’s focus on creating a clean edge that adds that final touch of professionalism to your cake.
Using a fondant smoother or the edge of a ruler, gently press the fondant at the base of the cake. This step helps to secure the fondant in place and creates a seamless transition from the cake to the board or cake stand.
As you press the fondant, you’ll notice it forms a neat, clean edge that frames the cake beautifully. This edge not only adds to the overall appearance but also keeps the fondant securely in place, ensuring your cake looks its best until it’s time to be devoured.
With a smooth and clean edge, your cake is ready to be adorned with your favorite decorations – whether it’s delicate flowers, intricate patterns, or a simple message. You’ve mastered the art of smoothing fondant, and your cakes will now stand out with that professional touch that turns them into true works of art.
Smooth Corners and Edges
We’re diving into the final finesse of fondant smoothing – focusing on those pesky corners and edges. Smoothing the corners and edges might seem like a small detail, but it’s these little touches that give your cake a truly polished appearance.
Corners can be a bit tricky, but don’t worry, you’ve got this. Start by gently lifting the fondant at one corner of the cake. Use your fingers to press and smooth the fondant towards the corner, creating a clean fold. Repeat this for all four corners.
As you smooth the fondant towards the corners, you’ll notice that any excess fondant gathers at the bottom. Trim this excess using your scissors, creating a neat and tidy fold. Imagine you’re wrapping a present and creating those crisp, neat folds for a perfectly wrapped gift.
Once the corners are smoothed and trimmed, it’s time to focus on the edges. Gently press the fondant along the edges of the cake using a fondant smoother or the edge of a ruler. This step ensures that the fondant adheres well and forms a seamless connection with the sides of the cake.
By paying attention to these corners and edges, you’re adding that extra layer of finesse to your cake decoration. It’s like giving your cake a tailored suit that fits perfectly. With these techniques in your toolbox, your cakes will look stunning from every angle, making them a centerpiece that’s sure to impress.
Final Thoughts
Congratulations, budding cake decorator! You’ve journeyed through the world of fondant smoothing, and your cakes are now shining examples of elegance and artistry. As you step back to admire your creations, there are a few final thoughts to keep in mind.
First and foremost, remember that practice makes progress. Your very first attempt might not be flawless, and that’s absolutely okay. Each cake you work on is a chance to refine your skills, learn from any challenges, and improve your technique. So, don’t be disheartened by imperfections – they’re simply stepping stones towards mastery.
Additionally, keep experimenting with different tools and techniques. Fondant smoothing is as much about creativity as it is about precision. Try out various fondant smoothers, rollers, and even your fingertips to discover what works best for you. Every cake decorator has their own unique approach, and you’ll find yours as you continue to explore and experiment.
Lastly, don’t forget to have fun along the way. The process of decorating a cake is an art form, and it’s meant to be enjoyable. Embrace the journey, relish the satisfaction of seeing your ideas come to life, and cherish the joy your creations bring to others. Whether it’s a simple birthday cake or an intricate wedding masterpiece, your effort and passion shine through in every detail.
So, as you embark on your cake decoration endeavors, keep these final thoughts in mind. With patience, practice, and a sprinkle of creativity, your fondant-smoothing skills will continue to evolve, and your cakes will become the talk of every celebration. Here’s to the artistry you’ve cultivated and the smiles you’ll create with your beautifully smoothed cakes!
FAQ
You’ve learned the ropes of fondant smoothing, but let’s tackle some common questions that might still be on your mind. Don’t worry, you’re not alone in your cake decoration journey!
Can I use something other than powdered sugar or cornstarch when rolling out fondant?
Absolutely! While powdered sugar and cornstarch work great, some cake decorators prefer using vegetable shortening or even a bit of water to prevent sticking. The key is to use a small amount and make sure your work surface and tools are well coated.
What do I do if I accidentally tear the fondant while smoothing?
Don’t panic – it happens to the best of us! If you have a tear, you can gently press the fondant back together using your fingers. If it’s a larger tear, you can strategically place a decoration or edible embellishment over it. Remember, imperfections can often be cleverly disguised.
How far in advance can I smooth fondant on my cake?
Fondant-covered cakes can stay fresh for a few days, depending on the type of cake and filling. It’s a good idea to complete the fondant smoothing a day or two before the event. Keep the cake in a cool, dry place away from direct sunlight to maintain its freshness.
Can I reuse fondant scraps?
Definitely! Fondant scraps can be kneaded together and re-rolled. Just make sure to dust your work surface with a bit of powdered sugar or cornstarch to prevent sticking. However, be cautious not to mix different colored fondants unless you want a marbled effect.
How do I prevent air bubbles from forming under the fondant?
Air bubbles can be pesky, but there’s a simple trick to avoid them. As you smooth the fondant onto the cake, use your hands to gently press from the center outward. This helps release any trapped air and prevents bubbles from forming. If you do get a bubble, use a small pin to prick it and then smooth the area.
What’s the best way to store a fondant-covered cake?
Once your cake is decorated, store it in a cake box or under a large, clean plastic container to protect it from dust and humidity. Avoid refrigerating fondant-covered cakes, as condensation can cause the fondant to soften and lose its smooth finish.
How can I add color to my fondant?
You can buy pre-colored fondant or add color to white fondant using gel or paste food coloring. Knead the coloring into the fondant until you achieve the desired shade. Start with a small amount of color and gradually add more until you reach the intensity you want.
Can I smooth fondant on cupcakes too?
Absolutely! Smoothing fondant on cupcakes follows a similar process as with cakes. Roll out small circles of fondant to cover the cupcakes, drape, and smooth gently. You can also get creative with textured fondant or cut-out shapes to add a personal touch.
Is fondant the only way to decorate cakes?
Nope! Fondant is just one of many cake decorating techniques. You can also use buttercream frosting, royal icing, edible paints, and various piping techniques to achieve stunning designs. Experiment with different methods to find the style that suits you best.
What’s the secret to achieving sharp edges on fondant-covered cakes?
Achieving sharp edges on fondant-covered cakes requires a bit of patience and precision. After draping the fondant over the cake, use a fondant smoother to press the edges against the cake and create clean, sharp lines. Trim the excess fondant and use your fingers to refine the edges until you’re satisfied with the result.
With these FAQs answered, you’re armed with the knowledge to confidently tackle any fondant smoothing challenge that comes your way. Remember, cake decorating is all about having fun, getting creative, and delighting in the sweet results. Keep practicing, keep experimenting, and enjoy the journey of turning cakes into edible works of art!