If you’ve ever savored the buttery, flaky goodness of a croissant and wondered how they achieve that perfect texture, you’re in the right place.
The most important thing when proofing croissants is allowing the dough to rest and rise properly before baking. Proofing is the final stage of fermentation, where the yeast in the dough activates, causing the croissants to become light, airy, and oh-so-fluffy. This process is essential for achieving that signature texture we all adore.
Now, let’s dive into the step-by-step process. We’ll guide you through each stage, providing you with tips and tricks to ensure your croissants turn out light, flaky, and utterly irresistible. Get ready to master the art of croissant-making, one proof at a time.
Prepare the Croissant Dough
Making croissants from scratch may seem daunting, but with a little patience and practice, you can achieve flaky, buttery perfection right in your own kitchen. The key lies in the preparation of the croissant dough. Follow this simple step-by-step guide to create a dough that will transform into delicious pastries.
- Gather your ingredients: To prepare the croissant dough, you will need 2 and ¾ cups of all-purpose flour, ¼ cup of granulated sugar, 2 teaspoons of active dry yeast, 1 and ¼ teaspoons of salt, 1 cup of unsalted butter (cold and cut into small pieces), 1 cup of cold water, and an egg for the egg wash.
- Combine the dry ingredients: In a large mixing bowl, whisk together the flour, sugar, yeast, and salt until well combined.
- Add the butter: Incorporate the cold, cubed butter into the dry mixture using a pastry cutter or your fingertips. The goal is to create a crumbly texture with small, pea-sized butter pieces.
- Mix in the water: Gradually add the cold water to the mixture, stirring with a wooden spoon or spatula until a rough dough forms.
- Knead the dough: Transfer the dough onto a lightly floured surface and knead it gently for about 5 minutes until it becomes smooth and elastic. Shape it into a ball.
- Chill the dough: Wrap the dough in plastic wrap and refrigerate it for at least 1 hour or overnight. This step allows the butter to solidify and makes the dough easier to work with.
Roll and Shape the Croissants
Now that you have prepared the croissant dough, it’s time to roll and shape it into the iconic croissant form. This process may require a bit of practice, but the results will be well worth the effort. Let’s dive into the next steps:
- Prepare your workspace: Dust your work surface with flour and gather a rolling pin. Ensure that your dough has been properly chilled and is still cold to the touch.
- Roll out the dough: Place the chilled dough onto the floured surface and gently roll it out into a rectangle shape. Aim for a thickness of approximately ¼ inch.
- Create the first fold: Fold the rectangle into thirds like a business letter. This is called a single fold. The left side of the dough should meet the center, and then the right side should be folded over that.
- Chill the dough: Wrap the folded dough in plastic wrap and refrigerate it for about 30 minutes. This chilling step helps the butter to firm up and maintains the proper texture.
- Repeat the rolling and folding: Take the chilled dough out and repeat the rolling and folding process two more times, making sure to chill the dough between each fold. This creates the characteristic layers in croissants.
- Shape the croissants: Roll out the dough one final time, maintaining a thickness of approximately ¼ inch. Cut the dough into long triangles, ensuring that each triangle has a wide base and a pointed tip. Starting at the wide base, gently roll up the triangle, tucking the pointed tip underneath to secure it.
Final Shaping
Now that you have rolled and shaped your croissants into delightful triangles, it’s time for the final shaping before they are ready to be proofed and baked. Follow these simple steps to give your croissants their distinctive curved appearance:
- Prepare your workspace: Ensure your work surface is clean and lightly dusted with flour. Line a baking sheet with parchment paper.
- Shape the croissants: Take one of the rolled triangles and gently stretch it lengthwise to make it a bit longer. This will help create the classic crescent shape. Starting from the base of the triangle, roll it up towards the pointed tip, curving the ends slightly inward. Place the shaped croissant on the prepared baking sheet, ensuring there is enough space between each croissant to allow for expansion.
- Repeat with remaining triangles: Repeat the shaping process with the remaining triangles, maintaining a consistent size and shape for your croissants.
- Cover and let rest: Once all the croissants are shaped, cover the baking sheet loosely with plastic wrap or a clean kitchen towel. Allow the croissants to rest at room temperature for about 1 hour. This resting period helps relax the gluten in the dough and allows the yeast to work its magic.
Proofing
After the final shaping, it’s time to let the croissants undergo the proofing process. This stage is crucial as it allows the dough to rise, resulting in light and airy croissants. Here’s how to proof your shaped croissants:
- Create a warm environment: Find a warm spot in your kitchen, free from drafts, where the croissants can proof. This can be near a warm oven or on a countertop away from open windows.
- Cover and let rise: Lightly cover the shaped croissants with a clean kitchen towel or plastic wrap, ensuring it is loose enough to allow for expansion. Let the croissants proof for approximately 1 to 2 hours, or until they have noticeably increased in size. The exact proofing time may vary depending on the temperature and humidity of your kitchen.
- Check for readiness: To determine if the croissants are properly proofed, gently press the dough with your fingertip. If the indentation slowly springs back, they are ready for baking. If the dough springs back quickly, give them a little more time to proof.
- Preheat the oven: While the croissants are proofing, preheat your oven to 375°F (190°C) to ensure it reaches the desired temperature when it’s time to bake.
Baking
The moment has finally arrived to transform your beautifully shaped and proofed croissants into golden, flaky delights through the baking process. With a few simple steps, you’ll be savoring the aroma of freshly baked croissants in your home. Let’s get started:
- Prepare the oven: Preheat your oven to 375°F (190°C) and make sure the oven rack is positioned in the center. This will ensure even heat distribution for perfectly baked croissants.
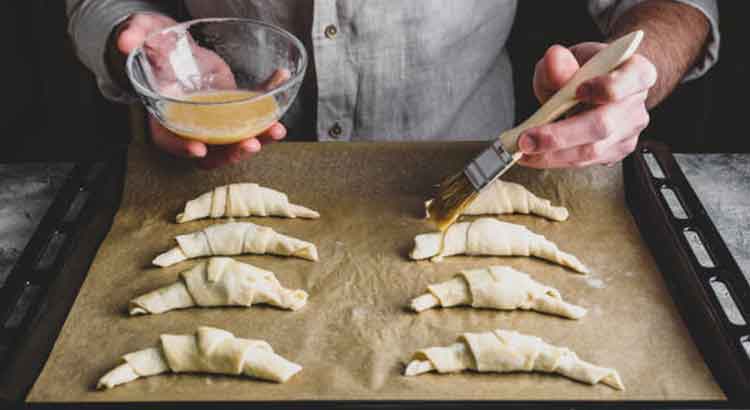
- Egg wash: In a small bowl, whisk an egg until well beaten. Using a pastry brush, gently brush the tops of the shaped croissants with the egg wash. This will give them a beautiful golden color and a glossy finish.
- Baking sheet placement: Carefully transfer the prepared baking sheet with the croissants into the preheated oven. Make sure to leave enough space between the croissants to allow for expansion during baking.
- Baking time: Bake the croissants for approximately 15 to 20 minutes or until they turn a gorgeous golden brown. Keep a close eye on them as baking times may vary depending on your oven’s temperature accuracy.
- Rotate the baking sheet: About halfway through the baking time, rotate the baking sheet 180 degrees. This helps ensure even browning and prevents any hot spots in your oven from affecting the croissants’ appearance.
- Cooling: Once baked to perfection, remove the baking sheet from the oven and transfer the croissants to a wire rack. Allow them to cool for a few minutes before indulging in their buttery goodness.
- Enjoy fresh or store: Croissants are at their best when enjoyed fresh out of the oven. However, if you have any leftovers, allow them to cool completely before storing them in an airtight container at room temperature. They can be enjoyed for up to 2 days, but reheat them gently in the oven or toaster for a few minutes to restore their delightful crispness.
Final Thoughts
Firstly, remember that practice makes perfect. Making croissants from scratch can be a bit challenging at first, but with each attempt, you’ll gain more confidence and finesse. Don’t get discouraged if your first batch doesn’t turn out exactly as you envisioned. Embrace the learning process, and with each subsequent batch, you’ll refine your techniques and achieve even better results.
Secondly, feel free to experiment and get creative. While the classic butter croissant is undeniably delicious, don’t be afraid to add your own personal touch. You can incorporate various fillings like chocolate, almond paste, or even savory options like ham and cheese. Let your imagination run wild and explore different flavor combinations to suit your taste buds.
Lastly, sharing is caring. There’s something incredibly gratifying about sharing your homemade croissants with family, friends, or neighbors. Whether you host a brunch gathering or surprise someone with a thoughtful gift, the joy that comes from seeing others relish your creations is truly priceless. So, don’t hesitate to spread the love and share the deliciousness of your homemade croissants.
As you embark on this culinary adventure, remember that making croissants is as much about the journey as it is about the destination. Enjoy the process, embrace the joy of working with dough, and take pride in creating a delectable treat from scratch. The satisfaction of biting into a freshly baked croissant that you made with your own hands is incomparable.
So, gather your ingredients, roll out the dough, shape those beautiful croissants, proof them to perfection, bake them until golden brown, and relish the delightful results. Happy baking, and may your home be filled with the aroma of warm croissants and the sounds of contented sighs as you savor every buttery, flaky bite.
FAQ
As you embark on your croissant-making adventure, you may have some questions along the way. Here are answers to common queries that beginner bakers often have:
Q: Can I use margarine instead of butter?
A: While it’s best to use butter for that classic, rich flavor and flaky texture, you can substitute margarine if needed. However, keep in mind that the result may differ slightly, as butter has a higher fat content. If you do opt for margarine, choose a brand that has a high fat content and is suitable for baking.
Q: Can I make the dough ahead of time and bake it later?
A: Absolutely! Croissant dough can be prepared in advance and refrigerated or frozen for future use. After completing the dough preparation, wrap it tightly in plastic wrap and store it in the refrigerator for up to 3 days. If you want to freeze the dough, wrap it well and store it in the freezer for up to 2 months. When you’re ready to bake, allow the dough to thaw in the refrigerator overnight before proceeding with the rolling, shaping, proofing, and baking steps.
Q: Why is it important to chill the dough at various stages?
A: Chilling the dough at different stages is crucial for a couple of reasons. First, it allows the butter to solidify between each rolling and folding step, creating distinct layers and ensuring that the croissants turn out light and flaky. Second, chilling the dough also relaxes the gluten, making the dough easier to work with and preventing excessive shrinkage during baking.
Q: Can I speed up the proofing process?
A: While it’s tempting to expedite the proofing stage, it’s best not to rush it. The proofing time allows the yeast to ferment, resulting in a light and airy texture. However, you can help speed up the process slightly by proofing the croissants in a slightly warmer environment. Just be cautious not to expose them to excessive heat, as it can cause the butter to melt and compromise the flaky layers.
Q: How do I achieve a deep golden color on my croissants?
A: Achieving a beautiful golden color on your croissants is a combination of using an egg wash and proper baking time. The egg wash helps create that golden hue and glossy finish. Make sure to apply it evenly on the shaped croissants before baking. As for baking time, keep a close eye on the croissants as they bake. The exact time may vary depending on your oven, so check for that desirable deep golden color and remove them from the oven once achieved.
Q: How can I store leftover croissants?
A: If you have any leftover croissants (which might be a rare occurrence!), allow them to cool completely before storing them. Place them in an airtight container or resealable bag at room temperature, and they will stay fresh for up to 2 days. To enjoy them at their best, gently reheat them in the oven or toaster for a few minutes to restore their delightful crispness.
Remember, don’t be afraid to experiment, embrace the learning process, and have fun with your croissant-making endeavors. With each batch, you’ll gain more confidence and refine your skills. So, get rolling, shaping, proofing, and baking those delicious croissants. Happy baking!