Do you ever find yourself passionate about baking, but frustrated when your dough sticks to the Banneton basket? It’s a common challenge, but fear not – we’ve got the answers you need.
The best way to keep dough from sticking to the Banneton basket is by using these 7 simple tricks. Whether you’re a seasoned baker or just starting out, these techniques will ensure your dough releases effortlessly and maintains its beautiful shape.
So, if you’re tired of dough disasters and want to create perfectly formed bread every time, stay with us. We’ll share insider tips and tricks to make your baking journey smoother and more satisfying. Say goodbye to sticky situations and hello to a world of delectable homemade bread!
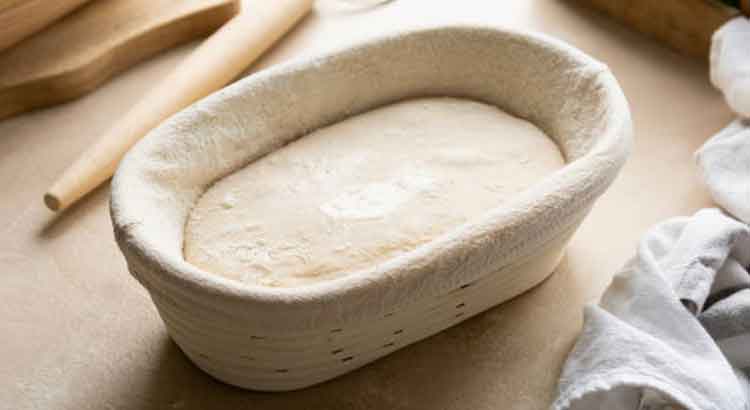
Flour Generously
Baking is a delightful adventure, but when your dough sticks to the Banneton basket, it can be a bit frustrating. One simple trick to prevent this is to flour generously.
Dust your Banneton basket with a liberal amount of flour before placing your dough inside. Don’t be shy with it; you want to create a barrier between the dough and the basket. Use a fine-mesh sieve or a flour duster to ensure an even coating. The flour not only prevents sticking but also imparts a rustic, artisanal look to your bread.
Remember, different flours absorb moisture differently, so you may need to adjust the quantity based on the type of flour you’re using. With this straightforward technique, you’ll notice a significant reduction in dough sticking issues, and your loaves will slide out effortlessly.
Use a Mixture of Flour and Cornstarch
When you’re on a mission to conquer sticky dough, combine flour and cornstarch for a dynamic duo that does wonders. This mixture creates an even more effective barrier, making sure your dough doesn’t cling to the Banneton basket.
To make this flour-cornstarch blend, simply mix two parts of flour with one part cornstarch. The cornstarch adds an extra layer of non-stick magic to your basket. As you dust your Banneton, pay attention to crevices and corners where dough can hide.
With this handy mixture, you’ll have dough that easily releases from the basket, and your final baked goods will have a beautiful, evenly floured finish. So, don’t be shy with the flour and cornstarch – it’s your secret weapon against sticky situations in the world of baking.
Rice Flour Paste
Another fantastic trick to keep dough from sticking to your Banneton basket is to use a rice flour paste. This method is a bit different from just dusting with dry flour, but it can be incredibly effective.
To make a rice flour paste, mix equal parts rice flour and water in a small bowl until you achieve a smooth, spreadable consistency. Now, generously coat the inside of your Banneton with this paste using a pastry brush. Ensure you cover every nook and cranny.
The beauty of rice flour paste is that it creates a moisture-resistant barrier, making it difficult for your dough to adhere to the basket. Plus, it adds a subtle crispiness to the bread crust, which is an added bonus. Give this technique a try, and you’ll be pleasantly surprised at how well it works.
Use a Linen or Cotton Liner
If you’re searching for an easy and mess-free solution to prevent dough from sticking to your Banneton basket, consider using a linen or cotton liner. These liners are like a safety net for your dough.
Simply line your Banneton basket with a clean linen or cotton cloth before placing your dough inside. Make sure to flour the cloth generously as well. As your dough rises, it will hold its shape within the lined basket, and when it’s time to bake, it will slide out effortlessly.
This method not only keeps your dough from sticking but also leaves behind a lovely pattern on your bread’s crust, giving it that artisanal touch. It’s a simple yet effective technique that many bakers swear by. So, if you want to keep your dough from sticking and achieve picture-perfect loaves, give the linen or cotton liner a try.
Non-Stick Spray
When you’re in a hurry or simply want a quick and hassle-free solution, non-stick cooking spray can come to the rescue. It’s a common kitchen staple that can work wonders in preventing dough from sticking to your Banneton basket.
Before placing your dough in the basket, give it a light but thorough coating of non-stick spray. Hold the spray can about 6 inches away to achieve an even distribution. Be cautious not to overdo it; a little goes a long way.
This method offers convenience and ease of use, making it a favorite among many bakers. The non-stick spray forms a protective layer, ensuring your dough slides out effortlessly when it’s time to bake. It’s a straightforward trick that can save you time and effort, especially on busy baking days.
Alternate with Parchment Paper
If you’re looking for a versatile solution that not only prevents dough from sticking but also simplifies the transfer process, consider using parchment paper.
First, line your Banneton basket with a piece of parchment paper, ensuring it covers the entire interior. Then, flour the parchment paper and place your dough inside. As your dough rises, it will maintain its shape within the lined basket.
When it’s time to bake, simply lift the parchment paper with the dough out of the basket and transfer it directly onto your baking sheet or stone. This method not only prevents sticking but also eliminates the need to invert and shake the basket, reducing the risk of deflating your dough.
Using parchment paper is a practical and foolproof way to keep dough from sticking while ensuring your final bread product looks and tastes fantastic. Give it a try, and you’ll appreciate the convenience it adds to your baking routine.
Season the Banneton
If you’re committed to perfecting your bread-baking game, consider seasoning your Banneton basket. This technique involves creating a natural non-stick layer over time by using the basket regularly.
To begin, you’ll need to prepare your Banneton by brushing it with a mixture of flour and water, creating a paste similar to the rice flour paste we discussed earlier. Apply this paste to both the interior and exterior of the basket. Then, place it in a warm, dry spot for about 24 hours to allow it to dry and set.
After this initial seasoning, use your Banneton regularly for your bread-making adventures. The more you use it, the smoother and less sticky it will become. With each use, a thin layer of flour residue builds up, creating a natural non-stick surface.
Remember, this method takes time and patience, but the results are worth it. A well-seasoned Banneton not only prevents sticking but also imparts a unique character to your bread, giving it that coveted artisanal quality.
Final Thoughts
In the world of baking, little things can make a big difference, and preventing dough from sticking to your Banneton basket is one of those little triumphs that can lead to consistently impressive results. We’ve explored seven simple tricks to help you achieve just that, and as we wrap up, let’s recap some key takeaways.
First and foremost, the choice of flour plays a crucial role. Whether you opt for generous dusting, a mixture of flour and cornstarch, or even a rice flour paste, the common theme is to create a barrier that keeps your dough from adhering to the basket’s surface. Experiment with these options to find the one that suits your baking style best.
Using a linen or cotton liner or parchment paper offers convenience and a clean release, making the transfer from Banneton to oven a breeze. And don’t forget the power of seasoning your Banneton over time; it’s a patient but rewarding method that enhances both the functionality and character of your basket.
In the end, the goal is not only to prevent sticking but also to elevate your baking experience. Each of these tricks brings its own charm and practicality to the table, allowing you to focus on crafting beautiful loaves of bread that not only taste amazing but also look like they came straight from a professional bakery. So, armed with these techniques, venture forth into the world of baking with confidence, and enjoy the delightful journey of creating artisanal bread at home.
FAQ
Q1: Can I use regular all-purpose flour to dust my Banneton basket, or should I use bread flour?
You can use regular all-purpose flour with success. While bread flour can provide slightly better results due to its higher protein content, all-purpose flour works well for dusting. Experiment with both to see which one you prefer.
Q2: Is it necessary to wash my Banneton basket after every use, or can I simply shake out excess flour and reuse it?
It’s generally best to avoid washing your Banneton after every use. Excess moisture can lead to sticking issues, so instead, simply shake out any excess flour after each use. If it becomes soiled or starts to smell, wash it gently with water and let it thoroughly dry before using it again.
Q3: Can I use other non-stick sprays like olive oil or butter-flavored sprays instead of the recommended non-stick cooking spray?
While olive oil or butter-flavored sprays can work in a pinch, they may leave a residue that affects the flavor of your bread. Non-stick cooking spray is designed to leave a minimal flavor and is a safer bet for preventing sticking.
Q4: How can I prevent my dough from overproofing or sticking to the Banneton due to humidity in my kitchen?
To prevent overproofing and sticking due to humidity, try adjusting your dough’s hydration level, reduce the rise time, and use techniques like retarding your dough in the fridge. You can also control humidity by using a dehumidifier in your kitchen.
Q5: What should I do if my dough still sticks even after using these tricks?
If your dough continues to stick, it could be due to a combination of factors like dough hydration, proofing time, or the type of flour used. Experiment with different techniques and adjustments to find the perfect solution for your specific baking conditions.
Q6: Can I use these tricks with any type of bread dough, or are there specific recipes that work best with these methods?
These tricks are versatile and can be applied to most types of bread dough, including sourdough, artisan, and traditional bread recipes. However, you may need to adjust the amount of flour, liner, or spray used depending on the specific characteristics of your dough.
Q7: How do I store my Banneton basket when not in use?
Store your Banneton basket in a cool, dry place. Ensure it’s completely dry before storing it to prevent mold growth. Some bakers prefer to store their baskets in breathable bags or cover them with a cloth to protect them from dust.
Q8: Can I use these methods with other proofing containers, like bread pans or glass bowls?
Yes, many of these methods can be adapted for use with other proofing containers like bread pans or glass bowls. Adjust the amount of flour, liner, or spray to suit the shape and material of your container.
Q9: Do these tricks work for gluten-free or alternative grain bread dough?
These tricks can also be applied to gluten-free or alternative grain bread dough. However, keep in mind that gluten-free dough may have different characteristics, so you might need to make some adjustments based on the specific recipe and flour blend you’re using.
Q10: How do I know when my Banneton basket needs to be replaced?
The lifespan of a Banneton basket depends on its quality and frequency of use. If you notice signs of wear and tear, such as cracks, fraying liners, or an inability to maintain its shape, it’s time to consider replacing it for the best results in your bread-making endeavors.
These frequently asked questions shed light on common concerns when it comes to using Banneton baskets and keeping dough from sticking. Armed with these answers, you can tackle any sticky situation that arises during your baking adventures and enjoy consistently excellent bread results. Happy baking!