Do your cakes sometimes end up with messy icing, leaving your creation less than perfect?
The simplest way to fix messed up icing on a cake is by smoothing it out with a hot spatula. Dip the spatula in hot water, wipe it dry, and gently glide it over the icing. The heat will help soften the icing, making it easier to smooth without damaging the cake.
Don’t fret over icing mishaps! Discover five straightforward techniques to rescue your cake’s appearance. From simple tricks to creative solutions, you’ll learn how to turn icing disasters into delectable masterpieces. So, if you’re tired of uneven frosting, join us as we unravel the secrets to picture-perfect cakes that taste as good as they look.
Smooth it Out
If you’ve ever found yourself staring at a cake with icing that’s gone all wonky, don’t worry – you’re not alone! Sometimes, despite our best efforts, icing can end up looking far from the polished perfection we had in mind. But fear not, because there are some super simple ways to fix that messed up icing and turn your cake into a treat that’s as pleasing to the eyes as it is to the taste buds.
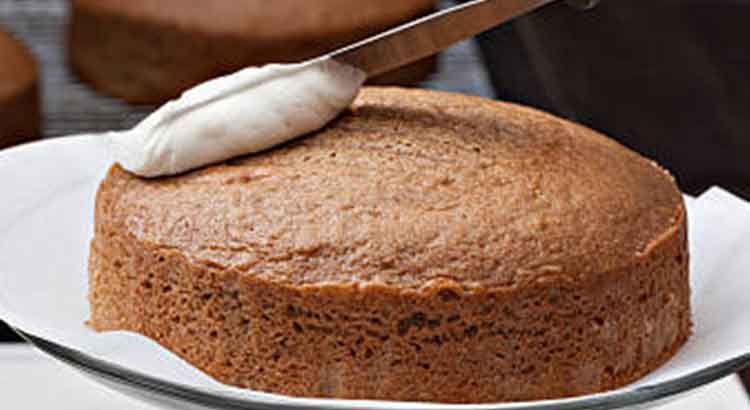
Hot Spatula Magic
One of the easiest tricks in the book is using a hot spatula to smooth out the icing. Here’s how you do it: dip a spatula in hot water, give it a quick wipe, and then gently glide it over the icing. The heat helps soften the icing, making it easier to smooth without messing up the cake underneath. It’s like a little spa day for your cake – relaxing and rejuvenating!
Chill and Repeat
Another handy method is to pop your cake in the fridge for a short while. This can help firm up the icing, making it less likely to wrinkle or tear when you try to fix it. Once it’s chilled, take it out and use a clean spatula to gently press and smooth the icing. If you find any gaps or uneven spots, don’t be afraid to add a bit more icing and work your magic until it’s all nice and even.
Texture Camouflage
Alright, let’s talk about texture camouflage – a clever way to mask those icing imperfections and give your cake a polished finish.
Embrace Texture
Instead of trying to make your cake look flawless, why not embrace a textured look? You can use a fork, a toothpick, or even a small offset spatula to create a deliberate texture on the icing. This not only hides any flaws but also adds a rustic charm to your cake. Plus, it’s a fun and artsy way to turn an oops into an opportunity.
Sprinkle Magic
Sprinkles, my friend, are a cake’s best ally. If your icing isn’t cooperating, sprinkle some edible decorations over it. Sprinkles, edible glitter, or even finely chopped nuts can work wonders in diverting attention away from the less-than-perfect spots. People will be too busy admiring the sparkles to notice any minor icing mishaps.
Decorative Elements
Now, let’s dive into the world of decorative elements – those little touches that can distract from icing woes and make your cake a true showstopper.
Fruit Fusion
Fresh fruits are like icing’s best friend. Place slices of strawberries, kiwi, or even a handful of berries strategically on top of the cake. The vibrant colors and natural beauty of the fruits draw the eye away from any icing issues. It’s like giving your cake a fruity makeover that’s as delightful to look at as it is to devour.
Candy Couture
Who can resist the charm of candy? Get creative with candy decorations. From colorful gummies to chocolate curls, these sweet additions can add a touch of whimsy to your cake and make everyone forget about any little icing mishaps. Just remember to place them strategically to create a visually appealing arrangement.
Start Over
Alright, let’s get real for a moment – sometimes the icing situation on your cake might be beyond a quick fix. When that happens, don’t be afraid to hit the restart button and start over. It’s not a failure; it’s a learning experience that can lead to a cake that’s even better than your original vision.
Stay Calm and Cake On
If you find that your icing has turned into a total disaster zone and none of the previous tricks are doing the trick, take a deep breath. It’s just cake, after all! Carefully remove the icing using a clean spatula or knife. If your cake can handle it, you can even give it a gentle rinse under cold water to start with a clean slate.
Fresh Start, Fresh Icing
Once your cake is clean and dry, whip up a fresh batch of icing. This time, you’ll have the advantage of experience, so you’ll likely do a better job. Take your time, spread the icing evenly, and use the techniques you’ve learned to create a beautifully decorated cake. Remember, practice makes perfect, and starting over is just another step on your baking journey.
Final Thoughts
And there you have it, dear baker! We’ve embarked on a journey to rescue icing mishaps and turn them into cake triumphs. Remember, the world of baking is filled with surprises, and not every masterpiece comes out of the oven looking picture-perfect. But that’s the beauty of it – the imperfections are what make each creation uniquely yours.
As you experiment with these five simple ways to fix messed up icing on a cake, don’t forget to have fun along the way. Baking is a delightful blend of science and art, and sometimes the best results come from a little creativity and a lot of love. Embrace the process, and don’t be discouraged by a wobbly icing or a bumpy texture. Your dedication to perfecting your cake-decorating skills will undoubtedly lead to sweet success.
So, whether you’re a novice baker or a seasoned dessert enthusiast, keep these techniques in your baking arsenal. The next time your icing decides to misbehave, you’ll know just what to do. Remember, it’s not just about fixing mistakes; it’s about transforming them into opportunities to showcase your creativity. Happy baking, and may your cakes always be as delightful to behold as they are to savor!
FAQ
Q: Can I fix icing that’s too thin or runny?
Absolutely! If your icing has a mind of its own and is sliding off the cake, don’t panic. Try adding a bit more powdered sugar to thicken it up. Start with small amounts and mix until you achieve the desired consistency. If you’ve added too much liquid, balance it out by adding more powdered sugar until your icing is back on track.
Q: My icing is too thick and won’t spread smoothly. What can I do?
No worries! If your icing feels like a stubborn lump and refuses to cooperate, a little milk or water can come to the rescue. Add tiny amounts at a time and mix well until your icing reaches a spreadable consistency. Patience is key here – go slow and steady to avoid over-thinning.
Q: Can I fix air bubbles in my icing?
Definitely! Those pesky air bubbles can be tamed. Gently tap the cake on a flat surface to encourage the bubbles to rise to the surface. Then, take a clean toothpick or a small needle and carefully pop the bubbles. Smooth the area with a clean spatula, and your icing will look as smooth as a calm pond.
Q: How do I prevent icing from sticking to my spatula?
A little non-stick magic can do wonders. Give your spatula a light coating of non-stick cooking spray or a thin layer of vegetable oil before you start smoothing the icing. This will help the spatula glide effortlessly, preventing any unwelcome tugging or lifting of your icing masterpiece.
Q: My cake is too warm, and the icing is melting. What should I do?
No need to sweat it! If your cake is a bit warm and your icing is turning into a puddle, simply pop the cake in the fridge for a short while. Let it cool down before you continue working on it. Cold cakes and room-temperature icing make for a much smoother decorating experience.
Q: Can I fix uneven icing edges?
Absolutely! Uneven edges happen to the best of us. Take a clean, damp paper towel and gently run it along the edges of the cake to smooth out any uneven spots. Your cake will look tidier, and no one will ever know about those little imperfections.
Q: How can I make sure my decorations stick to the icing?
Great question! To make sure your decorative elements stay put, consider using a tiny amount of icing as glue. Dab a bit of icing onto the back of the decoration and gently press it onto the cake. This adhesive icing will help your decorations adhere securely and prevent any unexpected sliding.
Q: My icing looks lumpy. How do I fix it?
Lumpy icing doesn’t have to be a disaster. If you’re dealing with lumps, give your icing a thorough whisk or run it through a fine mesh strainer. This will help break down any clumps and give you a smoother consistency to work with. Your cake will thank you for the smoother finish!
Q: Can I fix icing that’s gone too dark or too light in color?
Of course! If your icing hue didn’t turn out as expected, you have options. To lighten dark icing, add a touch of white icing and mix well. For icing that’s too light, gently incorporate small amounts of the desired color until you achieve the shade you’re aiming for. Remember, a little color adjustment can go a long way.
Q: How can I avoid getting crumbs in my icing while decorating?
Ah, the notorious crumbs! To keep those crumbs from sneaking into your icing, start with a thin layer of icing called a “crumb coat.” This initial layer seals in the crumbs, creating a smooth base. After the crumb coat sets, apply a thicker layer of icing for your final decoration. Crumbs begone!
There you have it – answers to some of the most common icing conundrums you might encounter. Baking is an adventure, and every mishap is a chance to learn and improve. Keep these solutions in mind, and remember that even the most seasoned bakers face challenges. So go ahead, don your apron, and let your creativity flow as you conquer the world of cake decorating!