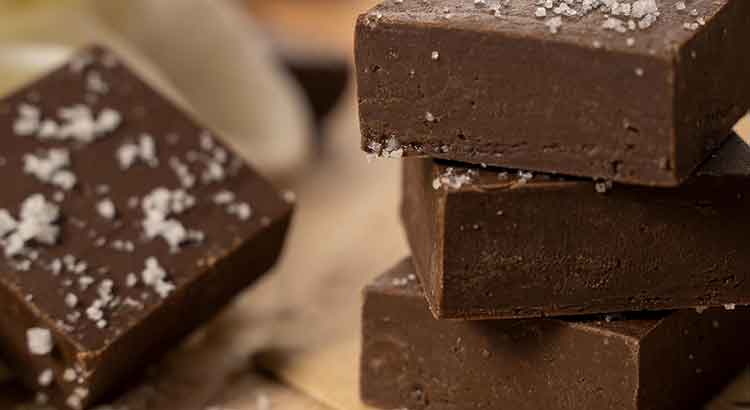
Do your homemade brownies sometimes come out too gooey, leaving you with a less-than-perfect treat? Have you ever wondered how to make them set faster for that irresistible chewy texture you crave? Well, worry not, because we’re about to dive into the sweet science of fudge setting.
The simplest way to speed up fudge setting is by chilling it in the refrigerator. Placing your freshly made fudge in the fridge helps it cool down and solidify more rapidly.
Are your taste buds already tingling at the thought of perfect fudge? From exploring cooling techniques to unveiling secret ingredients, we’re about to embark on a journey that will not only answer your pressing question but also reveal some delightful tricks to elevate your fudge-making game. Get ready to discover the art of achieving the ideal fudgy consistency that will have everyone asking for your secret recipe.
Refrigerate
When you’ve just whipped up a batch of delectable fudge and your anticipation is at its peak, waiting for it to set can feel like an eternity. Thankfully, there are a few nifty tricks to speed up the process without compromising on flavor and texture.
Pop that pan of freshly made fudge into the refrigerator. The cool environment works its magic by swiftly cooling down the fudge and encouraging it to solidify. Within a couple of hours, you’ll be savoring your delightful creation. The fridge becomes your ally, taking your fudge from gooey to fabulous in no time.
Freeze
Picture this: a plate of scrumptious fudge squares, ready to be devoured. But who wants to wait hours for the setting to complete? Here’s where your freezer steps in as the unsung hero. Tuck your fudge into the freezer, and within an hour or so, you’ll have firm and indulgent fudge pieces.
The freezer’s chilly embrace speeds up the setting process considerably. The rapid drop in temperature swiftly transforms the soft fudge into a delightfully firm treat. Just be cautious not to leave it in the freezer for too long, as overdoing it might compromise the texture and flavor you’ve worked so hard to achieve.
Cut into Smaller Pieces
Alright, let’s talk about the power of portioning. Your luscious fudge might be resisting the urge to set because it’s simply too thick. Don’t worry, you’ve got a solution right at your fingertips. Cut your fudge into smaller pieces! This allows more surface area to be exposed, which means quicker cooling and setting.
By slicing your fudge into bite-sized morsels, you’re giving them the chance to cool down evenly and efficiently. Think of it like this – a smaller piece has less fudge to solidify than a large slab. This method is especially handy if you’re in a hurry to dig into that sweet delight.
Cool Environment
Imagine a serene spot where your fudge can relax and set at its own pace. That spot? A cool room or area in your kitchen. Find a cozy nook away from direct sunlight, stovetop heat, and any heat-producing appliances. Your fudge adores a cool environment as much as you do on a breezy day.
Creating this cool zone helps your fudge solidify uniformly without any unwanted gooey surprises. Give it the peace and quiet it deserves, away from the hustle and bustle of the kitchen. This way, you’re ensuring that your fudge turns out just the way you envisioned – irresistibly firm and ready to melt in your mouth.
Use a Cooling Rack
Here’s a simple but effective hack to speed up fudge setting: introduce your fudge to a cooling rack. This handy tool works wonders by allowing air to circulate around your fudge, promoting faster cooling and solidification.
Place your freshly made fudge on a cooling rack, preferably one with closely spaced wires. Elevating your fudge ensures that air can reach both the top and bottom surfaces, encouraging even cooling. This means you’ll be diving into your fudgy treats sooner than you thought possible.
Spread Thinly
When it comes to fudge setting, thickness matters. If your fudge layer is too thick, it might take ages to set completely. The solution? Spread your fudge mixture thinly in your pan or dish. A thinner layer cools down faster and ensures that every bite has the perfect texture.
By spreading your fudge mixture thinly, you’re allowing heat to escape more efficiently, which aids in quicker cooling. Plus, you’re providing a favorable environment for your fudge to achieve that coveted firmness. So grab your spatula, spread that mixture evenly, and get ready to enjoy your delicious creation sooner than ever.
Refrigerate and Freeze Alternating
Here’s a nifty trick that’s like a tag team for your fudge: the alternating chill method. It’s simple and effective. Start by refrigerating your fudge for a short while, maybe around 30 minutes. This initial stint in the fridge jumpstarts the cooling process.
After that, move your fudge to the freezer for about 15-20 minutes. The sudden switch to the icy cold environment aids in rapidly firming up the outer layer. Then, back to the fridge it goes for another round of cooling.
This alternating pattern of refrigerating and freezing takes advantage of the unique benefits of each environment. The fridge provides a gentle, overall chill, while the freezer’s intense cold quickly tackles the outer layers. This one-two punch expedites the setting process, giving you the best of both worlds in fudge perfection.
Final Thoughts
And there you have it, fellow fudge enthusiasts! We’ve taken a delightful dive into the world of fudge setting and discovered some ingenious ways to speed up the process. Whether you’re craving that perfect chewy texture or simply can’t wait to share your delicious creations, these tricks are here to save the day.
From the trusty refrigerator and freezer to the art of portioning and spreading, each method we explored offers a unique approach to achieving fudge perfection in record time. While some might prefer the straightforwardness of chilling, others might find solace in the alternating embrace of the fridge and freezer.
Remember, these methods aren’t just about speed – they’re about enhancing your fudge-making experience. As you experiment with these techniques, you’ll find the ones that align with your personal preferences and kitchen setup. So whether you’re a novice in the world of fudge or a seasoned pro, these tricks are sure to elevate your creations.
As you embark on your fudge-making adventures, don’t hesitate to mix and match these methods or even come up with your own variations. The joy of fudge isn’t just in the eating; it’s also in the process of crafting something delightful and sharing it with loved ones. So, grab your apron, gather your ingredients, and let the journey to the perfect fudge commence. Happy fudge making!
FAQ
Q: Can I use the microwave to speed up fudge setting?
A: While the microwave might seem like a convenient option, it’s not the best choice for setting fudge. Microwaves can heat unevenly and might cause your fudge to melt or develop unwanted textures. Stick to the tried-and-true methods we’ve discussed for the best results.
Q: How do I know if my fudge is ready to be cut?
A: Patience is key here. Gently touch the surface of your fudge – it should feel firm but still have a slight give. You don’t want it to be rock-hard. Once it reaches this point, it’s ready to be cut into delectable squares of delight.
Q: Can I speed up fudge setting by adding more sugar or butter?
A: It might be tempting to tinker with the ingredients, but altering the sugar and butter ratio could affect the overall texture and taste of your fudge. Stick to the methods we’ve shared for a foolproof way to achieve perfect fudge every time.
Q: Can I use a fan to cool down my fudge faster?
A: Absolutely! A fan can help circulate air in the room, expediting the cooling process. Just make sure your fudge is covered to prevent any unwanted particles from landing on its surface. This method can work wonders alongside the techniques we’ve explored.
Q: My fudge turned out too soft even after trying these methods. What should I do?
A: Don’t fret! If your fudge didn’t set as expected, you can salvage it. Place the fudge back in the fridge or freezer for additional cooling time. If it’s still not cooperating, consider using it as a delectable topping for ice cream or as a delicious dip for fruits. There’s always a way to turn your kitchen experiments into something delightful.
Q: Can I use a hairdryer to speed up fudge setting?
A: While it might sound creative, a hairdryer can introduce unwanted moisture and uneven heat, leading to unpredictable results. It’s best to rely on the methods we’ve covered to ensure a consistent and delicious outcome.
Q: Can I eat the fudge before it’s completely set?
A: It’s hard to resist, we know! But allowing your fudge to set completely ensures the best texture and flavor. Cutting into fudge that’s still too soft might result in a messy experience. Exercise a little patience, and you’ll be rewarded with perfect squares of fudge goodness.
Q: How long does fudge last once it’s set?
A: Properly stored in an airtight container, fudge can last up to two weeks at room temperature. If you want to keep it even longer, store it in the fridge or freezer. Just make sure to label and date your containers so you can enjoy your fudge without worry.
Q: Can I speed up fudge setting by using a dehumidifier?
A: While a dehumidifier can help reduce moisture in the air, it might not have a significant impact on fudge setting time. Stick to the methods we’ve discussed, as they’re specifically tailored to encourage efficient and even cooling.
Q: Can I use these methods for all types of fudge?
A: Absolutely! Whether you’re making classic chocolate fudge, creamy peanut butter fudge, or even unique fruit-infused variations, these methods can be adapted to suit any fudge recipe. The principles of cooling and setting remain consistent across different flavors and ingredients.
We hope these FAQs have answered some of your burning questions about fudge setting. Now armed with these insights, you’re ready to create fudge that’s not only irresistibly delicious but also perfectly set. Happy fudge making!