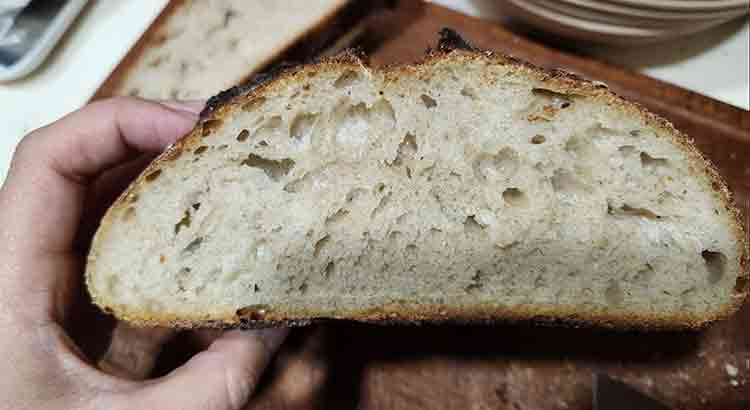
Gummy bread is a very common problem among new bakers that are just starting to make their own bread at home. And it can be a very frustrating one, since it’s impossible to tell until it’s out of the oven, at which point you were most likely thrilled by the way your bread looked and you were ready to taste it. So, why did it happen?
The most common reason why a bread becomes gummy is an overdeveloped gluten network which can be caused by excessive kneading or using the wrong flour type.
But that is not the only thing that can cause a gummy bread, other possibilities are not letting the bread rest after shaping it, wrong baking time and temperature, or simply not letting the bread cool off completely. Now, let’s take a look at each problem and see what you can do to fix it and prevent it.
The Gluten Network
When it comes to the texture of a bread, most problems are in one way or another tied to the gluten network.
A proper gluten network will allow the bread to properly expand while rising, keep its shape while baking and have a nice crumb. While an underdeveloped or overdeveloped gluten network won’t be able to properly keep its shape, it will be difficult to work with and the final texture of the bread will be gummy.
The most common mistake is over kneading the dough. Doing so will result in a gummy bread. If you overdevelop the gluten, the dough will become rubbery, and it will hold the interior of the bread glued together, instead of letting it expand. And, in the end you will be left with a dense, gummy and uncooked bread. So how do we avoid this?
Most recipes will tell you to knead the dough for a certain time, or using a certain method. But there is a problem with this, and that is that everybody moves at a different speed and applies a different pressure. So a dough that I’ve kneaded for 10 minutes won’t be the same as the dough that you’ve kneaded for 10 minutes, the gluten might be stronger or weaker.
So time is not a good way to tell if the gluten is properly developed. Instead you should use the windowpane test.
Windowpane Test

This is a very simple test that will tell you if you’ve kneaded your dough enough.
Take a small piece of dough and gently start stretching it out, and see if you can obtain a slightly transparent layer in the middle. If you can then you’ve kneaded the dough perfectly.
If the dough breaks too easily it means that you have to knead it a little more.
If the dough is too hard to stretch, and when you finally manage to stretch it breaks, it means that you’ve over kneaded and you need to start all over.
And here is a video showing how you can do this test:
Flour Type
Gluten is formed when you combine water with flour. SO, as you can imagine the type of flour that you use will have a huge impact on the strength of the gluten, and by extent the texture of your bread.
Flour is separated into different categories using a rating system. One problem with the rating system is that it’s not uniform worldwide, a lot of countries have their own, including the US, Italy, as well as France and Germany, and a few more. Here is the rating system, with the different names each country has for the flour types, and what that actually means.
| Ash Content | Protein | US | Italian | French | German |
| 0.4% | 9% | Pastry Flour | 00 | 45 | 405 |
| 0.5% | 11% | All-Purpose Flour | 0 | 55 | 550 |
| 0.8% | 14% | High Gluten Flour | 1 | 80 | 812 |
| 1% | 15% | First Clear Flour | 2 | 110 | 1050 |
| 1.5% | 13% | Whole Wheat Flour | Faina Integrale | 150 | 1700 |
In the US you will most likely see the US grading system, but it’s not uncommon to see some manufacturers use a different label just because 00 flour can sound fancier than pastry flour.
But regardless of what system you are using to rate the flour, you have to know that there are differences between a flour rated 00 and another rated 0. The biggest one is how fine the flour is 00 being the finest one of them all.
How fine the flour is ground will have a huge effect on how much water it can absorb and what texture your bread will have.
If a recipe calls for 100 grams of all purpose flour and you are using pastry flour, it’s like you will only be using around 80 grams of all purpose flour, and this difference will completely change the recipe.
Another big important difference is the protein content. The table that I showed you contains the average, but some flour will have more or less proteins, this is because different manufacturers have different grain sources, grown in different conditions. The amount of protein in a flour can greatly influence how much water the flour can absorb.
Different flour types can absorb different quantities of water. This is why I would suggest you stick to all purpose flour, also known as 0 flour, this is the type that is usually used for bread. Unless the recipe specifically calls for a different type of flour.
Not Enough Rest Time After Shaping
Another common cause of gummy bread is not letting the bread rest enough after shaping.
Shaping the bread is more or less the same thing as kneading it, the only difference is that you are not kneading it into a ball, but into a bread. This means that you are activating the gluten in the dough, and this makes it less and less elastic. To the point that instead of expanding, it will break.
While in the oven the bread has one final rise, and if the gluten is not able to expand properly, the inside of the bread will collapse, which will make it dense, spongy and hard to bake.
The only way to prevent this from happening is to let the bread rest after shaping it. But be careful, if you let the dough rest for too long, the gas inside the bread that makes it grow will completely escape, which will leave you with a bread that is unable to rise. So, how can you know if the dough has rested enough? Simply by poking it.
The Poke Test
This is extremely simple, you just have to slightly poke your dough and see how it reacts.
- If the dough bounces back quickly it still needs some more time to rest.
- If the dough slowly gets back to its original shape, then it sat for long enough, and it’s time to put it in the oven.
- If the dough doesn’t get back to its original shape, it means that it spent too much time resting and you should make a new one.
Baking Time and Temperature
All the hassle that we’ve been through with the gluten will be for nothing if the baking temperature and time are not correct.
First thing, first. All ovens are different, even if two ovens are the exact same model and have been bought at the same time, after a year or so the temperatures in them will differ, whether they are electric or run on gas. This is why the first thing that you need when you want to bake is an oven thermometer. They are inexpensive and will show you the exact temperature in your oven.
Now that we got this covered let’s talk about the exact temperature that you need.
Temperature
There are hundreds of different types of breads, and countless recipes out there. But all of them fall in two categories: enriched bread, that has sugar, oils, fats or egg inside its composition, and classic bread, that is made only using flour, water, and yeast.
Classic bread should be baked at 410°F (210°C). At this temperature the bread should bake perfectly in the middle.
Enriched bread should be baked at 350°F (175°C). The extra ingredients in enriched bread have a slightly lower tolerance to what, so if you were to use the same temperatures that you would use on classic bread, the enriched bread will get burnt.
One thing to remember is that once you open the oven door the temperature will suddenly drop. So when you preheat the oven, you should set it to a higher temperature than the one at which you will bake the bread, and only after the bread is in you should drop it to the baking temperature.
Time
Now that we know the temperature at which you should bake, let’s discuss time.
Unlike temperature, time will vary depending on a lot of things, but the most significant one is the size of the loaf. The bigger the loaf, the more time it should spend in the oven.
So, as you can imagine it can be quite hard to give an exact amount of time. But luckily you don’t need to know an exact amount of time, because you can easily check if your bread is ready or not by using a simple thermometer.
Unlike the oven thermometer, you will need one that is able to read the interior temperature, so one that has a metal road with which you can poke the bread. If you don’t have one, here is a link to the one that I’ve been using for the past few years: ThermoPro TP-16.
To check if your bread is done simply stick the metal road in the bread and push it until you reach the middle of the bread. And give it a few seconds until the thermometer starts beeping, this means that it managed to get an accurate reading. If you use one with a metal wire like I do, you can even close the door of the oven so you don’t lose any heat.
A fully baked bread will have a temperature between 350 and 390°F (180 and 200°C). If the thermometer shows a temperature like that you can take the bread out.
Let Your Bread Cool Down
Right after you take the bread out of the oven there is a good chance that you see steam coming out of the bread. That steam is nothing else but water heated up. And if you stop the cooking process right now by slicing the bread, all that water will remain in the bread and it will make it gummy.
Bread is not actually fully cooked once you take it out of the oven. But you can’t leave it in the oven any more either, because it will burn.
But remember that you took the bread out when its interior temperature was between 350 and 390°F (180 and 200°C), there are foods that are cooked at those temperatures. And that is exactly what is happening to the interior of the bread right now. It’s still baking.
The interior of the bread gets only partially baked in the oven, a significant portion of the baking process takes place outside of the oven while the bread is cooling down. This is why you shouldn’t cut the bread as soon as you take it out of the oven, or try to hurry the cooling process by placing it by the window, or somewhere cold.
Overall I would say that the best thing that you can do is to let the bread reach room temperature and only then slice it and eat it. I know that this can be hard to do, but it’s crucial that you let the bread cool down for at least one hour, from what I’ve noticed that is the minimum amount of time that you should let your bread cool down.
Final Thoughts
Gummy bread is one of the biggest letdowns, and it can be quite common when you are just starting out. But now, after we covered all the things that caused it, you should be able to avoid it completely.
As I’ve said, the most common cause is an overdeveloped gluten network, which can be caused by over kneading, using the wrong four types, or by simply not letting the bread rest enough. But all of those problems can be solved by two simple tests, the windowpane and poke test, and by sticking to all purpose flour.
Baking time and temperature are also common problems, but as you’ve seen they can be easily solved by using thermometers.
And of course, the most difficult part is waiting for the bread to cool off. But as we’ve discussed the baking process is not over the moment you take the bread out of the oven. SO make sure that you wait at least one hour before you slice up the bread.