Do you love baking sourdough bread but wonder if bleached flour will work for your starter? The answer is yes, but there’s a crucial step to ensure success! By combining bleached flour with whole wheat flour, you provide your starter with the essential nutrients and microorganisms it needs to thrive. Let’s find out how to create a lively and flavorful sourdough starter using this simple technique.
Yes, you can use bleached flour for your sourdough starter, but start by mixing it with whole wheat flour. Bleached flour alone lacks the wild yeast and bacteria necessary for fermentation. The combination of both flours jumpstarts the process, setting your starter up for success. As your starter grows stronger, you can gradually transition to using only bleached flour if you prefer.
But wait, there’s more! In this article, we’ll explore other key factors to maintain a healthy sourdough starter, such as switching to unbleached flour later, allowing longer fermentation times, and using unchlorinated water. Plus, we’ll address common questions to guide you on your sourdough journey. So let’s get started and unlock the secrets to perfecting your homemade sourdough bread!
Combine Bleached Flour with Whole Wheat Flour
To ensure a successful and healthy starter, it’s essential to combine the bleached flour with some whole wheat flour. This combination will provide the necessary nutrients and microorganisms needed for the fermentation process.
The reason we mix bleached flour with whole wheat flour is that bleached flour alone lacks the natural wild yeast and bacteria present in whole wheat flour. Whole wheat flour contains bran and germ, which are rich in the beneficial microorganisms needed to kickstart the fermentation process. By adding whole wheat flour to the mix, you introduce these friendly critters to the bleached flour, giving your sourdough starter a better chance of thriving.
When combining the flours, start with equal parts of bleached flour and whole wheat flour. As your starter progresses, you can gradually increase the proportion of bleached flour to your liking. The goal is to have a well-established and active starter before transitioning to bleached flour entirely.
Switch to Unbleached Flour Later
While you can begin your sourdough journey with bleached flour, it’s advisable to switch to unbleached flour as you maintain and feed your starter over time. Unbleached flour is a healthier option for your starter because it retains the natural nutrients and microorganisms that are beneficial for fermentation.
As your starter becomes more robust and stable, you can make the transition to unbleached flour. The process is simple—just replace the bleached flour in your feedings with unbleached flour. Continue with regular feedings and discard a portion of the starter as needed to keep it thriving.
By making this switch, you ensure that your sourdough starter has access to a wider range of nutrients and microbial diversity, resulting in a more flavorful and active starter.
Keep on reading for some essential tips to maintain a successful sourdough starter!
Allow Longer Fermentation Time
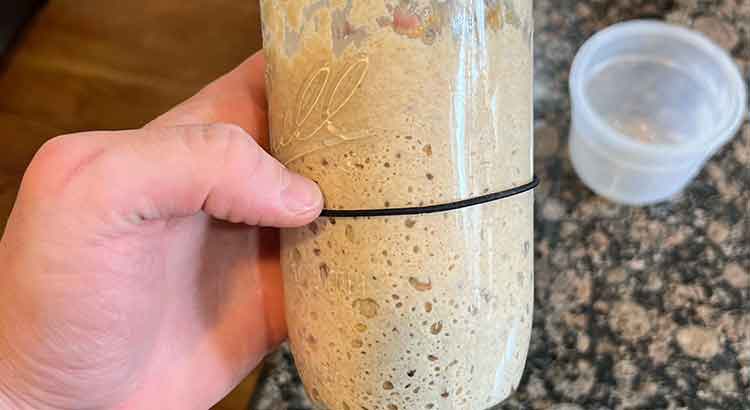
A longer fermentation time can work wonders for your sourdough starter. Once you’ve begun the process with the bleached flour and whole wheat flour mixture, you’ll notice that your starter might take a little longer to rise and show signs of fermentation compared to starters made with unbleached flour. This is entirely normal.
Be patient and give your starter the time it needs to develop and mature. As the microbial population increases and becomes more active, you’ll see a faster rise and more reliable fermentation. The extra time invested in the initial stages will pay off in the long run when you have a robust and flavorful sourdough starter.
Consider Adding Some Fruit or Raisins
If you want to give your sourdough starter a boost, consider adding some fruit or raisins to the mixture. Fruits like organic grapes or dried raisins contain natural yeasts on their skins, which can further enhance the fermentation process.
To do this, take a small piece of fruit or a few raisins and rinse them thoroughly to remove any chemicals or residues. Crush the fruit lightly and add it to your flour and water mixture when you feed your starter. The natural yeasts from the fruit will contribute to the growth of the starter’s wild yeast population, resulting in a more dynamic and flavorsome sourdough starter.
Use Unchlorinated Water
Water quality plays a vital role in the health of your sourdough starter. Chlorinated water can hinder the growth of the beneficial microorganisms in the starter. Therefore, it’s best to use unchlorinated water when feeding and maintaining your starter.
If your tap water is chlorinated, you can dechlorinate it by leaving it out in an open container for at least 24 hours before using it to feed your starter. Alternatively, you can use bottled spring water or water that has been passed through a water filter to remove chlorine.
Maintain Regular Feedings
Consistency is key when it comes to maintaining a healthy sourdough starter. Regular feedings ensure that your starter receives the nutrients it needs to thrive and produce delicious bread.
Feed your starter at least once every 24 hours, or even twice daily if necessary, especially during the initial stages. As your starter becomes more established, you can adjust the feeding schedule based on its activity level and the room temperature.
Remember to discard a portion of your starter before each feeding to prevent it from outgrowing your container and to maintain the right balance of yeast and bacteria.
Final Thoughts
I know that it might have seemed a bit daunting at first, but don’t worry, you’ve got this! By combining these flours, you gave your starter the best chance to thrive and become a bread-making powerhouse.
Remember, patience is the key to success in the sourdough journey. As you transition from bleached flour to unbleached flour and continue with regular feedings, you’ll witness the magic of fermentation and experience the delightful flavors that only homemade sourdough can offer.
So, don’t be disheartened if your starter takes a little longer to rise at first or if you encounter some hiccups along the way. Embrace the process, experiment with different techniques, and enjoy the learning experience. Sourdough baking is as much an art as it is a science, and with each loaf you make, you’ll gain valuable insights and skills.
As you embark on this bread-making adventure, don’t forget to have fun! Get creative with your recipes, play around with different flours and add-ins, and share your delicious creations with friends and family. The joy of baking goes beyond the final product—it’s about the journey, the satisfaction of creating something from scratch, and the sense of accomplishment when you pull that perfectly crusty and flavorful sourdough loaf out of the oven.
So, keep on feeding and nurturing your sourdough starter, and before you know it, you’ll have a loyal kitchen companion that will provide you with delicious bread for years to come. Happy baking, and may your sourdough adventures be filled with warmth, delicious aromas, and the joy of sharing your homemade creations with your loved ones. Bon appétit!
FAQ
Q: Can I use only bleached flour for my sourdough starter?
A: While it is possible to use only bleached flour for your sourdough starter, it’s not recommended. Bleached flour lacks the natural wild yeast and bacteria found in whole wheat flour, which are essential for kickstarting the fermentation process. To give your starter the best chance to succeed, start with a mixture of bleached flour and whole wheat flour. This combination provides the necessary nutrients and microorganisms that will help your starter thrive. Once your starter is well-established and active, you can gradually transition to using only bleached flour if you prefer.
Q: How long does it take to create a sourdough starter?
A: Creating a sourdough starter requires patience and time. The initial fermentation process can take anywhere from 5 to 7 days, but sometimes it might take longer, depending on factors like room temperature and the presence of natural yeasts in your environment. Remember, sourdough baking is an art, not an exact science. It’s normal for your starter to go through different phases of activity during this time. The key is to observe the changes, keep feeding it regularly, and be patient. Once your starter is consistently doubling in size within 4-6 hours after feeding, it’s a sign that it’s ready to be used for baking.
Q: Can I use tap water to feed my sourdough starter?
A: Using tap water to feed your sourdough starter is generally fine, but it’s essential to consider the water quality. If your tap water is chlorinated, it can hinder the growth of beneficial microorganisms in the starter. To ensure a healthy environment for your starter, use unchlorinated water. If your tap water is chlorinated, you can dechlorinate it by leaving it in an open container for at least 24 hours before using it for feedings. Alternatively, you can opt for bottled spring water or use water that has been passed through a water filter to remove chlorine.
Q: My sourdough starter isn’t rising much. What should I do?
A: Don’t worry; this is entirely normal, especially in the early stages of creating a sourdough starter. The fermentation process might take some time to get going, especially if you are using bleached flour. Be patient and continue with regular feedings. You can also try placing your starter in a slightly warmer spot, as warmer temperatures can encourage yeast activity. Another helpful tip is to incorporate some fruit or raisins into your feedings. The natural yeasts on the fruit’s skins can give your starter a boost and help with the rising process.
Q: How often should I feed my sourdough starter?
A: Regular feedings are crucial to maintaining a healthy and active sourdough starter. In the initial stages, feed your starter at least once every 24 hours or even twice daily if needed. As your starter becomes more established and active, you can adjust the feeding schedule based on its behavior and the room temperature. It’s also essential to discard a portion of your starter before each feeding to prevent it from outgrowing its container and to maintain the right balance of yeast and bacteria.
Q: Can I use my sourdough starter straight from the refrigerator?
A: While you can use your sourdough starter directly from the refrigerator, it’s best to allow it to come to room temperature and feed it before using it for baking. Cold temperatures slow down the fermentation process, so warming up your starter and providing it with fresh food will ensure it’s lively and active for your baking endeavors.
I hope these frequently asked questions have provided you with valuable insights into creating and maintaining a thriving sourdough starter. Remember, sourdough baking is a delightful journey of discovery, experimentation, and satisfaction. Don’t be afraid to try different flours, hydration levels, and baking techniques. With time and practice, you’ll become a skilled sourdough baker, delighting in the flavors of homemade bread straight from your oven. Happy baking!