Do your loaves sometimes come out tougher than you’d like? Wondering if you can over-knead dough by hand? Let’s unravel the mystery of kneading and its effects on your baked goods!
The simplest way to avoid over kneading dough is by paying attention to the texture. Knead until the dough is smooth, elastic, and slightly tacky, but not overly sticky. This usually takes about 8-10 minutes of kneading by hand. Over-kneading can lead to tough, dense results, so don’t overdo it!
From the magic of mixing flour and water to the tender, golden crusts that emerge from your oven, there’s a lot more to kneading than meets the eye. In this step-by-step guide, we’ll uncover the secrets of kneading dough by hand, ensuring your loaves and buns turn out just the way you want them – soft, fluffy, and oh-so-delicious! So, let’s roll up our sleeves and dive into the world of dough-making together!
Step-by-Step Beginners Guide to Avoid Over Kneading
Understanding the Dough’s Texture
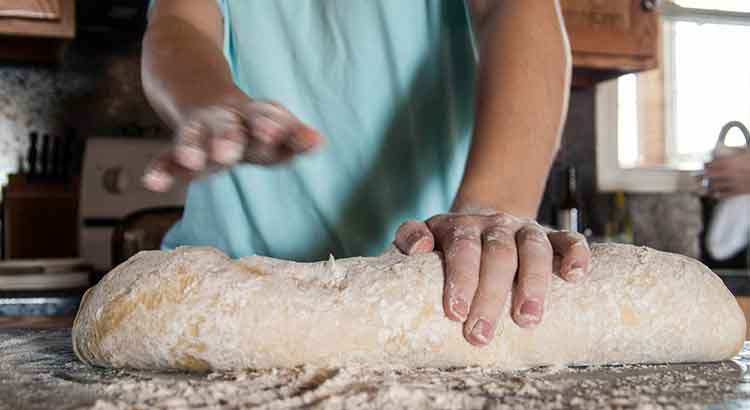
When it comes to kneading dough by hand, texture is key. You’re aiming for a dough that’s smooth, elastic, and just a bit tacky. The process typically takes around 8-10 minutes. If the dough feels overly sticky or starts to tear, you might be overdoing it. Remember, we’re after that sweet spot – a dough that’s well-kneaded but not overworked.
Finding the Right Amount of Flour
It’s tempting to add more flour if the dough feels sticky, but be cautious. Adding too much can lead to a tough, dry result. Instead, sprinkle a small amount of flour onto your work surface and hands. This will prevent sticking without altering the dough’s consistency. Patience is key here; a little flour goes a long way.
The Fold and Push Technique
This simple technique is a game-changer for kneading. Start by folding the dough in half, then use the heel of your hand to push it away from you. Rotate the dough a quarter turn and repeat. This motion helps distribute the yeast and develop gluten evenly. Remember, it’s about the motion, not the force. Gentle yet deliberate movements are your best friend.
Keeping an Eye on the Clock
While kneading, it’s easy to lose track of time. Set a timer for 8 minutes and give yourself a break. This ensures you don’t over-knead in the heat of the moment. Trust the process and let the timer be your guide. You’ll be rewarded with beautifully textured dough that’s ready to rise and bake to perfection.
The Windowpane Test
This nifty trick is a reliable indicator of well-kneaded dough. After kneading, take a small piece and gently stretch it between your fingers. If it forms a thin, translucent “windowpane” without tearing, you’re good to go. If it tears, give the dough a bit more love. This test ensures your dough has reached its full potential.
Embracing Rest and Relaxation
Just like us, dough needs a breather. After kneading, let it rest in a lightly oiled bowl, covered with a damp cloth. This step allows the gluten to relax, making the dough easier to shape and ensuring a tender end result. Give it the time it deserves, and you’ll be rewarded with baked goods that are a delight to the senses.
Additional Tips
Trust Your Senses
Baking is as much about touch and feel as it is about following a recipe. Trust your senses – the texture of the dough, its elasticity, and even the way it responds to your touch. Paying attention to these cues will guide you in achieving the perfect dough consistency.
Adjusting for Humidity
Humidity levels can greatly affect dough. On humid days, you may need to use slightly less liquid, and on dry days, a touch more. Don’t be afraid to make small adjustments as you go. Experience and intuition are your best allies in the kitchen.
Practice Makes Perfect
Like any skill, kneading improves with practice. Don’t be disheartened if your first attempts don’t yield the results you desire. Keep at it, and soon you’ll develop a feel for the dough that’s uniquely yours. Each batch you make brings you one step closer to becoming a confident kneading pro.
Experiment with Flours
Different types of flour yield different textures and flavors in your baked goods. Try using whole wheat, rye, or spelt flours to add depth and character to your creations. Just remember to adjust your kneading technique accordingly, as these flours can behave differently.
Embrace the Imperfections
Not every loaf will turn out picture-perfect, and that’s perfectly fine. Embrace the quirks and imperfections that come with handmade bread. They add character and charm to your creations. Remember, it’s the love and care you put into your baking that truly shines through.
Listen to Your Dough
Yes, you can actually listen to your dough! As you knead, you’ll notice a rhythmic slapping sound. This is a sign that the dough is reaching the desired consistency. It’s a small but satisfying indicator that you’re on the right track.
Clean as You Go
A tidy workspace is a happy workspace, especially when it comes to baking. Clean up any excess flour or dough bits as you go along. This not only keeps your work area organized but also prevents stray bits from getting mixed into your dough.
Don’t Rush the Rising
After kneading, allow the dough to rise in a warm, draft-free place. This is where the magic happens. Be patient and let nature take its course. Rushing this step can result in a less-than-ideal texture.
Trust Your Instincts
In the end, trust yourself. You know your dough better than any recipe. If it feels right, it probably is. Baking is a blend of science and art, and your intuition plays a crucial role in creating that perfect loaf.
Final Thoughts
Kneading dough by hand is a satisfying and timeless practice that connects us to the heart of baking. It’s a tactile experience that allows us to truly understand the transformation of simple ingredients into something magical. Through this journey, we’ve explored the nuances of texture, the art of adjustment, and the importance of trust in our senses. Remember, perfection isn’t the goal; it’s the love and care you infuse into each knead that makes your creations special.
As you embark on your dough-kneading adventures, embrace the learning process. Each batch is a step towards mastery, and every loaf tells its own story. From adjusting for humidity to listening to the rhythmic beat of your dough, you’ve gathered a repertoire of skills that will serve you well in your baking endeavors. So, take a deep breath, flour-dusted hands and all, and revel in the joy of creating something with your own two hands.
In the world of baking, there’s a unique satisfaction in knowing that you’ve played a pivotal role in the creation of your culinary delights. Whether it’s a rustic loaf of bread or tender rolls for a special occasion, the act of kneading connects us to a tradition that spans generations. So, with these newfound skills and a touch of intuition, go forth and let your creativity flow. Let the scent of freshly baked goods fill your kitchen, and know that with each knead, you’re leaving a mark on the world of homemade delights. Happy baking!
FAQ
Q: How do I know if I’ve over-kneaded the dough?
A: Over-kneading is a common concern, but it’s not as mysterious as it may seem. If your dough feels tough, dense, and has a lack of elasticity, it’s a sign of over-kneading. Additionally, if the dough tears easily or becomes excessively sticky, you might have gone a bit too far. Trust your instincts and remember, a slightly under-kneaded dough is always preferable to an overworked one.
Q: Can I salvage over-kneaded dough?
A: Yes, there’s hope! If you’ve realized you’ve over-kneaded, don’t panic. The best approach is to let the dough rest for an extended period. This allows the gluten to relax and may help improve the texture. If possible, give it a second, gentler knead after the resting period. However, be mindful not to overdo it again.
Q: Is it possible to under-knead dough?
A: Absolutely. Under-kneading can result in a dough that lacks structure and may not rise properly. It’s important to strike a balance. If your dough is still shaggy and rough after kneading, it’s a sign that it needs a bit more attention. Remember, practice and observation are your best guides to achieving the perfect texture.
Q: How does humidity affect the dough kneading process?
A: Humidity plays a significant role in baking. On humid days, the dough tends to absorb more moisture from the air, which can make it stickier. In contrast, dry conditions can cause the dough to be drier and harder to work with. Keep an eye on the dough’s consistency and adjust the flour or water accordingly. It’s a dance that requires a bit of flexibility.
Q: Can I use different types of flour for kneading?
A: Absolutely! Different flours bring their own unique flavors and textures to the table. Whole wheat flour, for example, adds a hearty, nutty flavor, while rye flour lends a distinct character. Just remember that different flours may require adjustments in kneading time and moisture levels. Embrace the experimentation and let your taste buds guide you.
Q: How long should I let the dough rise after kneading?
A: The rising time can vary depending on the recipe and the type of dough you’re working with. On average, allowing the dough to rise for about 1 to 2 hours in a warm, draft-free environment should suffice. Keep an eye on its size – it should roughly double in volume. Remember, patience is key in the rising process.
Q: Can I knead dough with a stand mixer or a food processor?
A: Absolutely, especially if you’re short on time or prefer a more hands-off approach. Both stand mixers and food processors come equipped with dough hooks that can do the job efficiently. Just be mindful to start on a low speed and gradually increase. It’s important to keep an eye on the dough’s texture, as these machines can be quite powerful.
Q: Can I freeze dough after kneading?
A: Indeed, freezing dough after kneading is a convenient way to have fresh-baked goods on hand whenever you need them. After kneading, shape the dough into portions, wrap them tightly in plastic wrap, and store them in a freezer-safe container. When you’re ready to use it, allow it to thaw in the refrigerator overnight, then proceed with the recipe as usual.
With these FAQs, you’re armed with answers to common dough-kneading queries. Remember, baking is as much about intuition as it is about following instructions. Trust your instincts, and let the dough guide you. Happy baking!