Do you love baking pies but find yourself wondering how long your pie dough will stay fresh in the fridge?
You can’t add more water to dough after it rises; what you can do instead is make adjustments to the dough’s consistency before it rises. This prevents over-hydration and ensures a perfect bake.
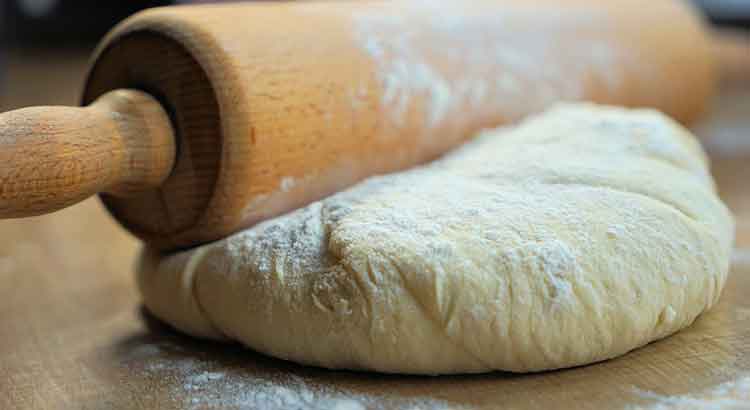
Are your baking experiments sometimes met with less-than-ideal results? Whether you’re a novice or a seasoned baker, understanding the science behind dough hydration is crucial for achieving that perfect texture and flavor. In this article, we’ll delve into the dos and don’ts of dough hydration, equipping you with the knowledge to elevate your baking game to a whole new level.
Do you love baking pies but find yourself wondering how long your pie dough will stay fresh in the fridge?
You can’t add more water to dough after it rises; what you can do instead is make adjustments to the dough’s consistency before it rises. This prevents over-hydration and ensures a perfect bake.
Are your baking experiments sometimes met with less-than-ideal results? Whether you’re a novice or a seasoned baker, understanding the science behind dough hydration is crucial for achieving that perfect texture and flavor. In this article, we’ll delve into the dos and don’ts of dough hydration, equipping you with the knowledge to elevate your baking game to a whole new level.
Proper Kneading
When it comes to dough hydration, proper kneading is another essential factor. Kneading is not just about mixing ingredients; it’s about developing gluten and ensuring that the water is evenly distributed. If you find your dough is too dry during the kneading process, resist the temptation to add more water directly.
Instead, wet your hands slightly or dip them in water, and then continue kneading. This small adjustment can help redistribute moisture without over-hydrating the dough. Conversely, if your dough is too sticky, lightly flour your hands and the work surface to prevent sticking while kneading. It’s all about finding that delicate balance.
Humidity and Flour Type
The environment in which you bake plays a significant role in dough hydration. Humidity levels can vary greatly, affecting how your flour absorbs moisture. On a humid day, your flour may absorb more moisture from the air, making your dough feel stickier. Conversely, in dry conditions, your flour may not absorb as much moisture, resulting in a drier dough.
Additionally, the type of flour you use matters. Different flours have varying absorption rates due to their protein content. Bread flour typically absorbs more water than all-purpose flour. Understanding your flour’s characteristics and adjusting your recipe accordingly can make a world of difference in your dough’s hydration.
Resting and Folding
Resting and folding are two more techniques that can help you achieve optimal dough hydration. After your initial mixing and kneading, allow the dough to rest for a while, typically 20-30 minutes. This rest period, known as the bulk fermentation stage, allows the flour to fully absorb water and helps relax the gluten, making the dough more manageable.
During bulk fermentation, consider employing a folding technique. Gently fold the dough over itself, like folding a letter, at intervals of 30 minutes to an hour. This process redistributes the moisture evenly throughout the dough, ensuring that every part is properly hydrated. It also helps develop a stronger gluten structure, leading to better texture and rise in your baked goods.
Proper Measurement
Finally, let’s talk about the importance of proper measurement. Precision matters when it comes to baking, especially in terms of flour and water. Use a kitchen scale to measure your ingredients by weight rather than volume whenever possible. This ensures accuracy and consistency in your recipes.
Remember that flour can settle and become compacted in a measuring cup, leading to inaccurate measurements. If you must use volume measurements, fluff the flour in the container and then spoon it into your measuring cup, leveling it off with a flat edge. This will help you avoid using too much or too little flour, which can drastically affect dough hydration.
Start Over
Sometimes, despite your best efforts, you might still end up with dough that’s either too dry or too sticky. If this happens, don’t despair; you can start over. It’s a common mistake, even for experienced bakers. Simply gather your ingredients and begin the process again, being mindful of the adjustments you need to make based on what went wrong the first time.
If your dough was too dry, pay extra attention to adding water gradually during mixing, ensuring it reaches the desired consistency. If it was too sticky, focus on not overdoing it with the water, and be sure to knead properly. Remember, baking is as much about learning from your mistakes as it is about following recipes.
In the world of baking, practice makes perfect. Don’t be discouraged by the occasional misstep. Instead, use it as an opportunity to refine your skills and understanding of dough hydration. With each attempt, you’ll become more adept at achieving that ideal dough consistency, and your baked creations will only get better.
Final Thoughts
In the world of baking, achieving the perfect dough consistency can sometimes feel like a balancing act. The right hydration level is critical for the success of your bread, pizza, or pastry. While it’s true that you can’t add more water to dough after it rises, there are plenty of techniques and tips to help you get it right from the start.
From adjusting during mixing to embracing the power of autolyse, proper kneading, considering humidity and flour type, and mastering the art of resting and folding, you have an array of tools at your disposal. These techniques not only ensure that your dough is adequately hydrated but also contribute to better texture, flavor, and overall baking success.
Remember, perfection comes with practice. Don’t be discouraged by the occasional dough mishap. Baking is as much about learning from your mistakes as it is about following recipes. So, keep experimenting, keep refining your skills, and with each batch, you’ll inch closer to becoming a dough hydration expert. Happy baking!
FAQ
Q1: Can I add more water to dough if it’s too dry after rising?
A1: Unfortunately, once dough has gone through the rising process, it’s not advisable to add more water directly. Instead, focus on achieving the right consistency during the mixing and kneading stages. Gradually adjust the water or flour as needed to prevent over-hydration or dryness. Starting with the correct hydration level is crucial.
Q2: What happens if my dough is too sticky after it has risen?
A2: If your dough is overly sticky, you might have added too much water during the initial mixing. To rectify this, dust your hands and work surface with flour while gently kneading the dough. Avoid adding more flour to the dough directly at this stage, as it can make it dry and tough. Proper kneading and the addition of flour during the initial mixing are key.
Q3: Can I save dough that’s too dry or too sticky after rising?
A3: Saving dough that’s already risen and has the wrong consistency can be challenging. The best approach is to learn from the experience and start over with fresh ingredients. This way, you can ensure the dough’s hydration is correct from the beginning, leading to better results in your baking.
Q4: What’s the importance of proper dough hydration in baking?
A4: Proper dough hydration is crucial in baking because it affects the texture, flavor, and overall quality of your baked goods. An ideal hydration level ensures your dough is easy to work with, resulting in a better rise, a soft and tender crumb, and a more flavorful final product.
Q5: How can I measure flour and water accurately for dough?
A5: Accurate measurement is vital in achieving the right dough hydration. Whenever possible, use a kitchen scale to measure your ingredients by weight, as it provides the most precise results. If you must use volume measurements, fluff the flour in its container and then spoon it into your measuring cup, leveling it off with a flat edge.
Q6: What is the autolyse technique, and how does it affect dough hydration?
A6: Autolyse is a technique where you mix flour and water and allow them to rest before adding other ingredients. This resting period helps improve dough hydration by allowing the flour to fully absorb water and relax the gluten. It results in dough that’s easier to handle and has better hydration, texture, and flavor.
Q7: Can I adjust dough hydration based on the humidity of my kitchen?
A7: Yes, the humidity in your kitchen can affect dough hydration. On humid days, your flour may absorb more moisture from the air, making your dough stickier. Conversely, in dry conditions, your flour may not absorb as much moisture, resulting in a drier dough. Be mindful of these factors and adjust your recipe as needed.
Q8: Why is proper kneading important for dough hydration?
A8: Proper kneading is essential for dough hydration because it helps evenly distribute water and develop gluten. If your dough is too dry or too sticky during kneading, adjust by wetting or flouring your hands. Kneading also plays a role in achieving the right consistency and texture in your dough.
Q9: What if I make a mistake with dough hydration?
A9: Mistakes happen, even to experienced bakers. If you find your dough has the wrong consistency, consider it a learning opportunity. You can improve your skills by starting over with fresh ingredients and applying the techniques discussed in this article. With practice, you’ll become more proficient at achieving the perfect dough hydration.
Q10: Any final tips for mastering dough hydration in baking?
A10: Practice, patience, and precision are key to mastering dough hydration. Experiment with different techniques, take notes, and pay attention to the feel of your dough. Over time, you’ll develop a keen sense of when the hydration is just right, leading to consistently delicious baked treats. Happy baking!