Do you ever find yourself craving the warm, crusty embrace of freshly baked sourdough bread? Is your kitchen filled with the delightful aroma of artisanal loaves, but you’re not sure where to start? Well, wonder no more, because we’re here to guide you through the delicious journey of baking sourdough bread in a Dutch oven!
To make sourdough bread in a Dutch oven, you have to master the art of fermentation, kneading, and baking. It’s a combination of time-honored traditions and simple techniques that yield that perfect, crispy crust and soft, airy interior.
From mixing the dough to achieving that signature sourdough tang, we’ll walk you through each step, ensuring your baking adventure is a success. Join us on this culinary voyage, and soon you’ll be savoring your homemade sourdough bread, lovingly crafted right in your own kitchen. Let’s get started on this flavorful journey together!
Step-by-Step Beginners Guide
Ingredients You’ll Need
Let’s kick things off with what you’ll need to make your sourdough bread magic happen:
- 500g of Bread Flour: This forms the base of your dough.
- 350g of Water: Use room temperature water for the perfect consistency.
- 100g of Active Sourdough Starter: Make sure it’s fed and bubbly.
- 10g of Salt: Essential for flavor and controlling fermentation.
Mixing the Dough
- Combine Flour and Water: In a large bowl, mix your bread flour and water until they come together into a shaggy, sticky mass. Let it rest for 30 minutes; this is called autolyse, and it helps the gluten develop.
- Add Starter and Salt: After the autolyse, add your active sourdough starter and salt to the dough. Mix them in thoroughly.
Bulk Fermentation
- Folding the Dough: Over the next 2-4 hours, perform a series of gentle folds every 30 minutes. This helps develop the dough’s strength and structure.
- Bulk Rise: Cover your dough and let it rise at room temperature for 8-12 hours. The exact time will depend on your room temperature and starter activity. It should roughly double in size.
Shaping and Final Rise
- Pre-shape and Bench Rest: Turn your dough out onto a floured surface, pre-shape it into a round, and let it rest for about 30 minutes.
- Final Shaping: Shape the dough into its final form, whether it’s a round boule or an oblong batard.
- Final Rise: Place your shaped dough into a well-floured proofing basket or bowl, seam side up. Cover it and let it rise for 1-2 hours at room temperature, or refrigerate it for a longer, slower rise.
Preparing the Dutch Oven
- Preheat Your Oven: About 30 minutes before you’re ready to bake, preheat your oven to 450°F (232°C) with the Dutch oven and its lid inside.
Baking Your Sourdough
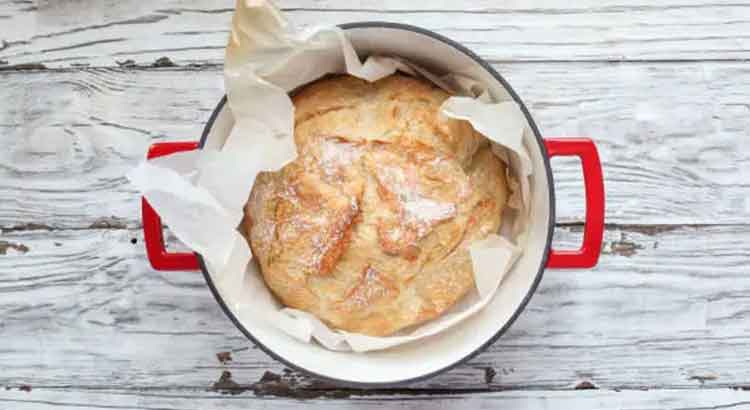
- Score the Dough: Remove the preheated Dutch oven from the oven and carefully place your dough into it, seam side down. Score the top of your dough with a sharp knife or a lame to allow for controlled expansion.
- Bake Covered: Put the lid back on the Dutch oven and place it in the oven. Bake for 20-25 minutes with the lid on. This captures steam and helps create a beautiful crust.
- Bake Uncovered: Remove the lid and continue baking for another 20-25 minutes, or until your bread has a deep golden-brown crust.
Cooling and Enjoying
- Cool Your Bread: Let your freshly baked sourdough bread cool on a wire rack for at least an hour before slicing. It’s hard to resist, but this helps set the crumb structure and prevents a gummy interior.
- Savor Your Success: Finally, slice into your homemade sourdough bread and enjoy it with your favorite spreads or simply a bit of butter. You’ve just created a delicious loaf from scratch!
Additional Tips
Experiment with Flours
Don’t hesitate to experiment with different types of flour to create unique flavors and textures. Whole wheat flour, rye flour, or even spelt flour can be incorporated into your sourdough recipes. (I usually use the 365 Amazon Brand, due to the accessible price, but I also had great results with King Arthur Flour)
Just be mindful that these flours may require adjustments to your hydration levels and fermentation times.
Consistency Is Key
Consistency in feeding your sourdough starter is vital. Try to maintain a regular feeding schedule and keep your starter at a consistent hydration level. This will ensure consistent results in your bread baking endeavors.
Play with Timing
You can adjust the timing of your sourdough bread making to fit your schedule. If you want fresh bread in the morning, prepare the dough the night before and let it rise in the refrigerator. This extended fermentation will develop a richer flavor.
Temperature Matters
Room temperature, especially during bulk fermentation and the final rise, plays a crucial role. The ideal room temperature for sourdough baking is around 70°F (21°C). If your kitchen is cooler, consider using a proofing box or warming your dough slightly in the oven with just the oven light on.
Develop Your Scoring Technique
Scoring your bread not only adds aesthetic appeal but also influences the way your bread expands during baking. Experiment with different patterns and depths to create your signature look. A sharp knife will be enough if you are just starting out, but later on you really need to get a dedicated lame, it will take your sourdough to the next level.
Embrace Mistakes
Sourdough baking can be finicky, and not every loaf will turn out perfect. Don’t be discouraged by the occasional flop. Learn from your mistakes, adjust your techniques, and keep on baking. Each batch is a chance to improve and learn.
Share the Love
Homemade sourdough bread is a labor of love. Share your freshly baked loaves with friends and family. It’s a fantastic way to spread the joy of baking and build a community around your delicious creations.
Get Creative with Add-Ins
Once you’ve mastered the basics, get creative with add-ins like nuts, seeds, dried fruits, or even herbs and spices. These additions can elevate your sourdough bread to a whole new level of flavor.
Practice Patience
Sourdough breadmaking requires patience, but the rewards are worth it. Be patient with your starter, your dough, and yourself. As you gain experience, you’ll develop an intuition for the process that makes it all the more enjoyable.
Keep Learning
Sourdough baking is an art and a science that you can continually improve upon. Explore books, online resources, and baking communities to expand your knowledge. Joining a local bread-making group or attending workshops can be a great way to learn from others and exchange ideas.
Enjoy the Journey
Baking sourdough bread in a Dutch oven is not just about the end result; it’s about the entire experience. Enjoy the tactile process, the anticipation as your dough rises, the aroma as it bakes, and the satisfaction of sharing your homemade bread with loved ones. Embrace the journey of sourdough baking, and you’ll find it to be a deeply rewarding culinary adventure.
Final Thoughts
In the world of sourdough baking, simplicity and patience often yield the most satisfying results. Baking your sourdough bread in a Dutch oven is a wonderful way to achieve that coveted artisanal quality in your loaves. While the process may seem intimidating at first, with each batch, you’ll gain confidence and finesse.
The heart of sourdough lies in its unhurried nature. From feeding your starter to the final slice of bread, it’s a journey that unfolds over time. Embrace the process, appreciate the learning curve, and remember that even the occasional misstep can teach you valuable lessons. Sourdough baking is as much about the journey as it is about the destination.
As you continue to explore the world of sourdough, don’t forget to share your creations with others. Whether it’s a beautifully scored boule or a rustic batard, the joy of sharing your homemade bread with friends and family is incomparable. So, keep experimenting, keep learning, and keep enjoying the simple pleasure of freshly baked sourdough bread. Your kitchen will always be filled with warmth and the irresistible scent of a loaf well-made.
FAQ
Q: Why does my sourdough bread turn out flat?
A: Flat sourdough bread can be a common issue, and it’s usually caused by a few factors. First, check the health of your sourdough starter; it should be active and bubbly. Additionally, ensure that your dough undergoes adequate bulk fermentation to develop structure. Finally, make sure your Dutch oven is preheated sufficiently, as the initial burst of heat helps your bread rise.
Q: What can I do if my dough is too sticky to work with?
A: Sticky dough can be frustrating, but it’s often a sign of high hydration. To make it more manageable, you can try incorporating a bit more flour during the mixing stage or during the final shaping. Be cautious not to add too much, though, as this can affect the texture of your bread.
Q: Can I use all-purpose flour instead of bread flour?
A: Yes, you can use all-purpose flour for sourdough, but keep in mind that bread flour typically has a higher protein content, which contributes to better gluten development and a chewier texture. If you use all-purpose flour, your bread may have a slightly different texture, but it can still be delicious.
Q: My sourdough bread has a dense crumb. How can I achieve a more open, airy texture?
A: Achieving an open crumb in sourdough bread is a matter of proper fermentation and handling. Ensure you’re giving your dough enough time during bulk fermentation and final rise. Gentle folding and shaping techniques also help preserve air pockets. Experiment with hydration levels and starter activity to find the balance that works for you.
Q: Can I bake sourdough in a regular oven without a Dutch oven?
A: While a Dutch oven is great for trapping steam and creating a crusty exterior, you can still bake sourdough in a regular oven. Preheat a baking stone or an inverted baking sheet in the oven, and use a steam-generating method like a pan of hot water or spraying the oven with water to create steam. Place your bread directly on the hot surface and bake as usual.
Q: How do I store my sourdough bread to keep it fresh?
A: To keep your sourdough bread fresh, store it in a paper bag or a cloth bread bag at room temperature. Avoid sealing it in a plastic bag, as this can make the crust soft. If you won’t finish the loaf within a couple of days, you can freeze it for longer storage. Slice it before freezing, so you can easily defrost individual slices as needed.
Q: What if my sourdough starter is too active?
A: An overly active starter can lead to dough that rises too quickly and becomes overly acidic. To mitigate this, you can use a smaller amount of starter in your recipe or reduce the fermentation time. Experiment with your starter’s feeding routine to balance its activity.
Q: Can I add flavors like herbs, cheese, or olives to my sourdough bread?
A: Absolutely! Adding flavors like herbs, cheese, or olives can enhance the taste of your sourdough bread. Incorporate these ingredients during the mixing or shaping stages, ensuring they’re evenly distributed. Keep in mind that ingredients like olives may add moisture, so adjust your hydration accordingly.
Q: Why does my sourdough bread taste too sour?
A: The sourness of your sourdough bread depends on various factors, including the fermentation time, temperature, and the acidity of your starter. To reduce sourness, shorten the bulk fermentation or final rise time, use a milder starter, or adjust the temperature of your fermentation environment to be slightly warmer.
Q: Can I make gluten-free sourdough bread?
A: Yes, you can make gluten-free sourdough bread using alternative flours like rice flour, sorghum flour, or a gluten-free flour blend. Keep in mind that gluten-free sourdough will have a different texture and won’t rise as much as traditional sourdough due to the absence of gluten. Experiment with different flour combinations to find the best results.
Q: How can I tell if my sourdough bread is fully baked?
A: A fully baked sourdough bread will have a deep golden-brown crust, sound hollow when tapped on the bottom, and have an internal temperature of about 190-210°F (88-99°C). If you’re unsure, it’s better to slightly overbake than underbake, as underbaked bread can be gummy.
Q: Can I use a different type of pot instead of a Dutch oven for baking?
A: Yes, you can use alternative cookware like a cast iron skillet with a lid, a cloche, or a heavy oven-safe pot with a tight-fitting lid. The key is to have a vessel that can trap steam and provide a sealed environment for the initial baking stage to create a crispy crust.
Q: How long should I wait before slicing my sourdough bread?
A: To achieve the best texture, allow your sourdough bread to cool for at least an hour after baking before slicing into it. This resting period helps set the crumb structure and prevents the bread from becoming gummy.
With these FAQs, you’re armed with knowledge to troubleshoot common issues and enhance your sourdough baking journey. Keep experimenting and enjoy the delicious world of homemade sourdough bread!