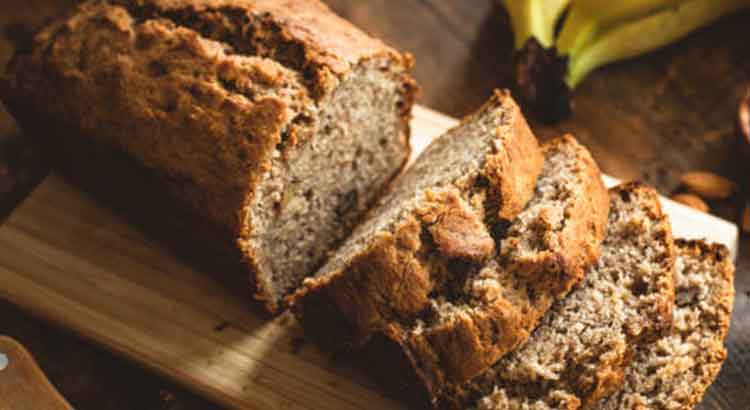
Do your baking endeavors often lead to the perplexing question of when your banana bread is truly done? You’re not alone! Amidst the tempting aromas and rising anticipation, achieving that perfect balance of moistness and doneness can feel like a bit of a mystery.
The simplest way to tell if your banana bread is done is by using the toothpick test. Insert a toothpick into the thickest part of the bread, and if it comes out with no wet batter clinging to it, you’re on the right track. A few crumbs are okay, as long as there’s no gooey batter.
Now, let’s delve into these seven uncomplicated methods to unravel the secrets of gauging your banana bread’s readiness. With each technique, you’ll not only gain a deeper understanding of your baking masterpiece but also unlock the satisfaction of consistently creating moist, flavorful, and perfectly baked banana bread.
Toothpick Test
When it comes to baking banana bread, figuring out when it’s perfectly done can be a bit tricky. After all, no one wants to bite into a slice that’s undercooked or overdone. That’s where the trusty toothpick test comes in. It’s a simple and foolproof way to determine the doneness of your banana bread.
To perform the toothpick test, follow these steps:
- Wait for the Aroma: As your banana bread bakes, your kitchen will be filled with the delightful smell of bananas and warmth. When this aroma starts wafting around, it’s a good indicator that your bread is getting close to being done.
- Pick the Right Spot: Take a toothpick and choose a spot to test. It’s best to insert it into the thickest part of the bread or where you think it might be less likely to be fully cooked.
- The Clean Toothpick: Gently insert the toothpick into the chosen spot. If it comes out with no wet batter sticking to it, your banana bread is likely done. You might have a few crumbs clinging to the toothpick, but that’s okay – as long as there’s no wet batter.
- Consider the Crumbs: Keep in mind that banana bread is meant to be moist and tender, so a few crumbs on the toothpick are normal. If the toothpick is clean or has just a few dry crumbs, it’s time to take the bread out of the oven.
The toothpick test is a tried-and-true method that ensures your banana bread is baked to perfection. It helps you avoid the disappointment of cutting into a loaf that’s still gooey in the middle. So, next time you’re baking this classic treat, remember to rely on the trusty toothpick to guide you to that ideal, moist center.
Finger Press Test
Another way to determine if your banana bread is ready to come out of the oven is by using the finger press test. This technique involves a bit of tactile intuition and can be especially handy if you don’t have toothpicks on hand.
Here’s how to perform the finger press test:
- Wait for Visual Clues: As your banana bread bakes, keep an eye on its appearance. The top should turn a lovely golden brown color, and cracks might appear. These visual cues indicate that your bread is nearing doneness.
- Give it a Gently Press: Using clean fingers, gently press down on the top of the banana bread. If it springs back and feels firm to the touch, it’s likely done. This firmness suggests that the bread has set and is fully cooked.
- Watch for Rebound: If you release your finger and the bread bounces back immediately without leaving a dent or an impression, it’s a strong sign that your banana bread is ready to be taken out of the oven.
The finger press test allows you to rely on your instincts and the texture of the bread to gauge its readiness. With a little practice, you’ll become adept at determining that perfect moment to pull your banana bread out of the oven and savor its deliciousness.
Side Pull-Away
Checking the sides of your banana bread can give you another clue about its doneness. This method is all about observation and touch, helping you ensure that your bread is baked just right.
- Examine the Sides: Take a look at the sides of your banana bread. As it bakes, you might notice that the edges pull away slightly from the sides of the pan. This happens because the bread is shrinking as it cooks.
- Gentle Touch: Reach out and gently touch the sides of the bread. If they feel firm to the touch and have a slight resistance when you press them, it’s likely a sign that your banana bread is fully baked.
- Avoid Overbaking: Be careful not to wait until the sides are too dry or too firm, as this could mean your bread is overcooked. You’re aiming for a gentle firmness that indicates the bread is set but not overdone.
Using the side pull-away method allows you to assess the texture and consistency of your banana bread, helping you avoid the risk of undercooking or overcooking it. It’s a simple yet effective way to achieve that perfect balance between moistness and doneness.
Internal Temperature
If you’re a stickler for precision, using an instant-read thermometer to check the internal temperature of your banana bread is a fantastic option. This method takes the guesswork out of the equation and gives you an accurate reading of the bread’s readiness.
- Insert the Thermometer: When you think your banana bread is close to being done, insert the probe of the instant-read thermometer into the center of the bread. Make sure to avoid hitting the pan or any large air pockets.
- The Magic Number: The internal temperature you’re looking for is around 200°F (93°C). At this temperature, the bread’s starches and proteins have fully set, resulting in a moist yet thoroughly cooked banana bread.
- Patience is Key: Keep in mind that the temperature might rise a few degrees after you take the bread out of the oven due to residual heat. So, if you’re at 197°F (91°C), it’s okay to remove the bread and let it rest.
Using an instant-read thermometer is like having a kitchen wizard that tells you exactly when your banana bread is at its prime. It’s a dependable method that ensures your bread is baked to perfection, every single time.
Hollow Sound
You might be surprised to learn that your ears can help you determine if your banana bread is done. This method involves using sound as a reliable indicator of doneness.
- Tap and Listen: Once your banana bread looks golden and you think it’s close to being done, carefully take it out of the oven. Gently tap the bottom of the bread with your fingers.
- Listen for Resonance: Pay close attention to the sound that comes back to you. If the bread is fully baked, you’ll hear a hollow and slightly echoey sound. This happens because the interior of the bread is airy and has set.
- Practice Makes Perfect: This method might require a bit of practice, but over time, you’ll become better at distinguishing between a dull thud and the satisfying hollow sound.
The hollow sound technique is like a secret melody that your banana bread plays to let you know it’s ready. It’s a fun and unique way to rely on your senses and create that perfectly baked loaf.
Aroma
Ah, the power of smell! The aroma of your banana bread is more than just tantalizing – it’s also an indicator of its doneness.
- Follow Your Nose: As your banana bread bakes, your kitchen will be filled with the comforting and sweet fragrance of ripe bananas. This aroma intensifies as the bread gets closer to being done.
- Rich and Deep: When the banana bread is fully baked, the aroma becomes rich and deep, saturating the air with its enticing scent.
- Trust Your Senses: If the aroma is at its peak and you can practically taste the banana goodness in the air, it’s a good sign that your bread is likely ready to be taken out of the oven.
Using your sense of smell to judge the doneness of your banana bread adds a touch of intuition to your baking process. It’s a sensory experience that connects you with your creation and ensures you won’t miss out on that perfect moment to enjoy your delightful treat.
Visual Inspection
Sometimes, your eyes are your best kitchen companions when it comes to assessing the doneness of banana bread. By simply looking at the bread, you can gather important clues about its readiness.
- Golden Delight: Keep an eye on the color of your banana bread as it bakes. When it reaches a beautiful golden-brown hue, it’s likely getting close to being done. This color transformation is a sign that the sugars in the bread are caramelizing, adding both flavor and texture.
- Crack the Code: As your banana bread bakes, you might notice cracks forming on the top. These cracks indicate that the bread is rising and expanding, which is a good sign. When these cracks seem to settle and don’t expand further, it’s a cue that your bread is approaching its prime.
- Visual Fluff: The bread’s texture can also give you a hint. If the top of the banana bread appears firm and slightly springy to the touch, it’s likely an indication that the interior has set as well.
Visual inspection is like having a conversation with your banana bread. By observing its appearance, you can gather insights into its journey in the oven. It’s a simple and intuitive method that allows you to make informed decisions about when to proudly take your creation out of the oven.
Final Thoughts
In the world of banana bread baking, the journey to perfection might seem daunting, but fear not! Armed with these simple techniques, you’re well-equipped to conquer any banana bread challenge that comes your way. Remember, baking is both an art and a science, and finding the sweet spot of doneness is all about mastering the right cues.
Whether you’re a banana bread enthusiast or just starting your baking adventure, these methods offer a mix of observation, touch, and precision. The toothpick test, finger press test, side pull-away, internal temperature, hollow sound, aroma, and visual inspection – each of these methods has its own charm and reliability.
As you embark on your banana bread baking endeavors, don’t be afraid to experiment and adjust these techniques to suit your own baking environment and preferences. Over time, you’ll develop a keen sense of intuition, knowing exactly when your banana bread is ready to shine. So, roll up your sleeves, preheat that oven, and let the aroma of banana goodness fill your kitchen as you master the art of creating the perfect loaf of banana bread. Happy baking!
FAQ
Q: Can I use these methods for other types of bread?
Absolutely! While we’ve been focusing on banana bread, these methods are versatile and can be applied to various types of quick bread and even cakes. The toothpick test, finger press test, and other techniques discussed here are helpful indicators of doneness for any baked goods that have a similar texture and consistency.
Q: What if my banana bread looks done but the toothpick comes out slightly moist?
Don’t worry, that’s a common scenario! Remember that banana bread is meant to be moist and tender. If the toothpick comes out with a few crumbs or a bit of moisture clinging to it, that’s perfectly fine. As long as there’s no wet batter, your bread is likely ready. Over time, you’ll get a sense of how moist your banana bread should be when it’s perfectly baked.
Q: Can I combine these methods for more accuracy?
Definitely! In fact, combining two or more methods can give you a more comprehensive understanding of your banana bread’s doneness. For example, you can use the toothpick test along with the visual inspection technique. This way, you’re covering multiple angles and increasing your confidence in your assessment.
Q: My banana bread still turned out undercooked. What did I do wrong?
Undercooked banana bread can be a bit disappointing, but don’t worry – it’s all part of the learning process. If this happens, try extending the baking time by a few minutes and checking with the toothpick test or another method. It’s important to calibrate your oven temperature and baking time to match your specific setup. Keep practicing, and you’ll soon become a banana bread connoisseur.
Q: Can I reheat undercooked banana bread?
Absolutely! If you find that your banana bread is slightly undercooked after slicing into it, you can always pop it back into the oven for a short while. Just be sure to cover it with foil to prevent excessive browning on the top. Keep a close eye on it, and check for doneness using your preferred method.
Q: Are these methods foolproof?
While these methods are highly reliable, there can be variations depending on factors like your oven’s temperature accuracy, the type of baking pan you use, and even the altitude of your location. Practice and observation are key. As you gain experience, you’ll develop a knack for recognizing the signs that your banana bread is perfectly done.
Q: Can I use these methods for gluten-free or vegan banana bread?
Absolutely! These methods are not limited by the type of banana bread recipe you’re using. Whether your banana bread is gluten-free, vegan, or follows a traditional recipe, the techniques for determining its doneness remain consistent. The toothpick test, finger press test, and other methods work regardless of the specific ingredients you’re using.
Q: What’s the best way to store leftover banana bread?
To keep your banana bread fresh, wrap it tightly in plastic wrap or aluminum foil and store it at room temperature for a day or two. If you want to keep it longer, you can refrigerate it for up to a week. For even longer storage, slice the bread, wrap the slices individually, and freeze them for up to three months.
As you embark on your banana bread baking journey, these frequently asked questions and answers should help guide you through any uncertainties you may encounter. Baking is an enjoyable adventure, and with a bit of practice and patience, you’ll soon become a banana bread pro, confidently determining its perfect doneness every time.